Creating Custom Emoji Reactions in Chatter on Salesforce Experience Cloud
You’ve been asked many times to implement custom emoji reactions in Salesforce Chatter but didn’t know how to do it? Unfortunately, out of the box, Salesforce doesn’t provide support for custom emoji reactions. However, the Advanced Communities team found the solution. Excited to know more? Keep reading our article and we’ll show you how it can be achieved.
Custom emoji reactions in SFDC Chatter: implementation guide
We were asked to implement сustom emoji reactions for Salesforce Chatter in the Experience Cloud site. Considering that Salesforce Chatter does not support reactions by default and that Feed as a standard component can’t be customized, we started searching for a more creative solution to extend the capabilities of the community we were working on.
So, the solution was to create and add a Rich Publisher App to the Chatter Feed in order to add a payload to FeedItem we needed.
After enabling and setting up the Rich Publisher App, users can use Chatter Publisher to add payload via the “Composer” component. But in our case, we decided to skip this step by automating the payload creation. Using Connect API, we provided FeedElement with ConnectApi.ExtensionsCapability. We indicated which extension needs to be used by the Feed component for this FeedItem. The “Renderer” component (part of the RPA), in its turn, shows the component we’ve chosen to implement. In our case, it’s custom emoji reactions.
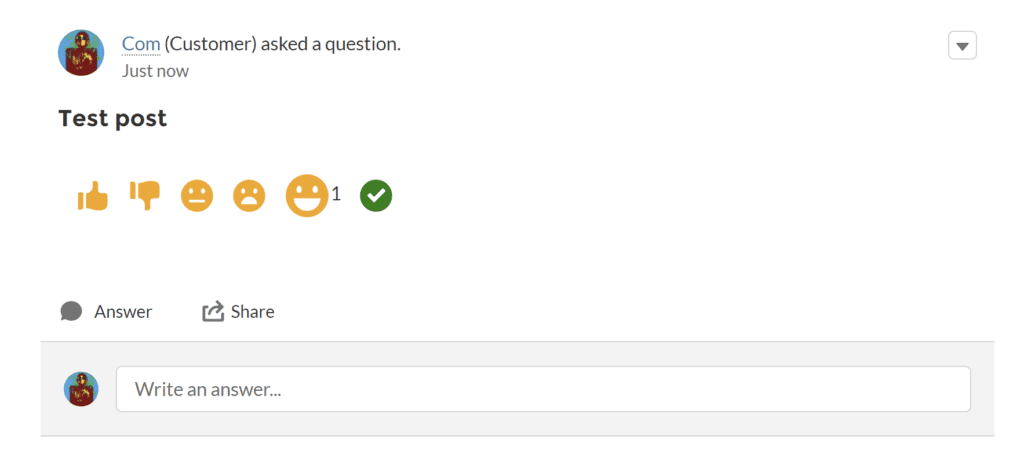
Needless to say, all emoji reactions “know” what FeedItem they’re linked to.
As a result, the emoji reactions picker is now available for each FeedItem in the standard Feed component to be used by Experience Cloud site users.
In order to implement emojis support in Chatter posts, follow the simple steps below:
- Create a Rich Publisher App https://www.salesforce.com/video/1765949/
- Enable Rich Publisher App for your Experience Cloud site. To do it, go to Experience Workspaces, click Administration, and choose the app you want to add to your site https://help.salesforce.com/s/articleView?id=sf.networks_chatter_rich_publisher_apps.htm&type=5
- Automate the creation of ConnectApi.ExtensionsCapability for FeedItem with the help of trigger
trigger FeedItemTrigger on FeedItem(after insert) {
  Id communityId = '0DB5g000000CeUmGAK';

  List<FeedItem> feedItems = (List<FeedItem>) Trigger.new;

  FeedItem currentFeedItem = feedItems[0];

  ConnectApi.FeedEntityIsEditable isEditable = ConnectApi.ChatterFeeds.isFeedElementEditableByMe(
    communityId,
    currentFeedItem.Id
  );

  if (isEditable.isEditableByMe == true) {
    ConnectApi.FeedItemInput feedItemInput = new ConnectApi.FeedItemInput();

    ConnectApi.ExtensionInput extensionInput = new ConnectApi.ExtensionInput();
    extensionInput.alternativeRepresentation = new ConnectApi.AlternativeInput();
    extensionInput.alternativeRepresentation.textRepresentation = 'alternativeRepresentation';
    extensionInput.alternativeRepresentation.title = 'alternativeRepresentation';

    extensionInput.payload = '"' + currentFeedItem.Id + '"';
    extensionInput.extensionId = '0MY5g000000oLkj';
    extensionInput.payloadVersion = '1';

    ConnectApi.FeedElementCapabilitiesInput feedElementCapabilitiesInput = new ConnectApi.FeedElementCapabilitiesInput();
    feedElementCapabilitiesInput.extensions = new ConnectApi.ExtensionsCapabilityInput();
    feedElementCapabilitiesInput.extensions.itemsToAdd = new List<ConnectApi.ExtensionInput>();
    feedElementCapabilitiesInput.extensions.itemsToAdd.add(extensionInput);

    feedItemInput.capabilities = feedElementCapabilitiesInput;

    ConnectApi.FeedElement editedFeedElement = ConnectApi.ChatterFeeds.updateFeedElement(
      communityId,
      currentFeedItem.Id,
      feedItemInput
    );
  }
}
- With CSS styles, hide the button in Chatter Publisher that runs the “Composer” component. Also hide the standard Likes statistics from the ‘My Profile’ page

.forceChatterToggleLike, .forceChatterChatterExtensionButton{
    display:none;
}
.forceCommunityUserProfileStats table .slds-has-dividers--top td:nth-child(3) {
    display:none;
}
- Put the LWC into the Aura “Renderer” component (part of RPA)
<aura:component implements="lightning:availableForChatterExtensionRenderer">
  <c:likePublisherContainer payload="{!v.payload}" />
</aura:component>
- Add all the necessary logic into the LWC container in accordance with your specific needs
<template>
  <div class="publisher-container likes-block">
    <template for:each={counter} for:item="item">
      <span key={item.label}>
        <lightning-icon
          icon-name={item.icon}
          class={item.class}
          alternative-text={item.label}
          title={item.label}
          data-id={item.label}
          onclick={handleClick}
          size="Small"
        >
        </lightning-icon>
        <span class="slds-text-body_x-small"
          ><template if:true={item.value}>{item.value}</template>
        </span>
      </span>
    </template>
  </div>
</template>

import { api, LightningElement, track } from "lwc";
import getLikesByFeedId from "@salesforce/apex/LikePublisherController.getLikesByFeedId";
import addFeedLike from "@salesforce/apex/LikePublisherController.addFeedLike";

export default class LikePublisherContainer extends LightningElement {
  @api
  payload;
  @track
  counter = [
    {
      icon: "utility:like",
      label: "like",
      value: 0,
      class: "pub-icon slds-m-left_small orange"
    },
    {
      icon: "utility:dislike",
      label: "dislike",
      value: 0,
      class: "pub-icon slds-m-left_small orange"
    }
    //add more icons if you need
  ];

  connectedCallback() {
    getLikesByFeedId({ feedItemId: this.payload })
      .then((result) => {
        let counter = this.counter;
        for (let i = 0; i < counter.length; i++) {
          if (result[counter[i].label]) {
            counter[i].value = result[counter[i].label];
          }
        }
        this.counter = [...counter];
      })
      .catch((error) => {
        console.log(error);
      });
  }

  handleClick(event) {
    let iconType = event.target.dataset.id;
    addFeedLike({ feedItemId: this.payload, type: iconType })
      .then(() => {
        let counter = this.counter;
        for (let i = 0; i < counter.length; i++) {
          if (iconType === counter[i].label) {
            counter[i].value = counter[i].value + 1;
          }
        }
        this.counter = [...counter];
      })
      .catch((error) => {
        console.log(error);
      });
  }
  //add other handlers if you need
}
Benefits of using Rich Publisher App for custom emoji reactions implementation
Our custom solution for implementing Salesforce Chatter emoticon reactions gives you unlimited customization and setting-up capabilities.
You are free to:
- Choose the style, type, and quantity of reactions you’d like to implement
- Allow your users to select multiple Chatter emoticons or emoji reactions at the same time. The emoji picker is no longer closing, making it much easier to react with numerous emojis
- Add custom reactions that are in perfect harmony with your brand identity
- Configure, remove or add custom emoji reactions, smileys, and reactions you’d like
- Track emoji analytics and see the most popular and highly reacted posts
- Let your users react to any posts published on the Chatter Feed of your Experience Cloud site.
How can we help?
In case you face issues with custom Salesforce emojis reactions implementation, you’re welcome to contact us!
Need help with building a Salesforce self-service customer portal or looking for impactful Salesforce PRM solutions? Just let us know! Advanced Communities is also happy to help you with Experience Cloud setup and implementation. We’ll create a beautiful PRM portal, B2B Commerce site, Support portal, online community, or Member/Volunteer portal for you and find the best solutions in accordance with your specific needs.
On our website, you can also learn more about our apps, such as AC Events Enterprise, AC MemberSmart, AC Ideas Ultimate, AC Housing, or other comprehensive solutions for Experience Cloud sites.
Feel free to contact us for professional Salesforce Experience Cloud consultant support or demo requests.