How to Create Salesforce Assignment Rules: a Step-by-Step Guide
Last Updated: October, 7, 2024
Salesforce is a strong and even irreplaceable tool when it comes to modern customer relationship management, customer service, and sales. Since it has an array of functionalities, one might feel overwhelmed by them. No worries!
Today we’d like to highlight one of the most important features for your marketing and service activities: Salesforce Case Assignment Rules and Salesforce Lead Assignment Rules. What is the difference between them? Keep reading.
Assignment Rules in Salesforce Explained
First things first, assignment rules are a great instrument to better organize your sales and support teams’ work. It’s also a perfect tool for improving your lead generation. As you already know, there are two types of assignment rules in Salesforce: Lead Assignment Rules and Case Assignment Rules. By using them, you can automate the process of assigning appropriate users or queues to Leads and Cases.
To better understand the Salesforce terminology, we’ll give you a short definition of what is a Lead and what is a Case in Salesforce:
- Lead – this is a prospect, meaning that this is someone who is interested in your product or service, but not yet ready to buy.
- Case – this is literally a customer’s question, complaint, or suggestion about your product or service.
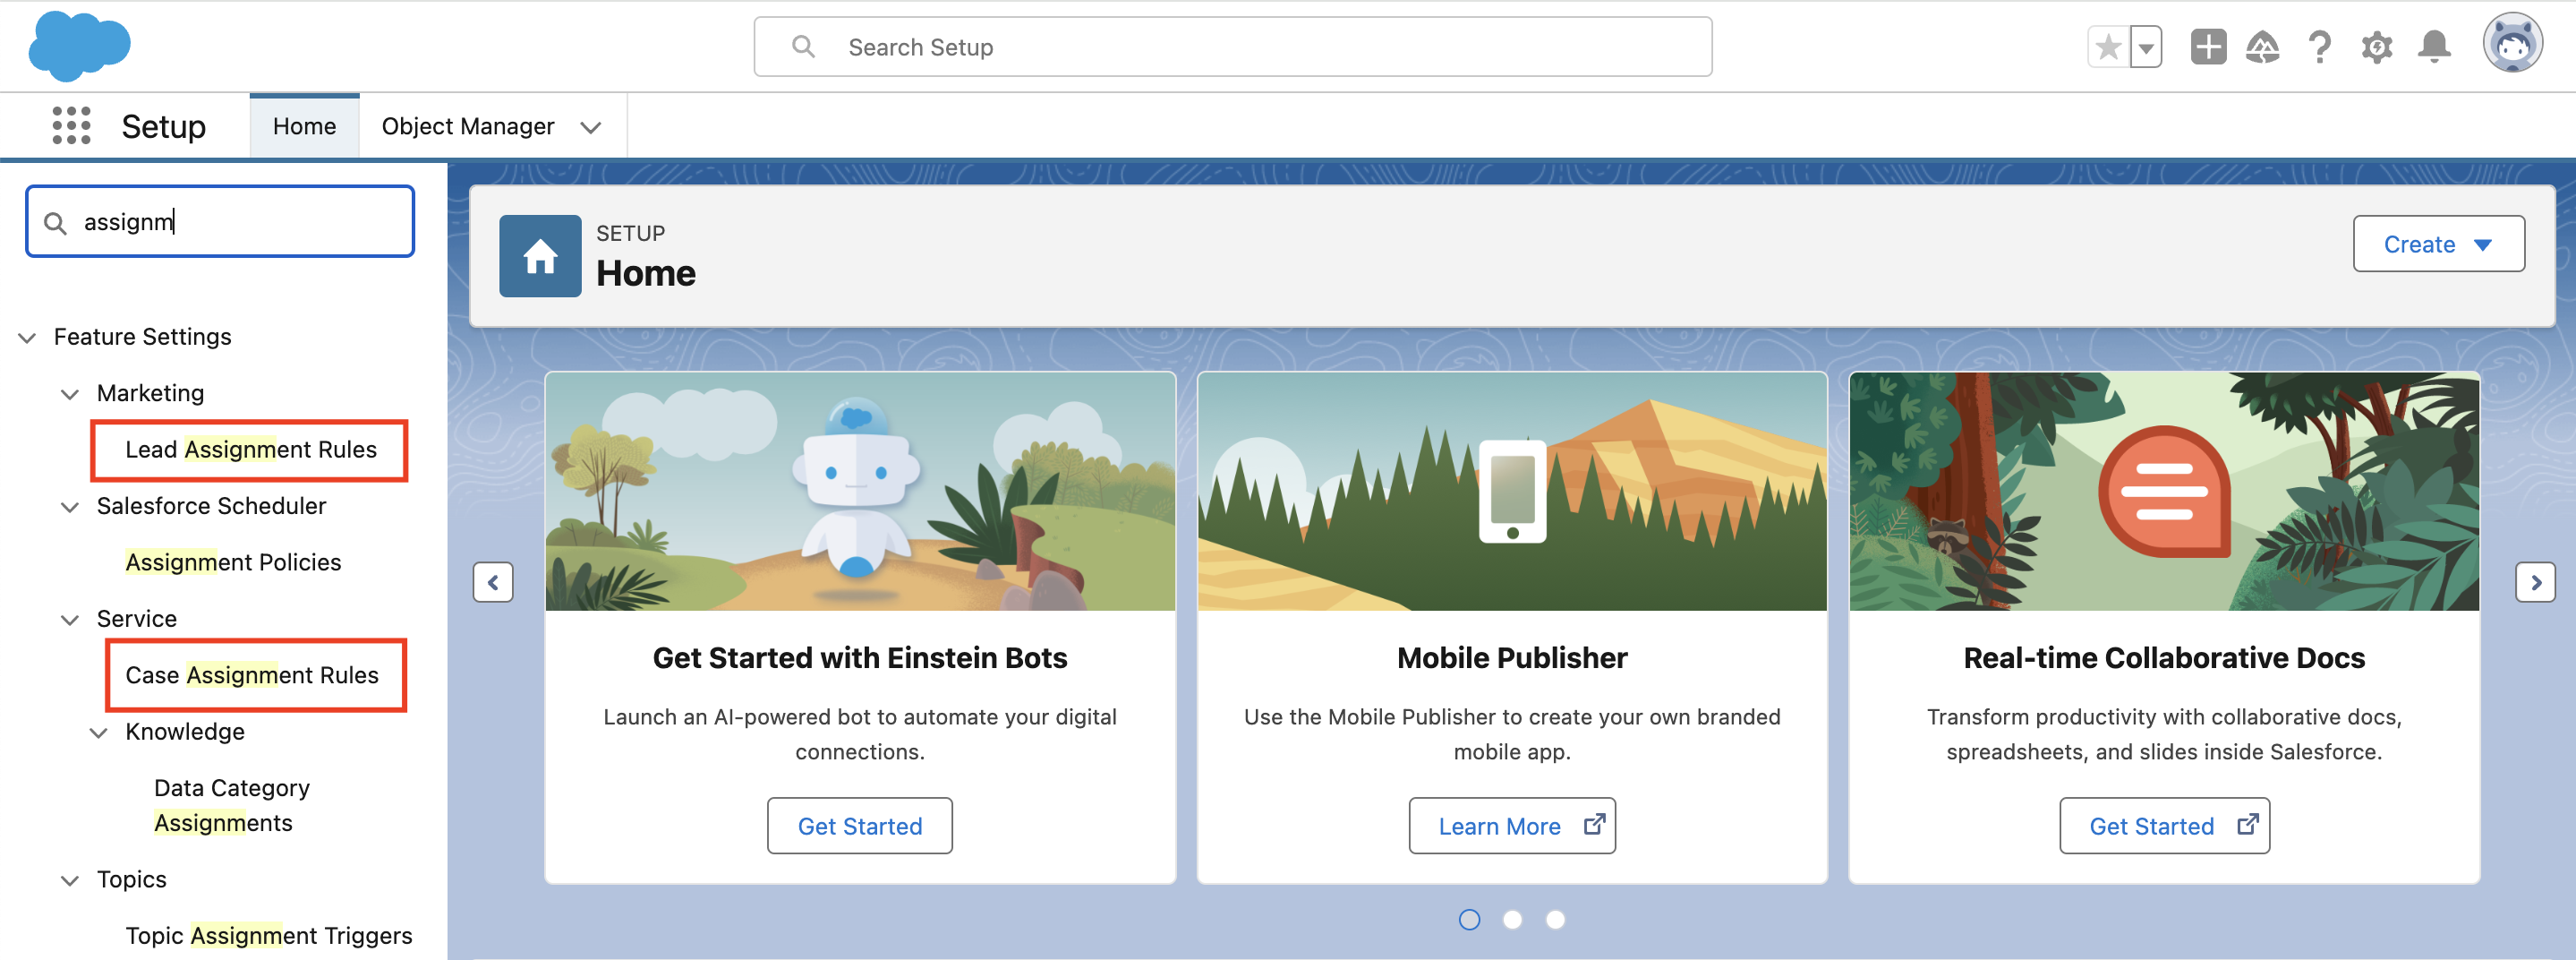
How to locate Salesforce Lead Assignment Rules and Case Assignment Rules? Easy. First, go to the Setup tab in your organization. Start typing Assignment rules in the Quick Find box and there you are: you can view assignment rules under Marketing (Salesforce Lead Assignment Rules) and Service (Case Assignment Rules) tabs.
With assignment rules, you can automatically deliver specific Cases to the right people in the team or departments who are specialized in a certain area (aka subject-matter experts), so that the customers receive timely and qualified responses. A Case Assignment Rule can assign cases without the connection to the case creation source. The thing is that a case can be submitted through a customer portal, a self-service portal, or by email, to name just a few options.
Plus, assignment rules in Salesforce also enable you to sort cases by priority according to the customer’s support package (Platinum, Silver, etc.).
The same thing applies to Lead Assignment Rules in Salesforce. By leveraging lead assignment criteria, you can specify how leads will be assigned to users or queues. They can do that regardless of whether leads are created manually or imported with the Data Import Wizard.
Salesforce Classic vs Lightning Experience: Establishing the Key Differences

Assignment Rules Limitation
You can’t build as many assignment rules as you see fit. There are certain limitations in Salesforce. For instance, there are limits for the number of rules, entries, and actions allowed by the rule.
Thus, there can be up to 2,000 total rules across objects (applies to any combination of workflow, assignment, auto-response, and escalation rules, active or inactive), 50 actives rules per object (applies to any combination of active workflow, assignment, auto-response, and escalation rules, as well as record change processes), 3,000 entries per rule, and 300 formula criteria entries per rule.
Besides, there is a limitation on actions when creating assignment rules in Salesforce – up to 200 actions allowed per rule. As for filter criteria, you can specify up to 25 per rule entry.
Creating Assignment Rules in Salesforce
Now that you know what assignment rules are for, we’ll show you how to set them up. After reading this paragraph, you’ll understand how to create a Case Queue, Case Assignment Rules, and Lead Assignment Rules in Salesforce. Spoiler alert: this is no sweat!
1. Case Queue in Salesforce Creation
What is a queue? It allows groups of users to manage a shared workload more effectively. A queue is basically a location where records can be transferred for processing by a group member.
Now, let’s get the ball rolling.
- Navigate Setup in your Salesforce organization. Type “Queue” in the Quick Find box and then enter its Name and Label.
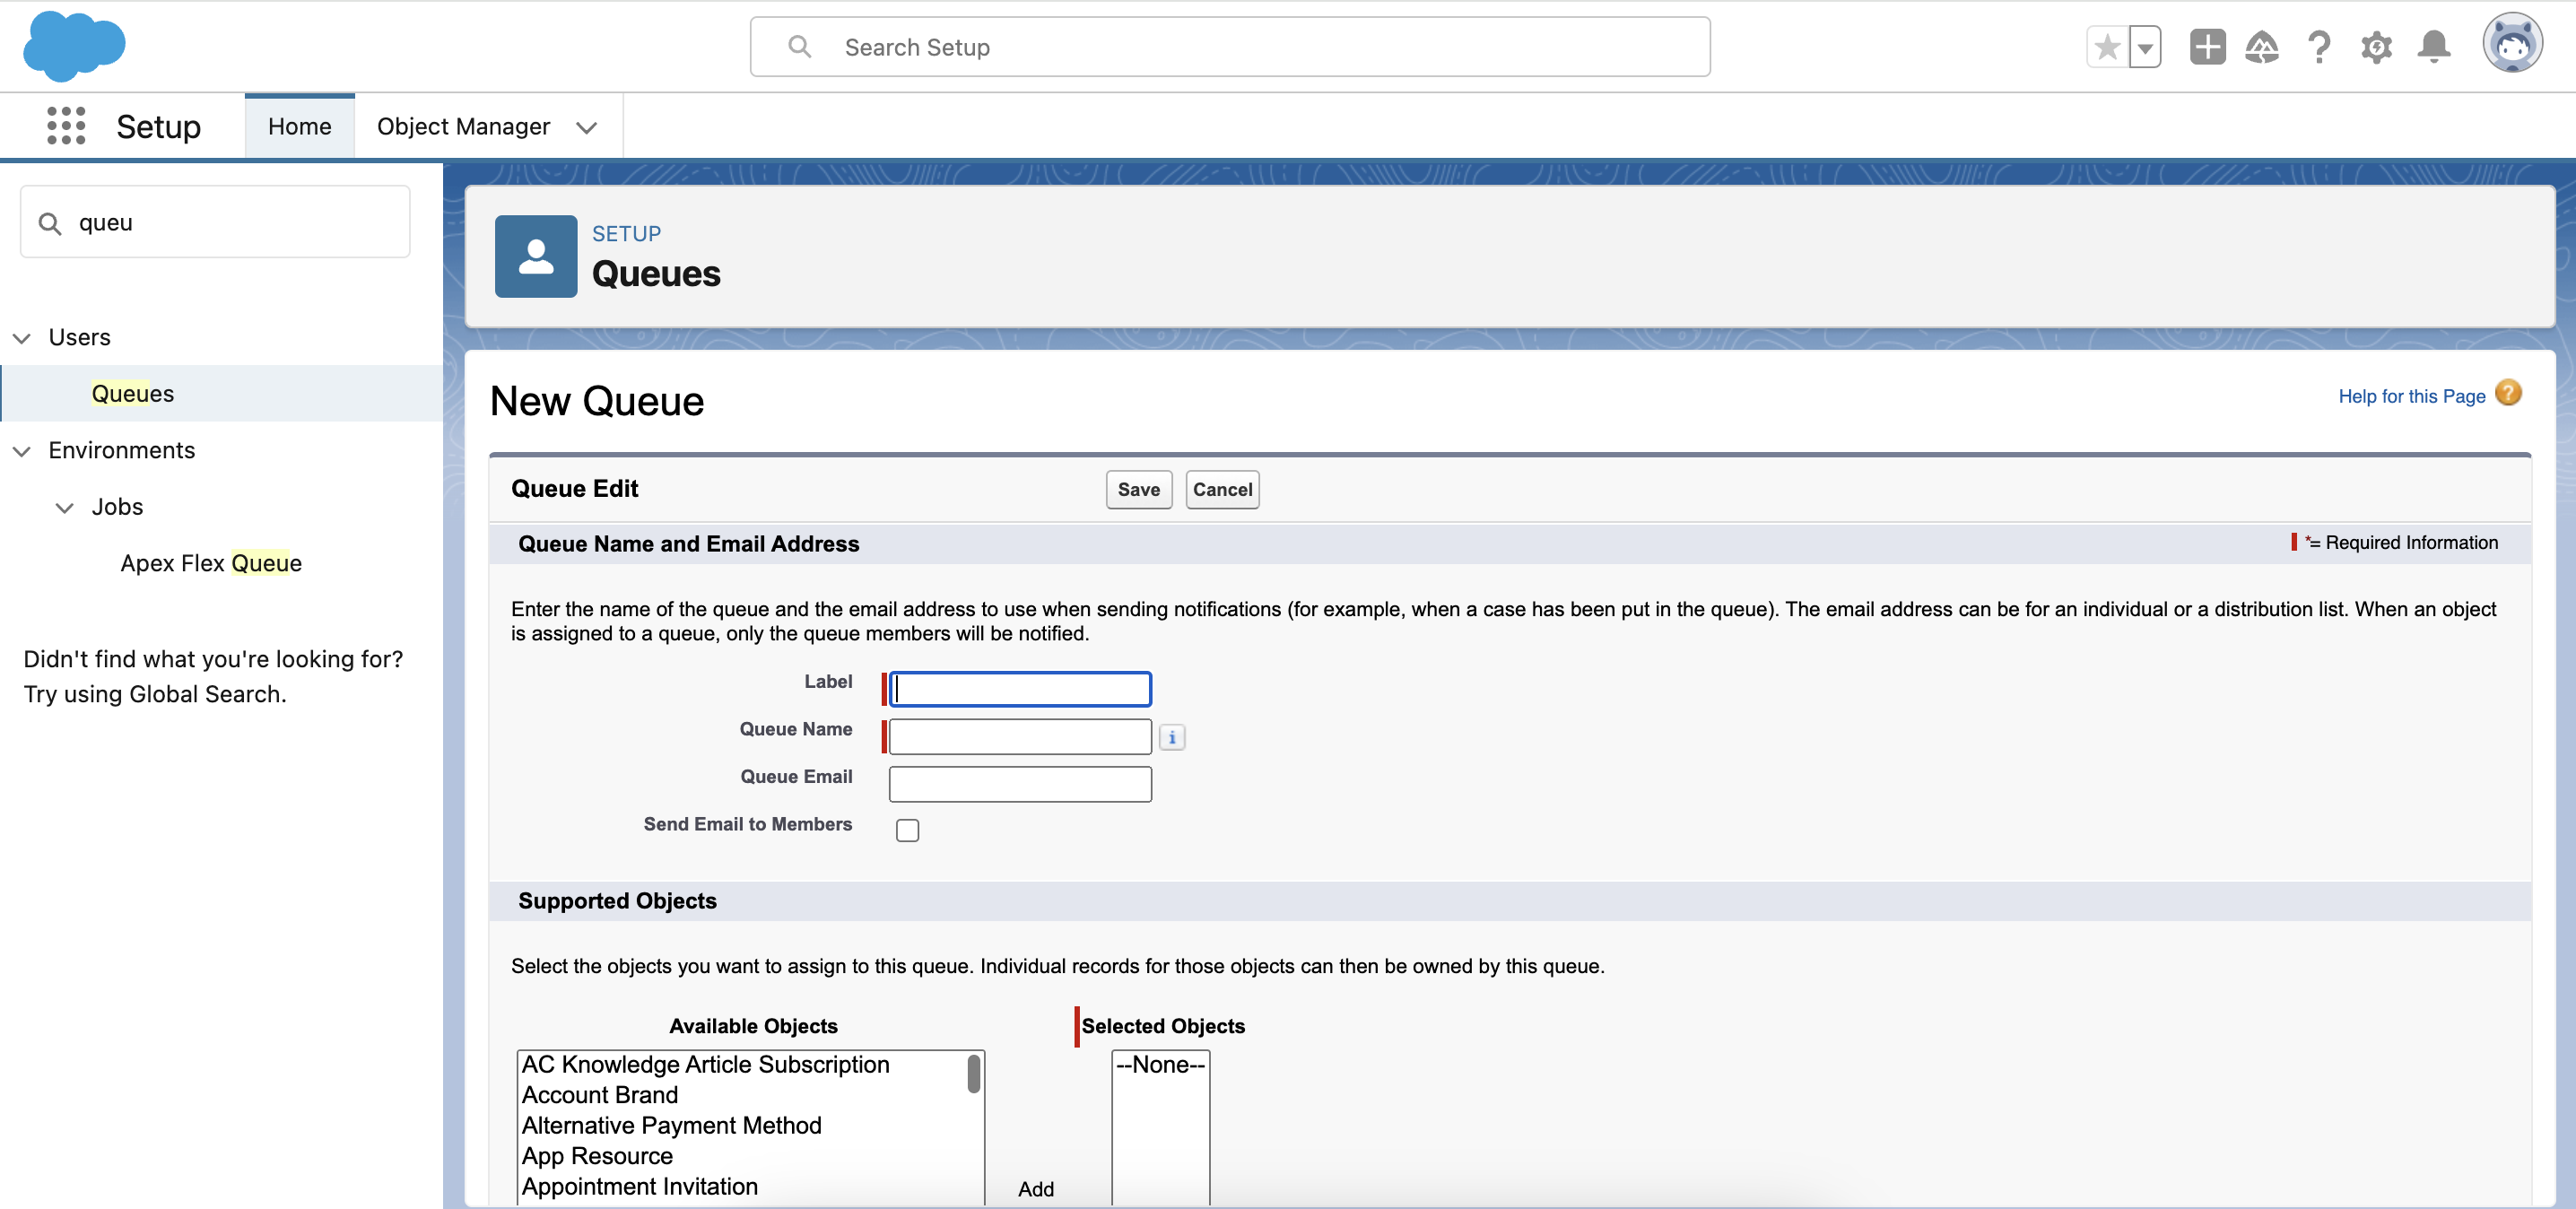
- Leave the Queue Email field empty if you want the support employees included in the queue to receive emails when new cases are created or type the email addresses of the people who will receive this kind of notification.
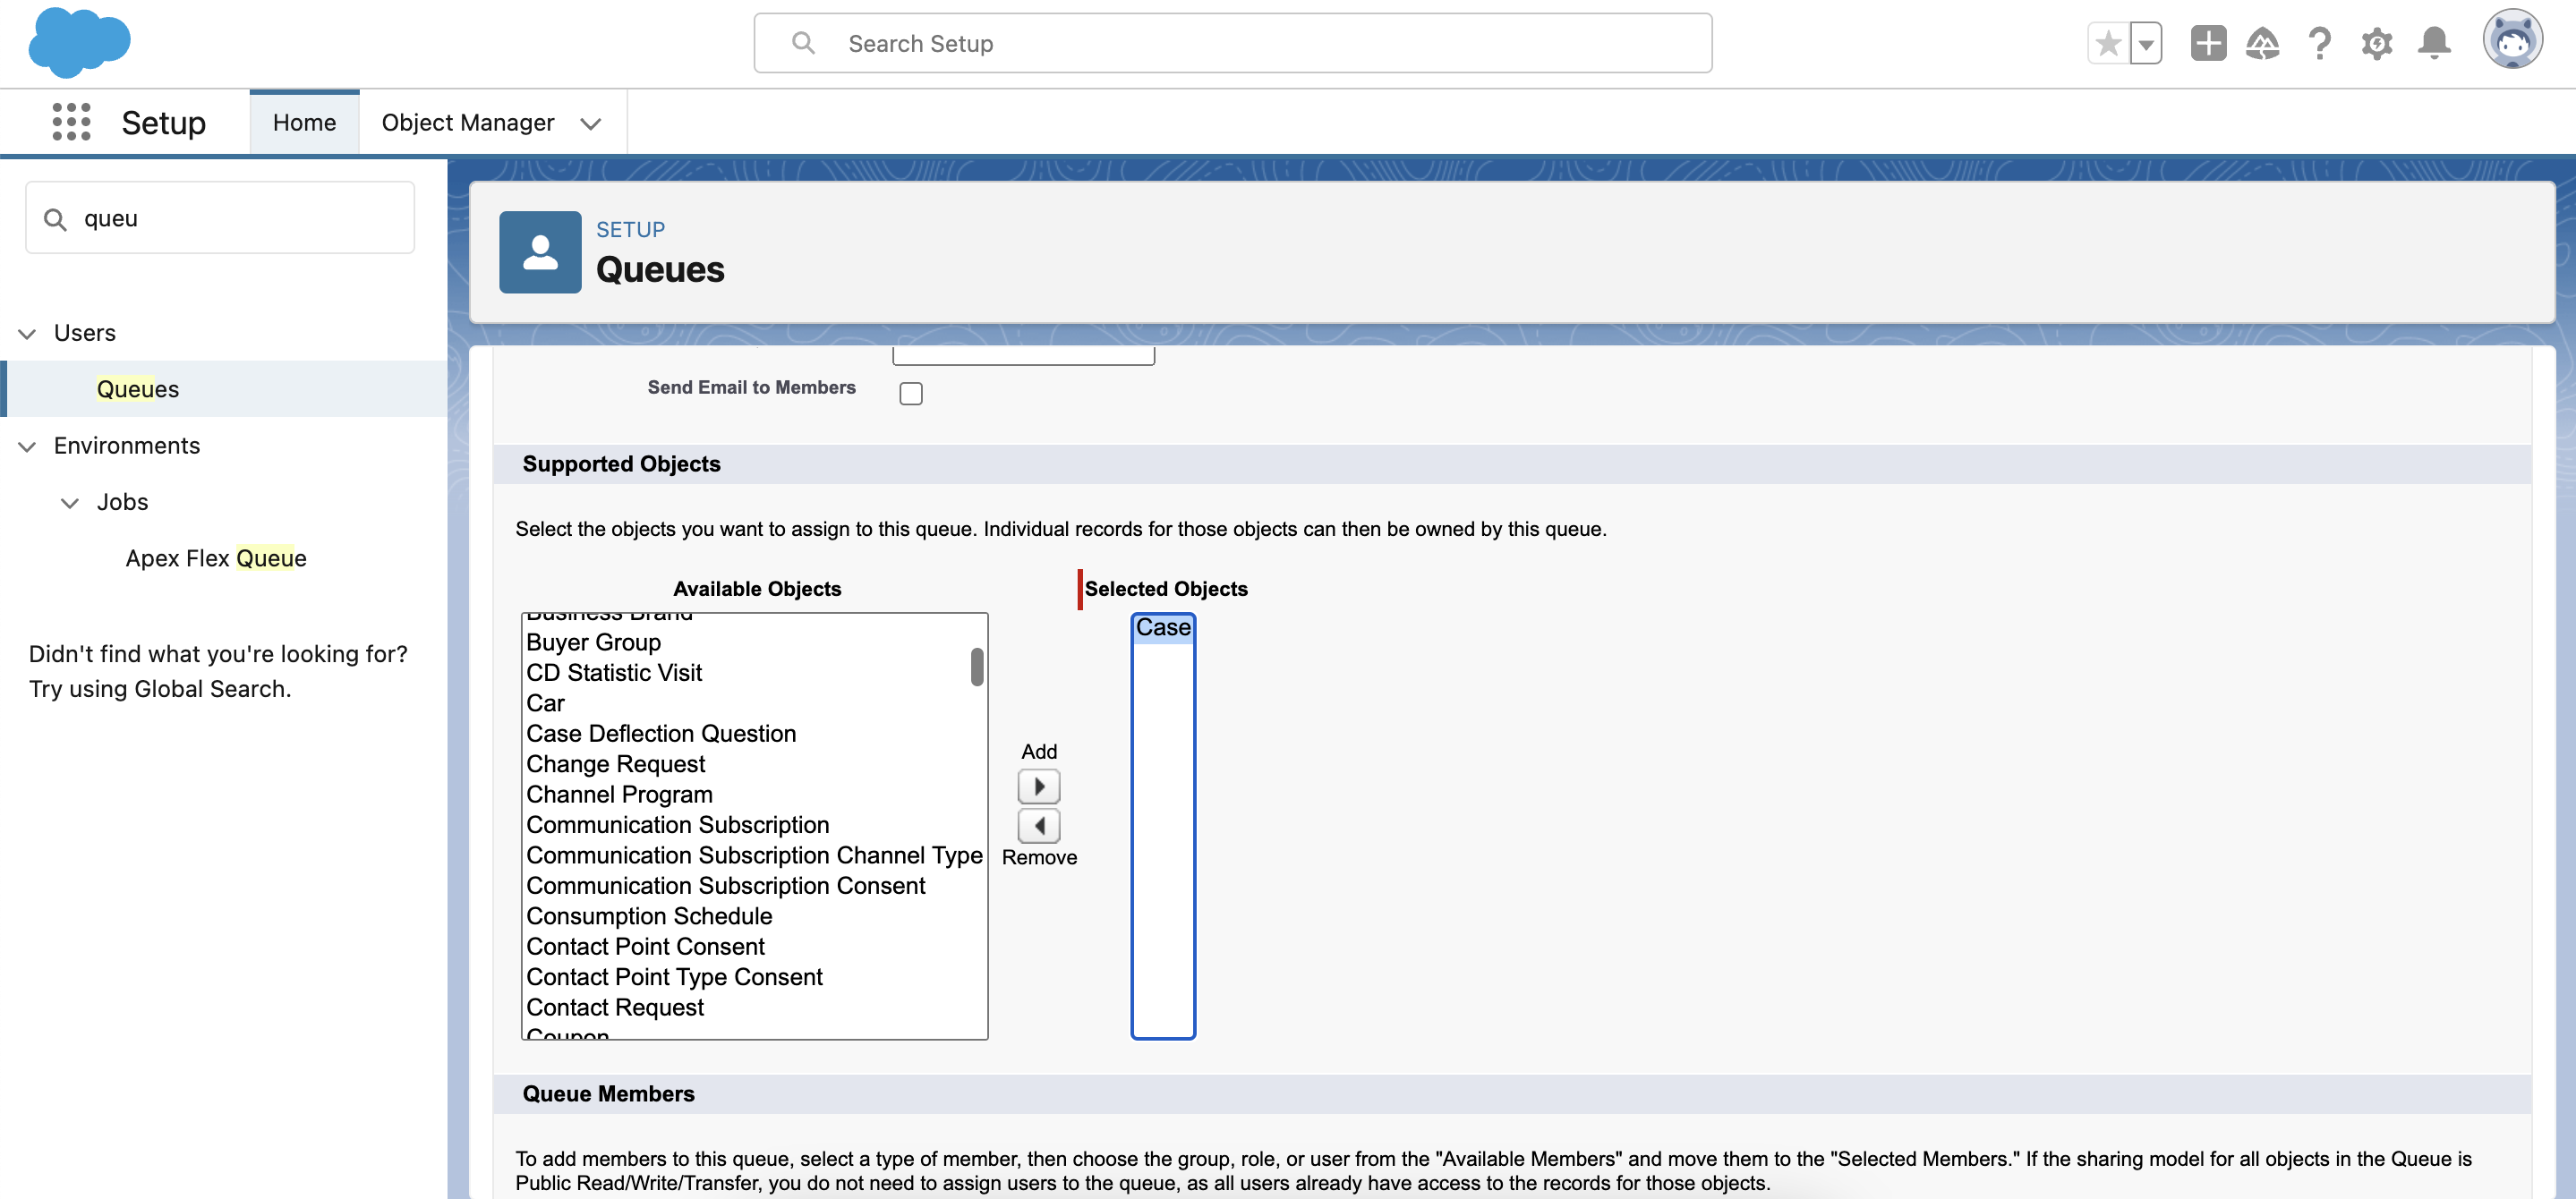
- Choose Case and add it to the Selected Objects column.
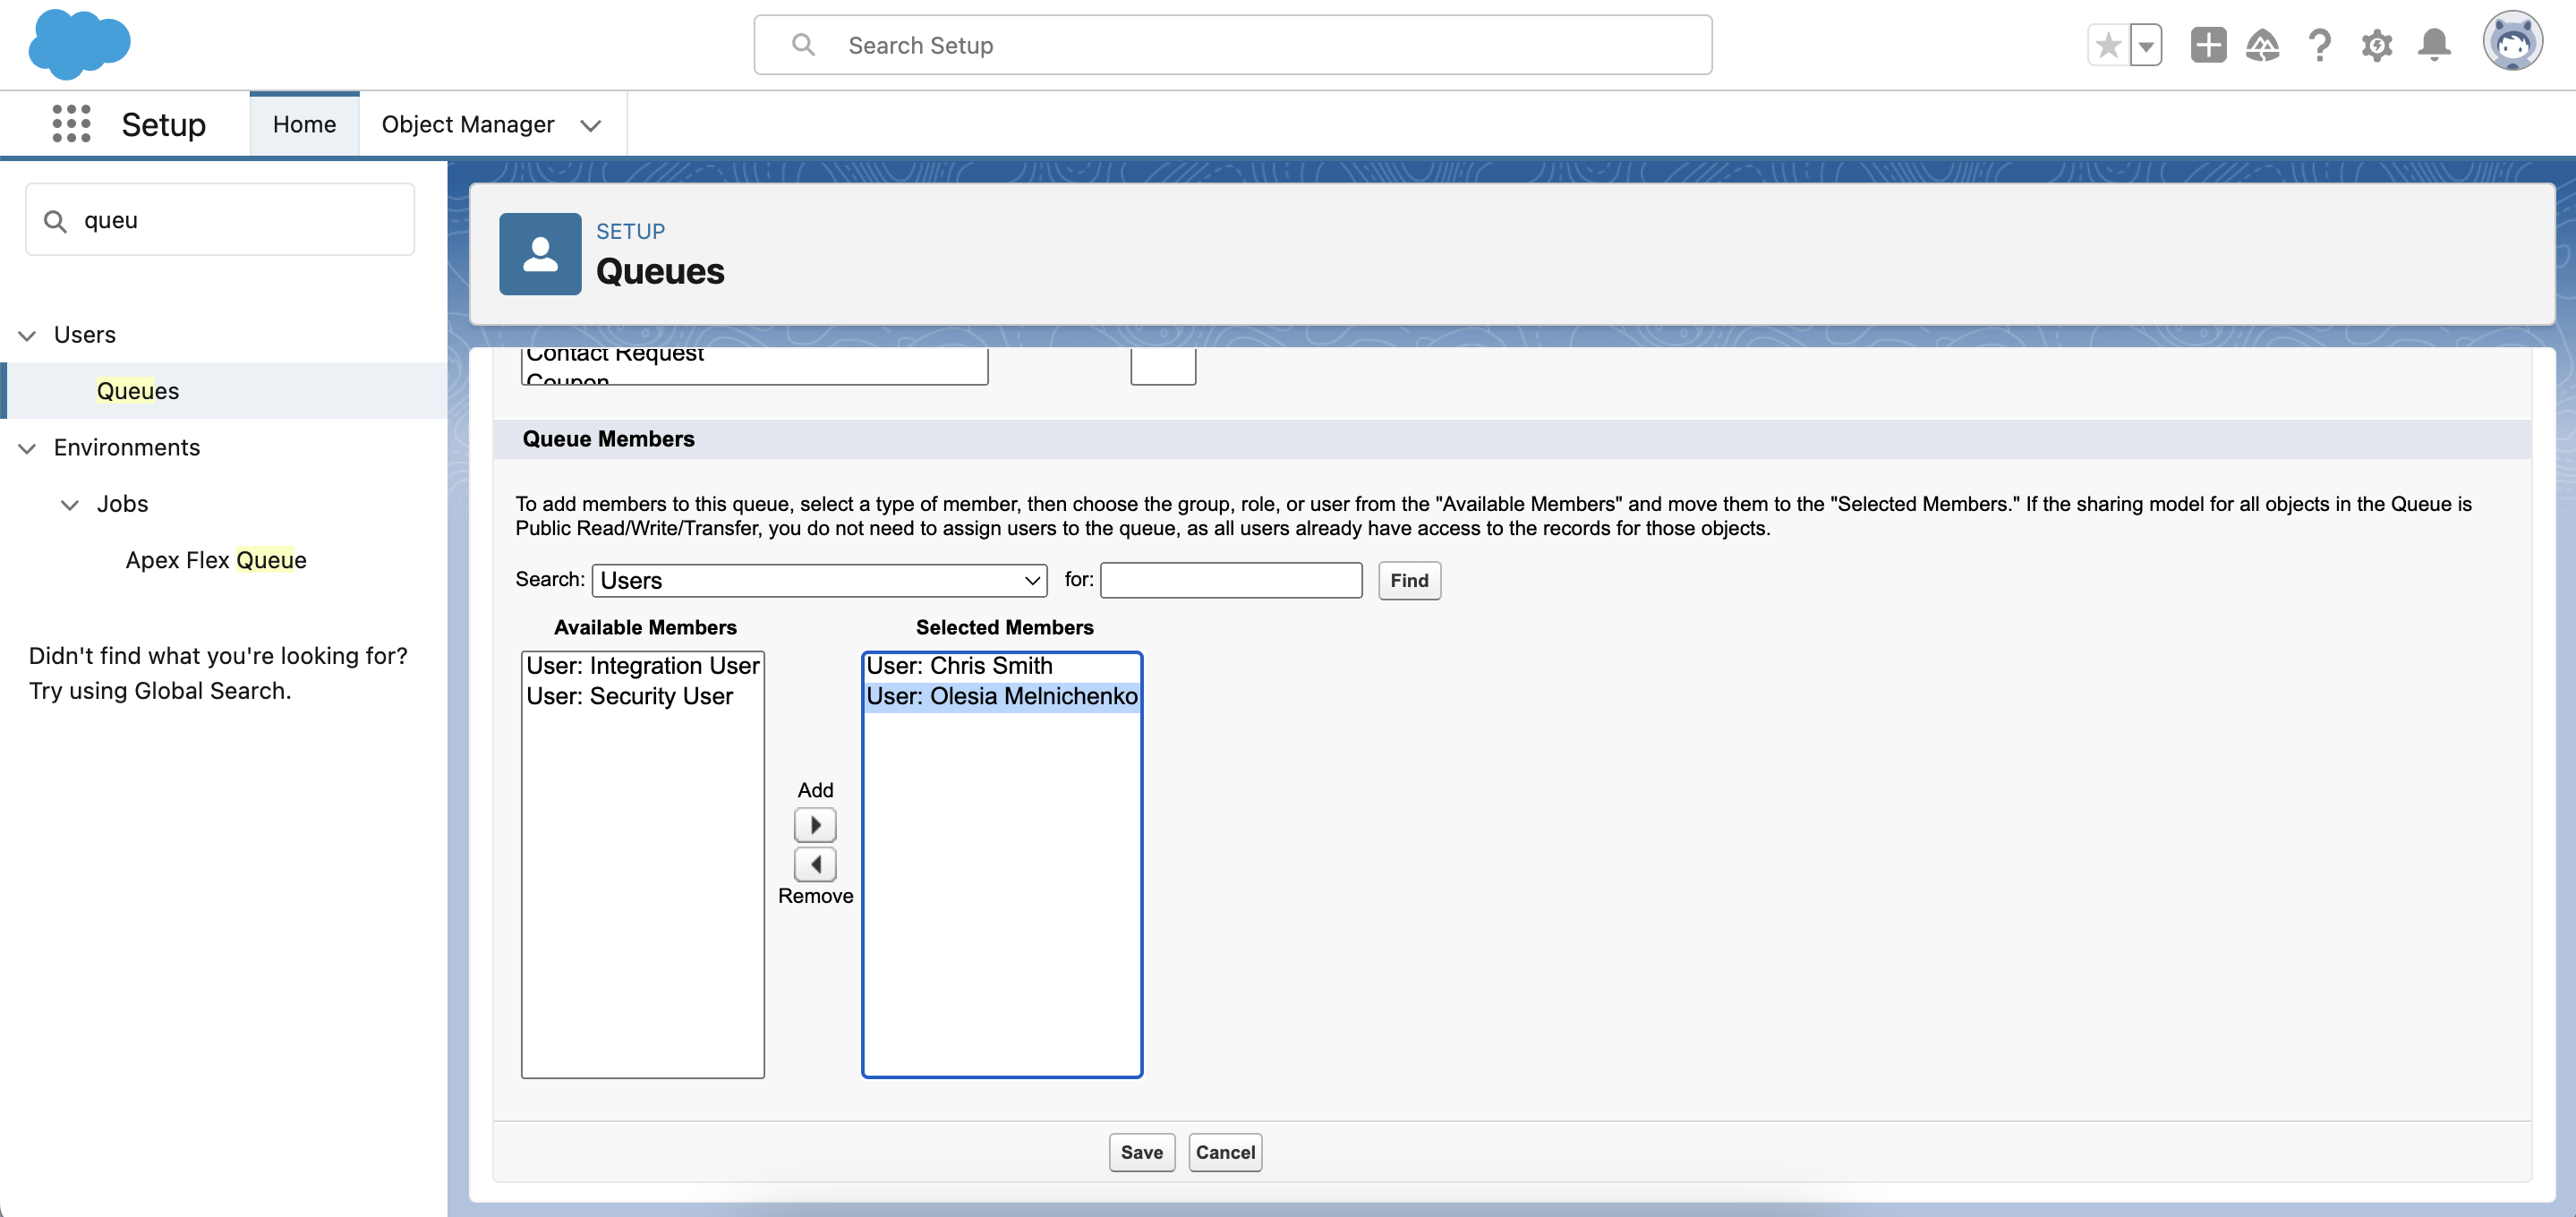
- Choose members and add them to the Selected Members column. After everything is done, click Save.
2. Case Assignment Rule Creation
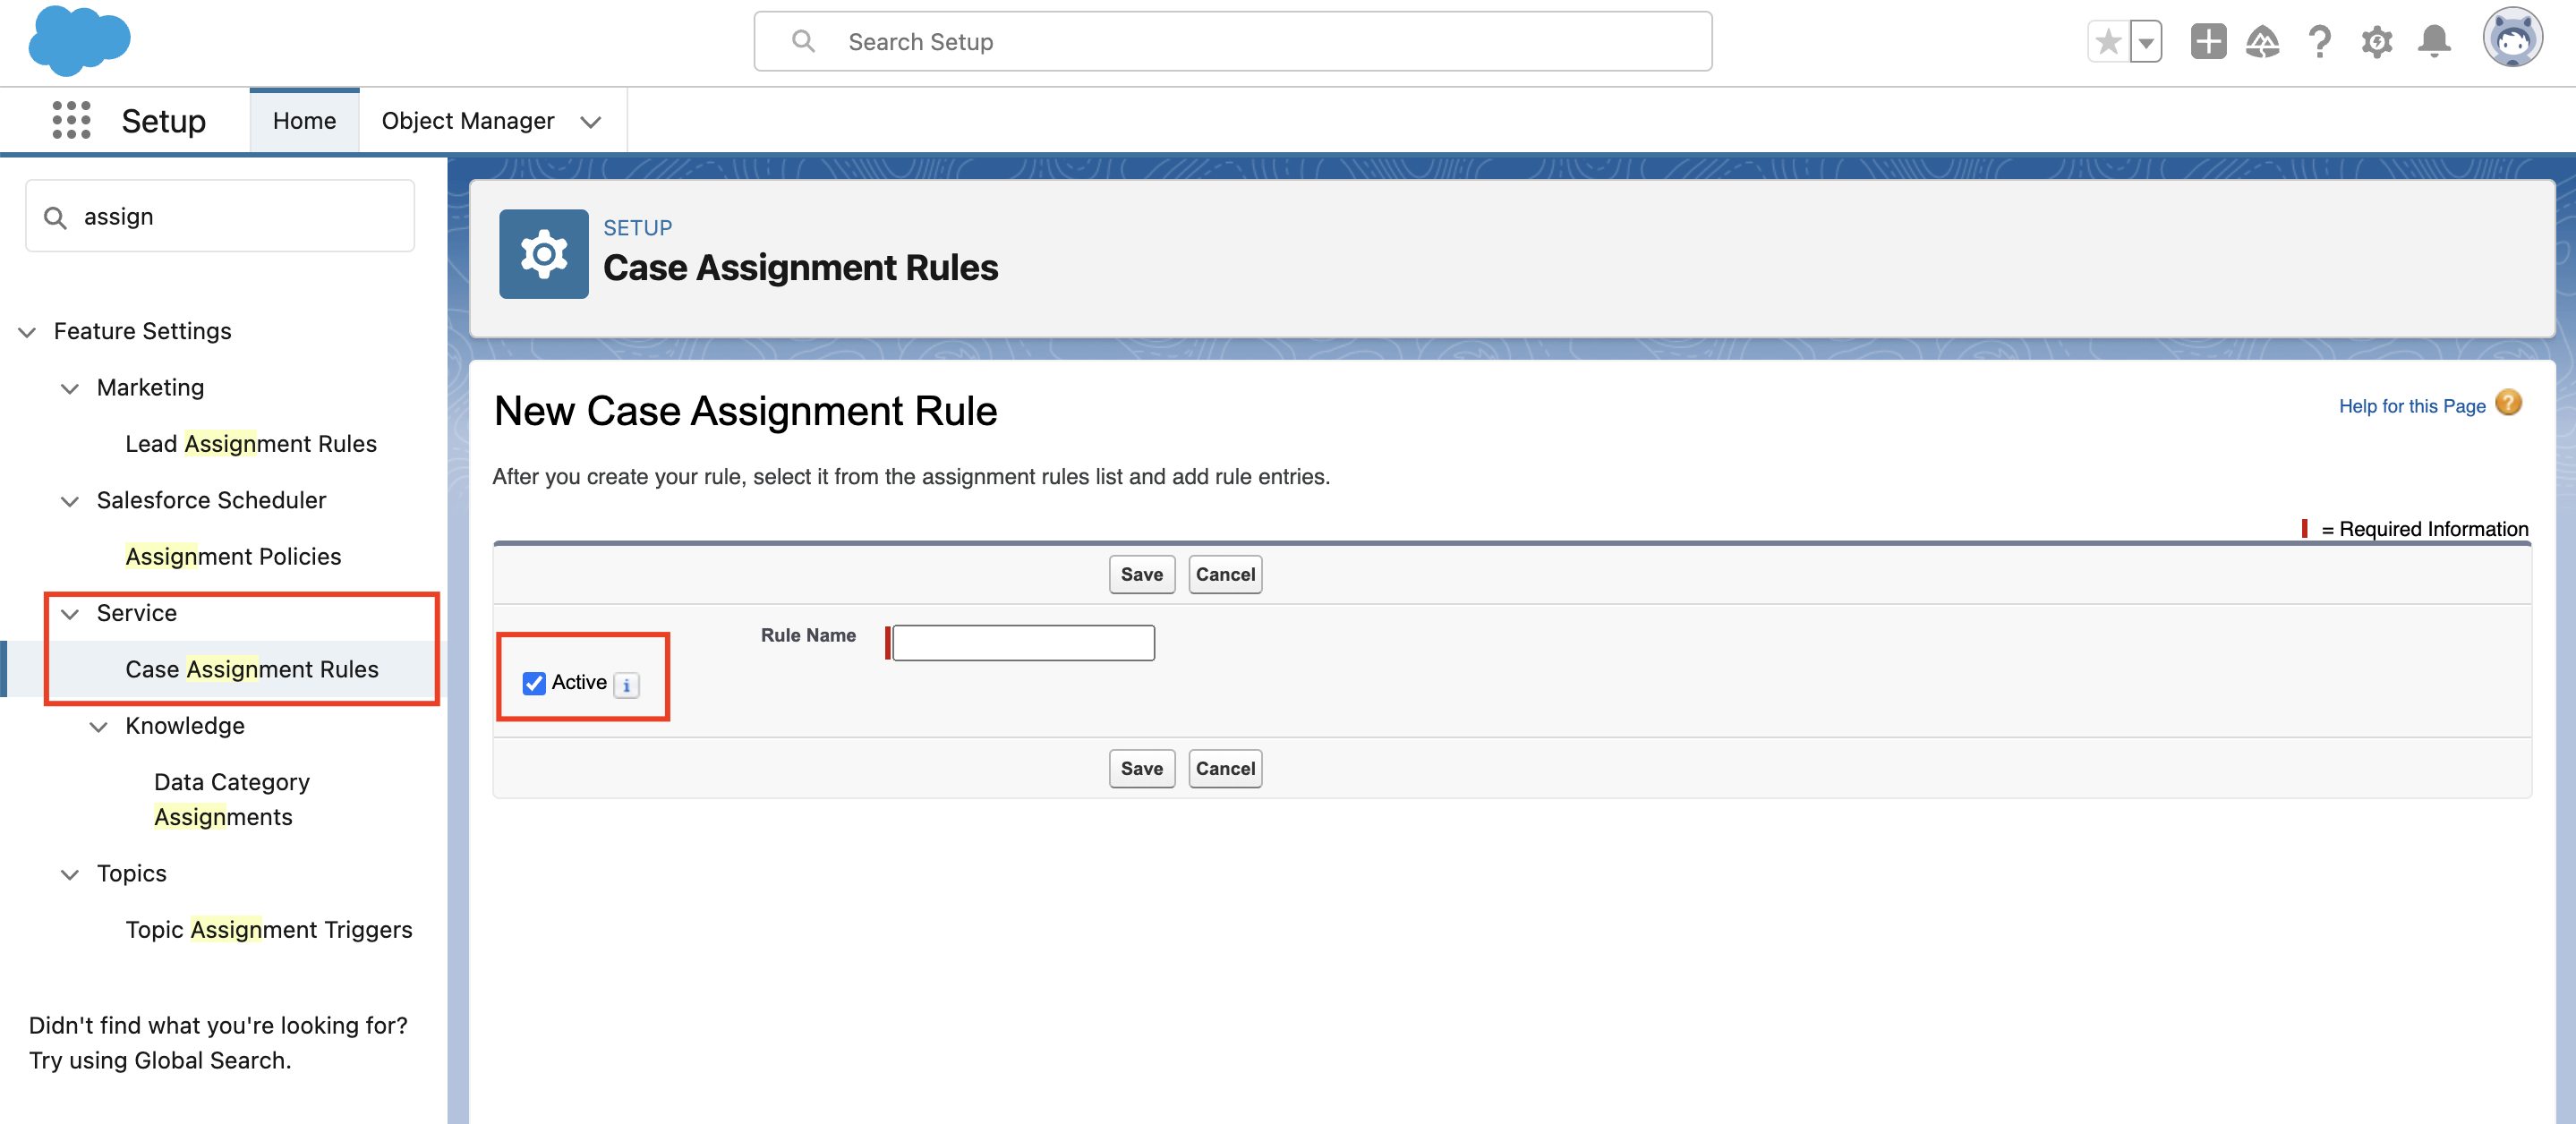
- To create one Case Assignment Rule, acess Setup in your Salesforce organization. Type Assignment Rules in the Quick Find box and choose Case Assignment Rules. After that, click the New button and enter the Rule Name. Once you’re done, hit Save. Make sure you tick the Activate field to make your new assignment rule legitimate. Remember that this action will deactivate any other current Case Assignment Rule.
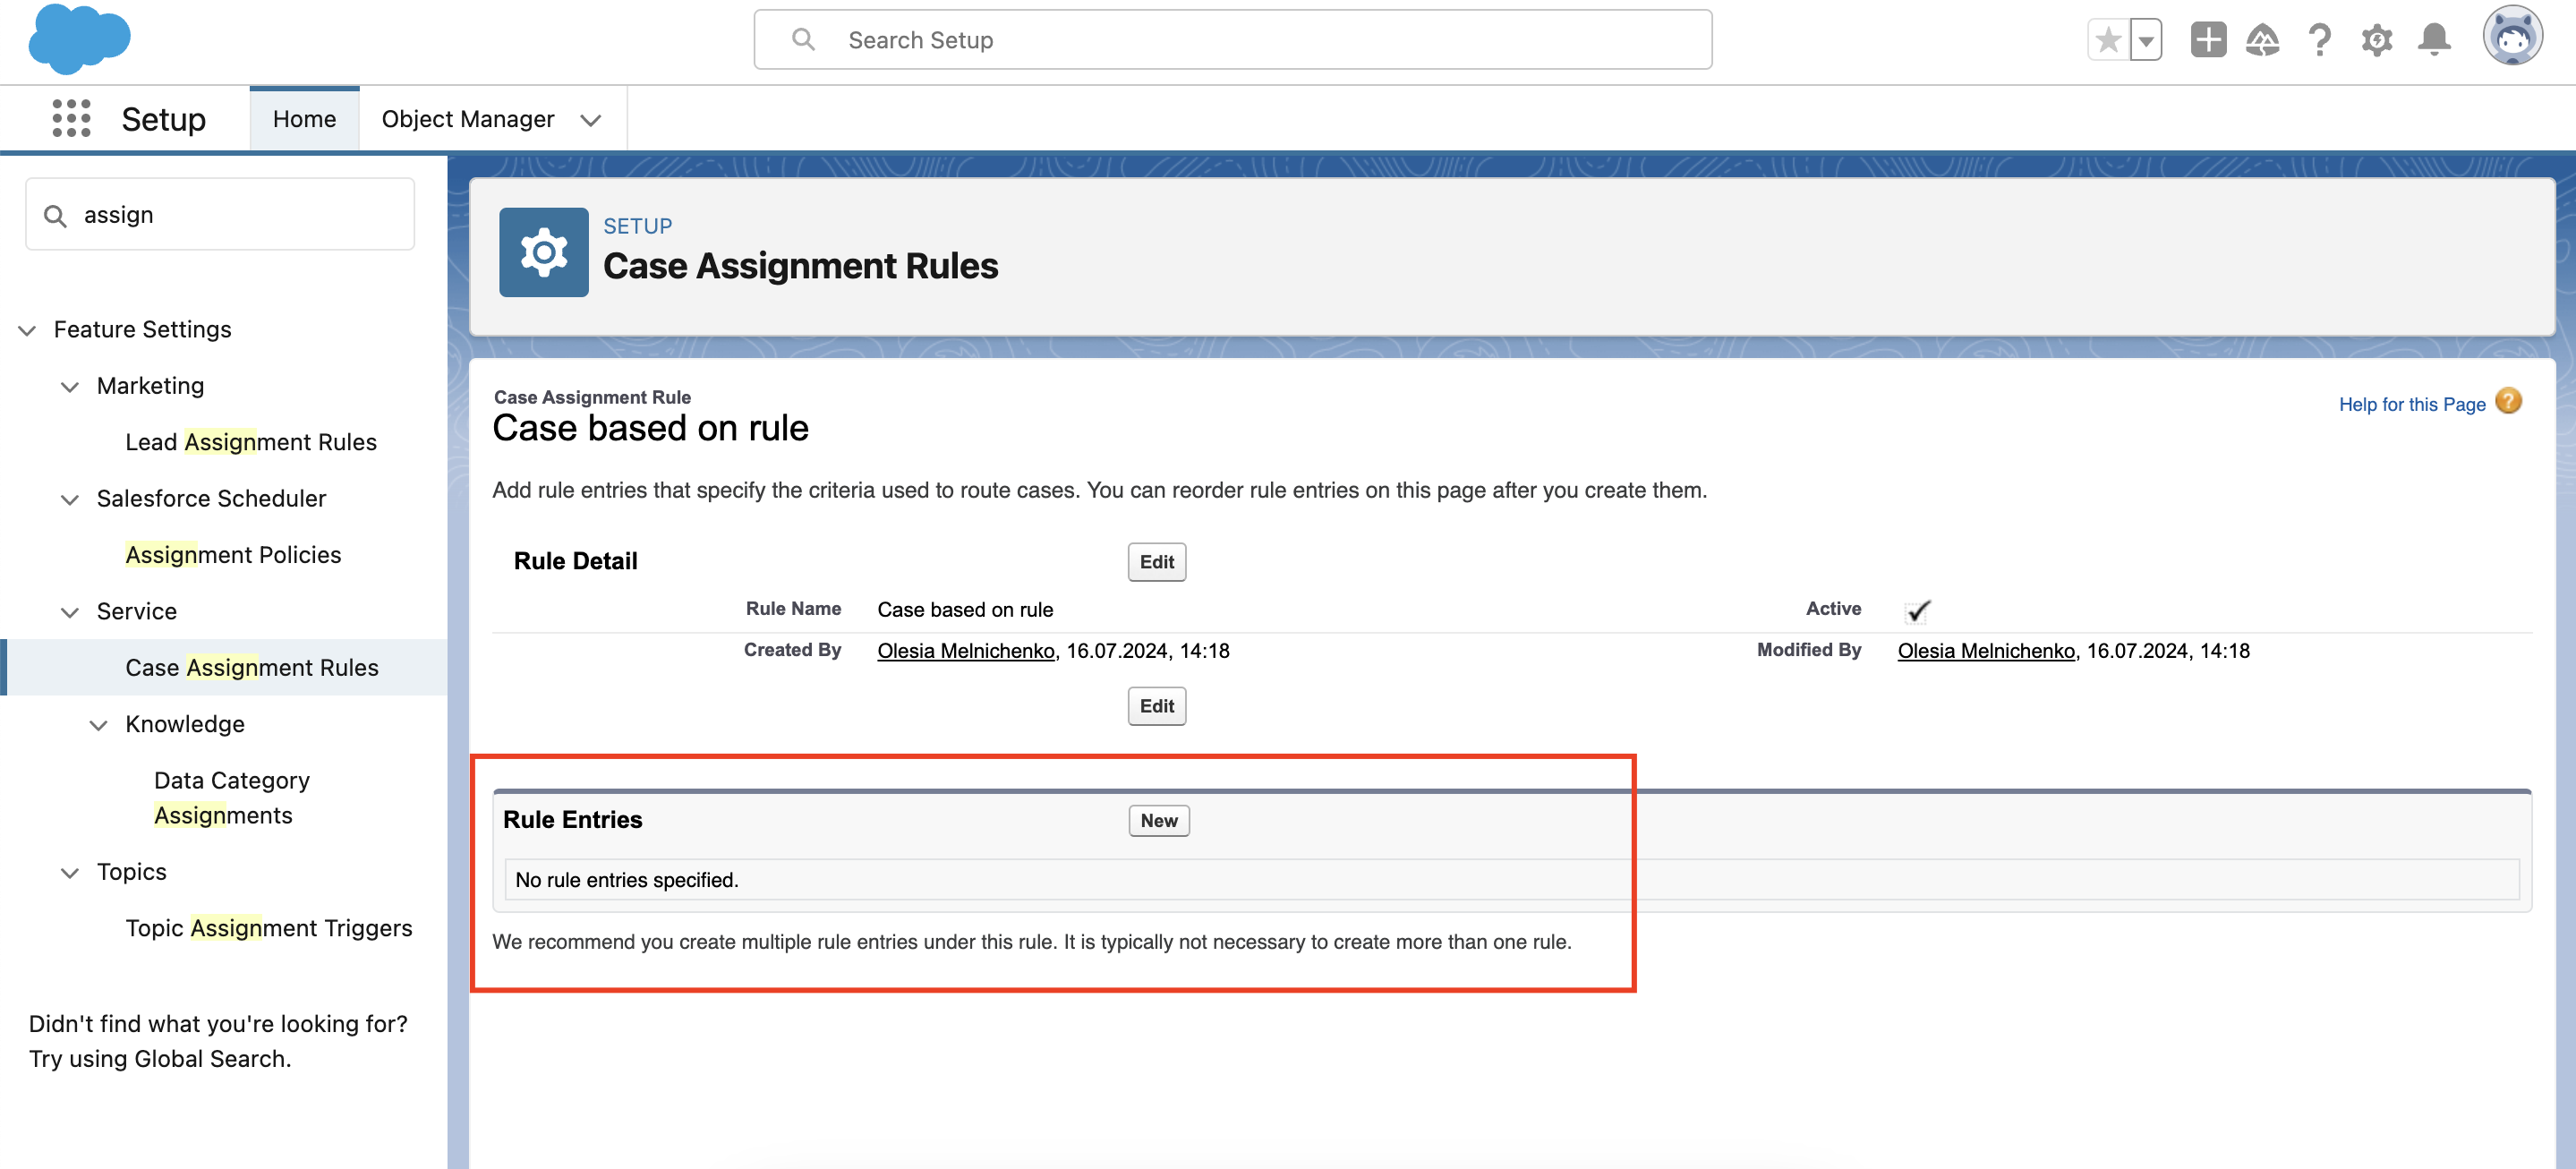
- Click on the rule you just created. In the Rule Entries section, click the New button.
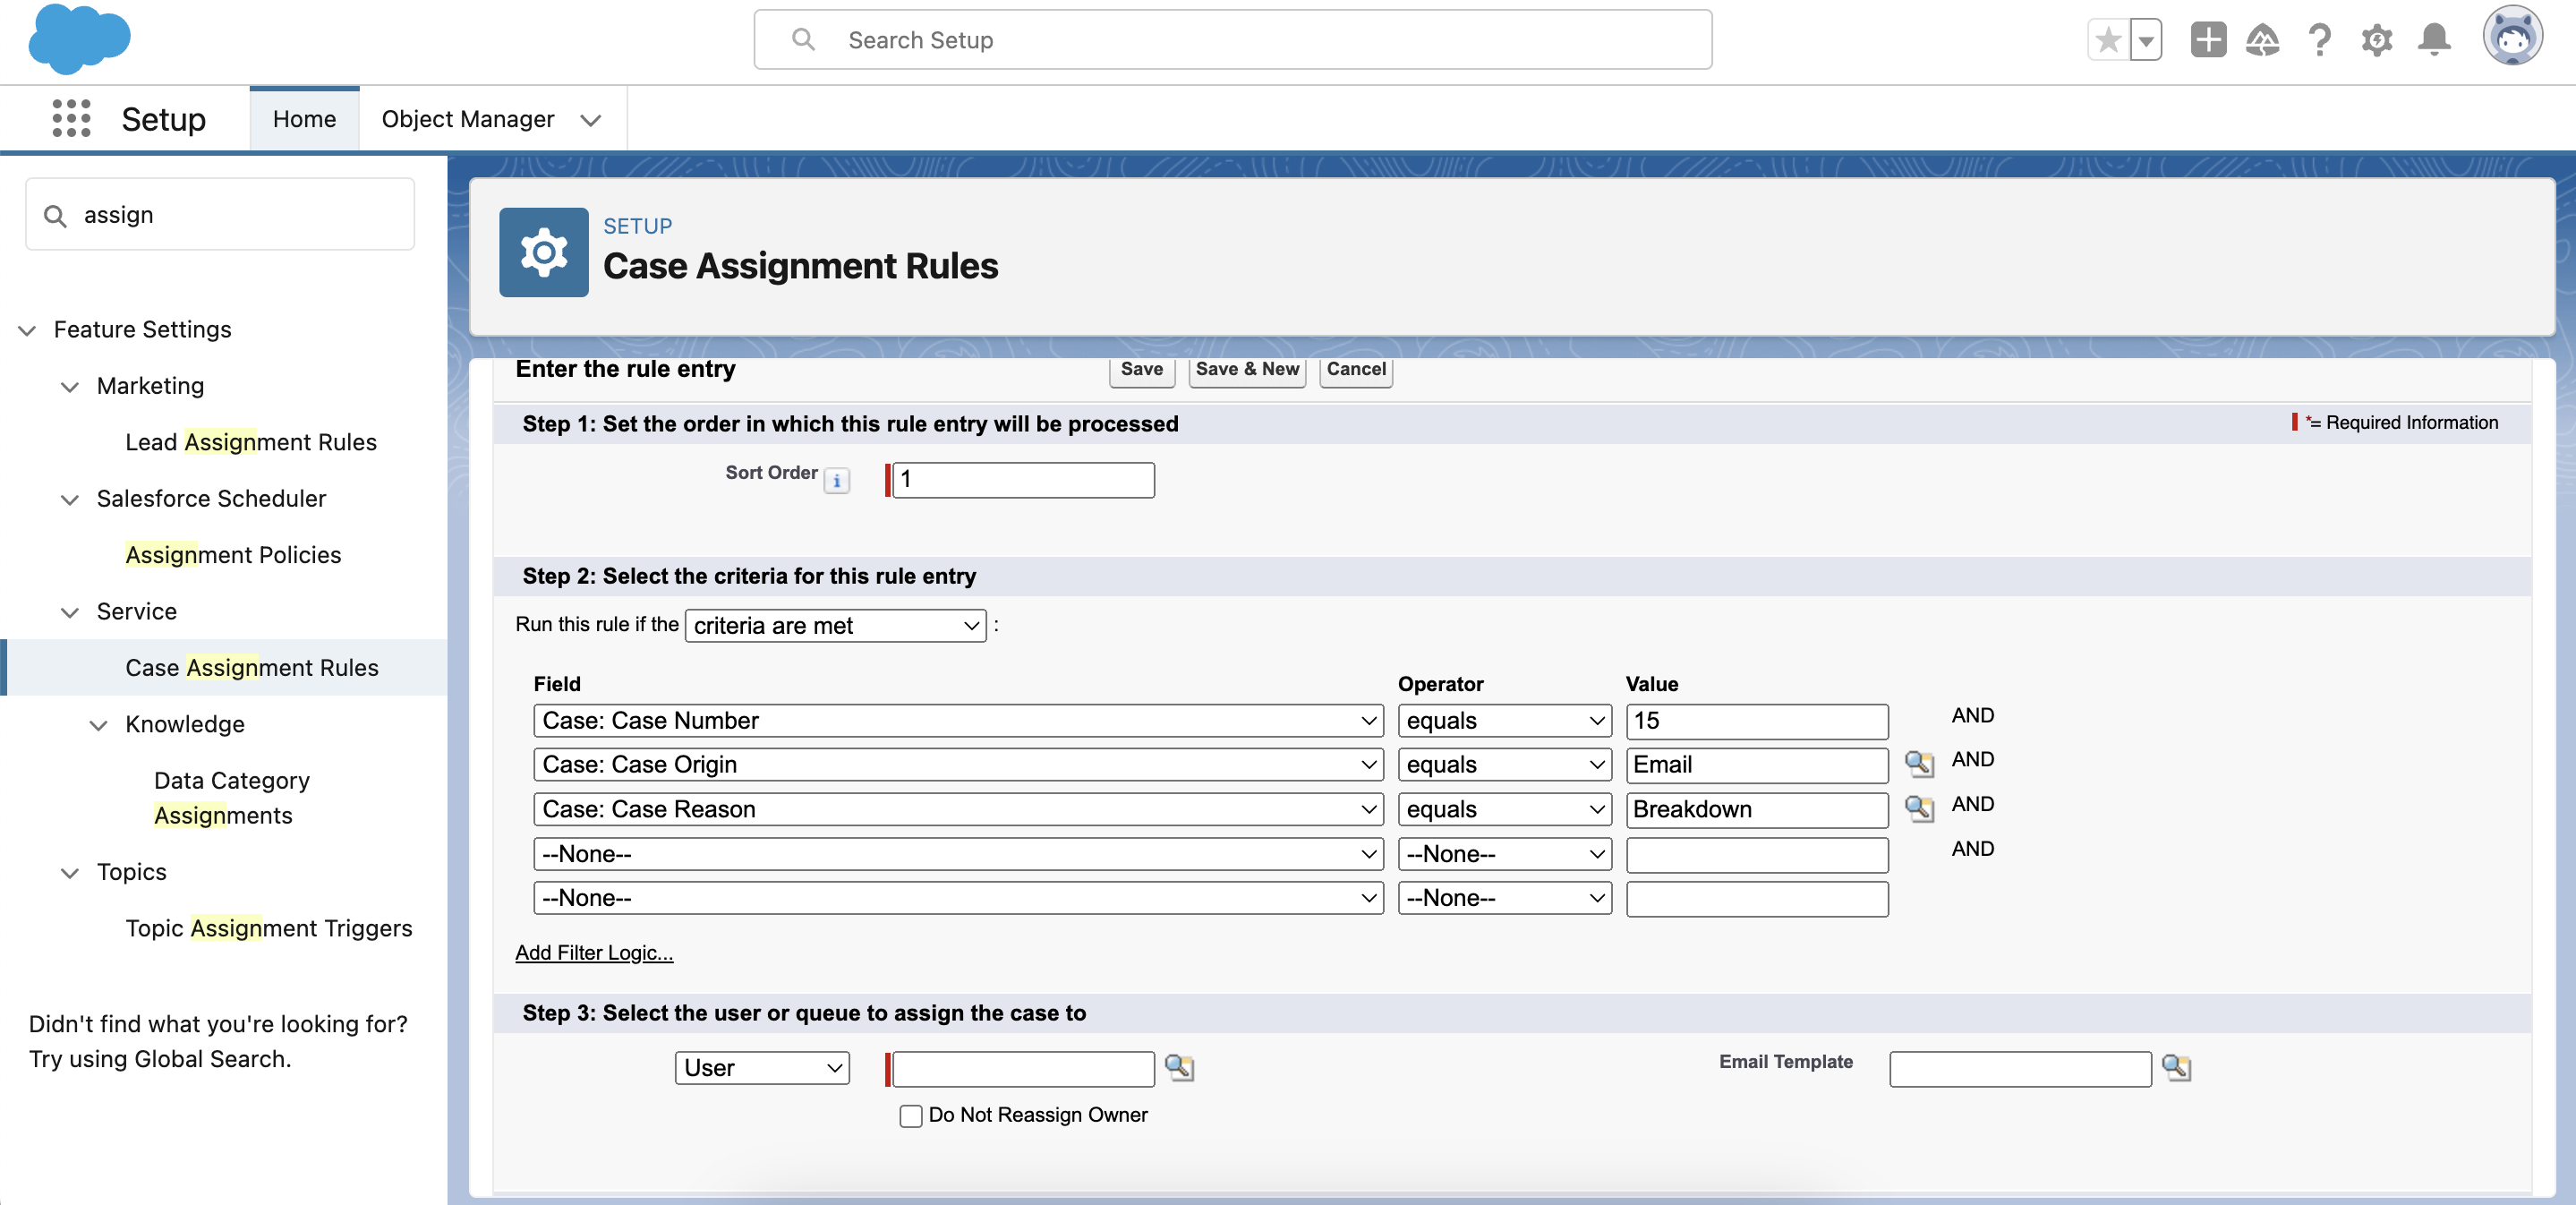
- This is when all the magic starts. The Sort Order section defines the order in which entries will be processed. If you enter “1”, it means that this entry will be processed first.
- Select the criteria for this rule entry. Here, you have several options: to run this rule if the criteria are met or if formula evaluates to true. In our case, I selected the criteria. This pretty much a standard Case Assignment Rule with such criteria as Case Number, Case Origin, and Case Reason.
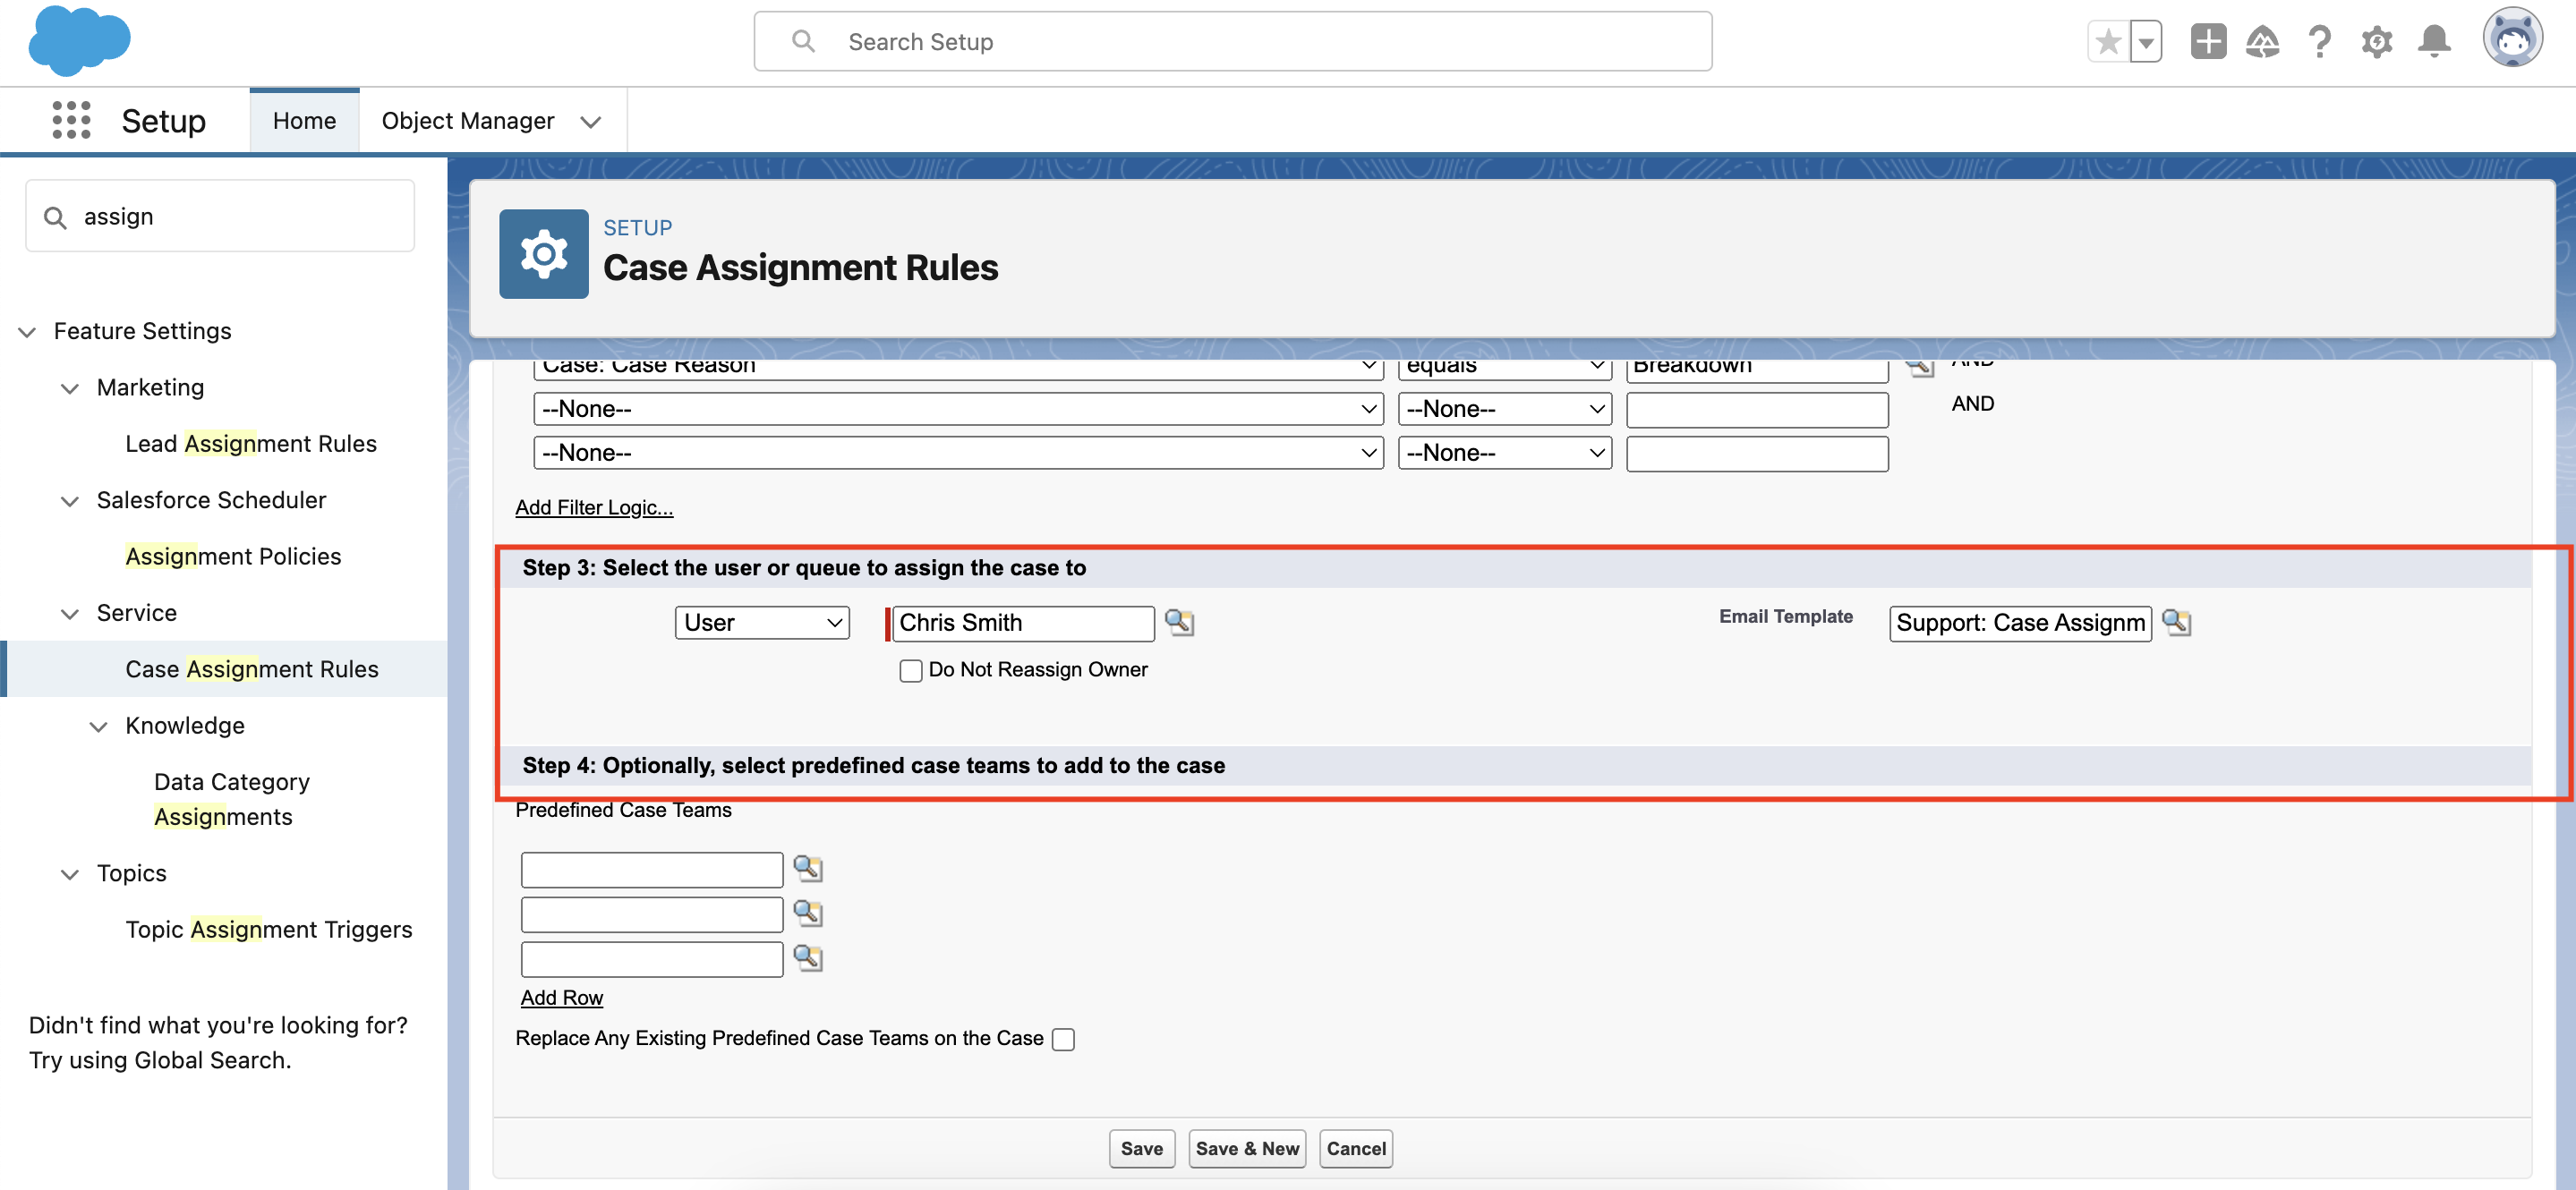
- After that, you can choose the User or a queue this rule entry will be assigned to. I will select a User.
- Choose the Email Template this user will receive when the new case will be assigned to him. After that, hit the Save button.
- Do not omit the testing phase – you need to clearly understand if everything is working correctly or you need to change assignment rules.
3. Lead Assignment Rule Creation
- With Salesforce Lead Assignment Rules, the process is pretty much the same. Navigate to Setup in your Salesforce organization. As previously done, start typing Assignment Rules in the Quick Find box and select Lead Assignment Rules. Click the New button.
- Specify the lead assignment rule name and do not forget to check the Activate box.
- In the Rule Entries section, choose New. Here, you specify the order in which the rule entry will appear and define the criteria for the given rule entry. For this lead assignment, I will specify such criteria as Lead:City equals New York, Lead:Email contains examplecompany, and Lead: Lead Status equals Open – Not Contacted.
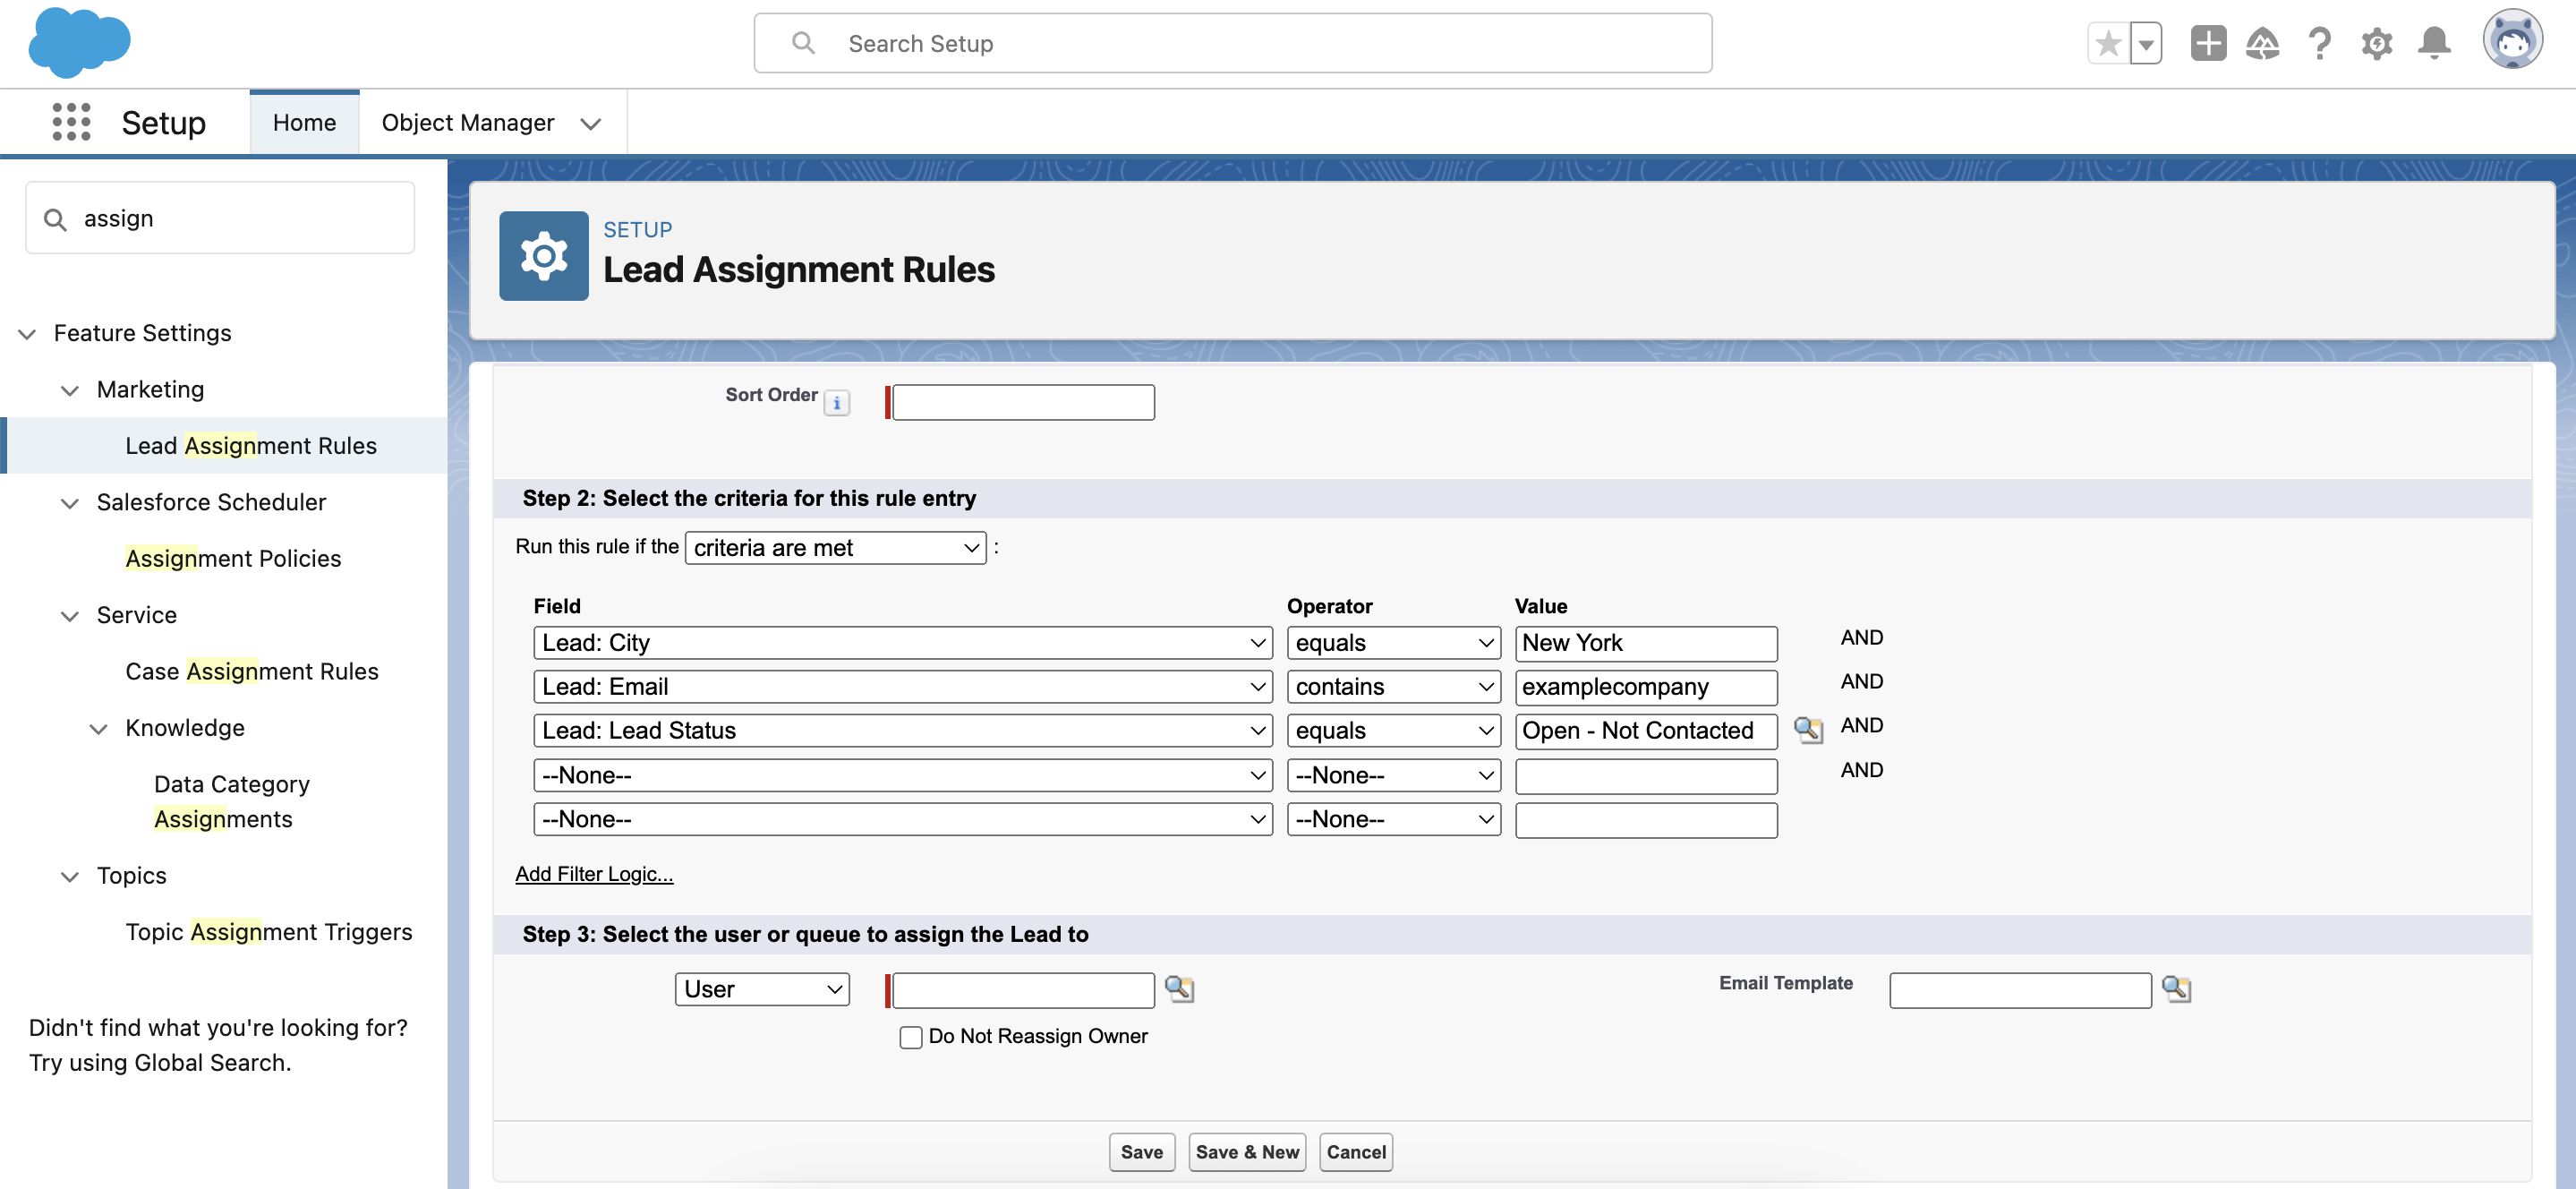
- Next, we need to select a User or a queue for this lead assignment. Let it be Olesia Melnichenko.
- After that, we also choose an email template and click Save.
Tips and Tricks for Creating Assignment Rules in Salesforce
- Test your assignment rule in a sandbox before running it on your production org. This way, you can prevent yourself from glitches and inaccurate data.
- Leverage custom formula fields to simplify complex assignment rules. This might be the case if you need to enlist the states by regions.
- Set up round robin assignment rules for avoiding bottlenecks in your work routine. It means that the system will allocate each new case or lead to a different user or a queue until everyone has been assigned the same amount and the process repeats.
- Consider a final rule entry with no criteria. This way, you can gather everything that didn’t match the criteria you define and assign it to a user or a queue.
Bottom Line
Hopefully, we managed to unscramble the assignment rules in Salesforce for you. They are the best for streamlining your business operations. Just imagine how sleek and error-free your work can be! Newly created leads and cases are assigned to an appropriate team member or queue, no chaos.
That is why you shouldn’t miss the benefits you can get from using assignment rules. Give them a try on your organization! In case you have any troubles, ask the Advanced Communities team. We can help you with everything from the Salesforce integration and configuration or further technical maintenance.
Q&A
1. How to Create Assignment Rules in Salesforce?
To create assignment rules in Salesforce, you have to log into your Salesforce org, find Setup. In the Quick Find box, type in Assignment Rules, select it, and click New. Define Rule criteria (name, object, active), add evaluation criteria, assign records, and save.
2. How Many Assignment Rules Can be Active in Salesforce?
There is no limit to the number of active assignment rules you can have in Salesforce. However, only one assignment rule can be applied to a given record.


