SHARE

COMMUNITY GUIDE FOR ABSOLUTE BEGINNERS 2

10 min read
Rating:
0
(0)
0
(0)

Community Builder: Brand your Community; Create a page and add it to the Navigation Menu; See how it looks with a Preview option.

Welcome to our second post in “absolute beginners” series. In our first post we have created a community with five easy steps. And here we talk about how to brand your community and make it unique and interesting. You will create your first page and see how it can be added to the Navigation Menu.

Let’s start with opening your community in Community Builder.

Go to Setup – All Communities – Builder (next to the community name).

1.    Brand your Community.

The first thing we do – create a brand new style for your Community.

Use Community Builder’s Theme panel to change color, upload images and choose fonts.

In the Colors section, you can choose colors for text, actions, links, navigation, and borders. You can also generate a custom color palette based on the main colors of the image you upload (for example your company’s logo).
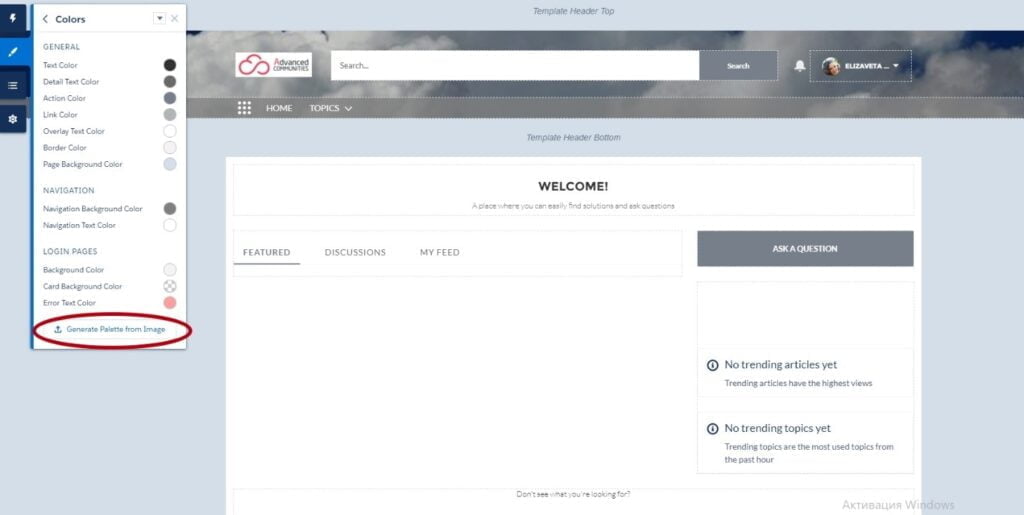
Upload and select images for your header, logo and login page background using the file selector in Community Builder.

Specify primary and header font style, weight, and text case, and add a custom font.

2.    Create a Page and add it to Navigation Menu.

Pages make up your community. To create and edit the page, use Pages menu and Page Properties.

In the Pages menu you can see the list of all pages which are grouped by types, and create a new page. In Page Properties section you can see the page name, title and URL, manage the access to this page, add a description and change its layout.

So, it’s time to create your first page in Community. Go to the Page menu and click New page – Standard Page.
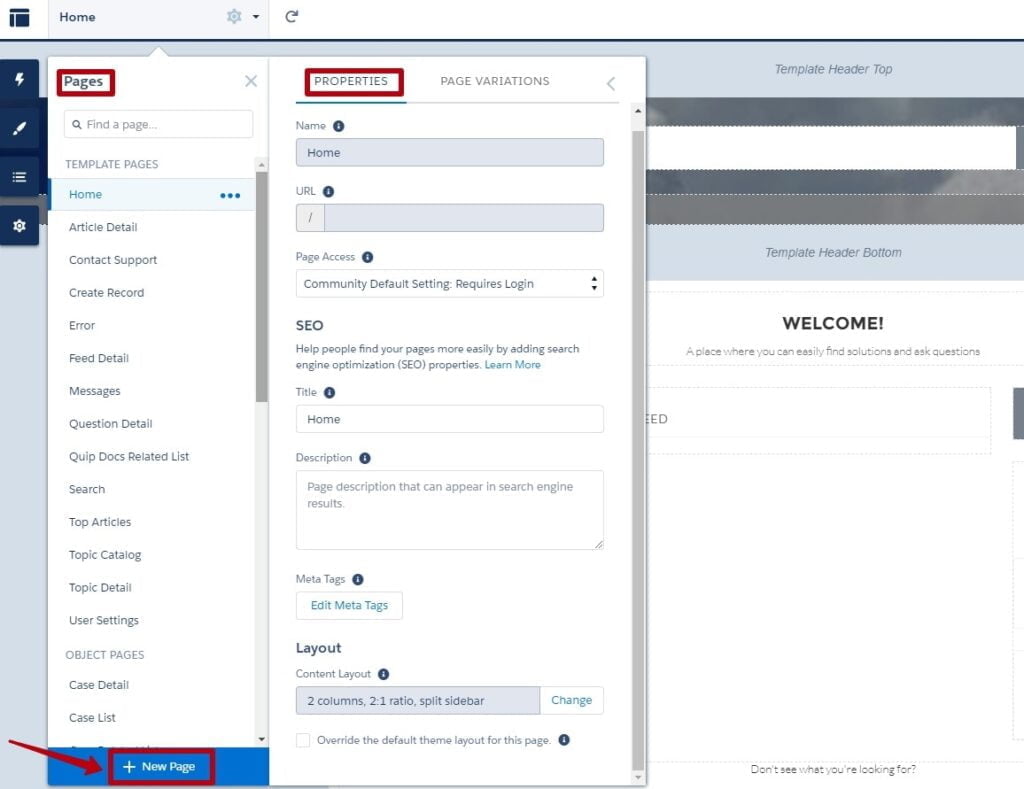
Click “New Blank Page”to choose a layout, let’s take 1 full-width column, then click Next.

Enter a name and URL for new page and click Create.

Now you can see your page in the Pages Menu – My Pages. If you need to delete a page, you can do this in the Page Properties.

To save all your changes, click Publish.

Great job! Let’s add your page to the Navigation Menu. Hover over the cursor on the Navigation Menu and click. Now you can see the Properties box, click the Navigation Menu button there.
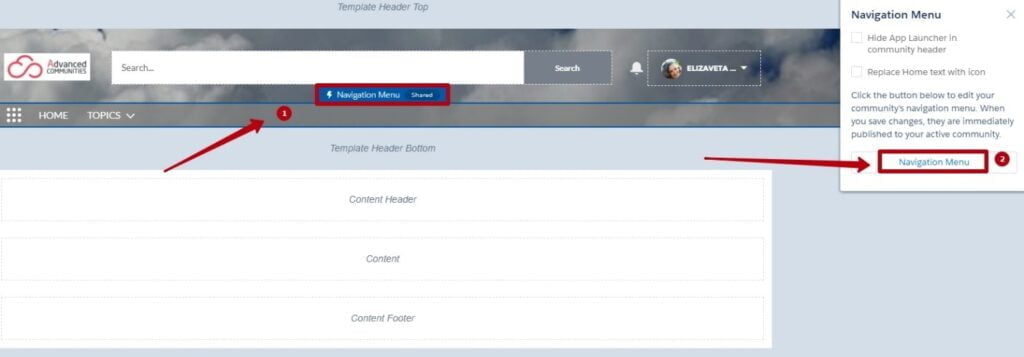
Choose Add Menu Item, fill in the Name, Type of the page and choose the page you created from the drop-down list. If you want your page to be Publicly available, enable the checkbox. Click Publish.

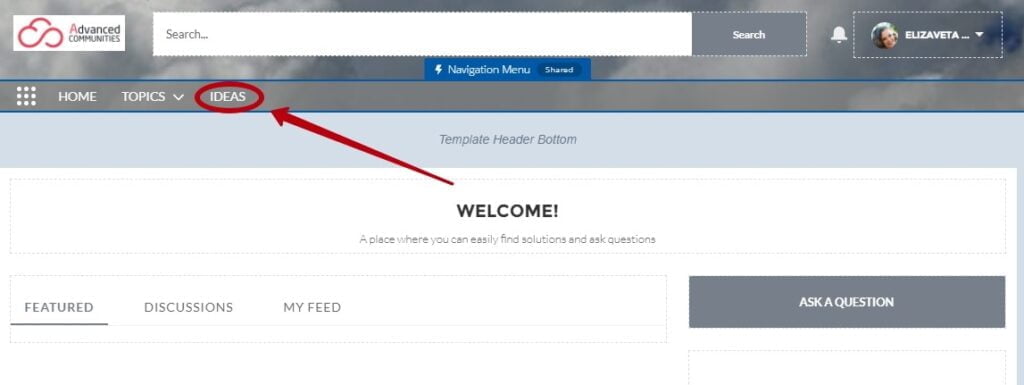
Now you can see it on the Navigation Menu.
3.    Preview your Community: see how it looks on Mobile and Tablet.

If you want to see how your Community looks live and how users can see it on their mobiles and tablets, you can use the Preview option.

Click Preview to see your community in a browser window.

To see how the community looks on different devices, choose one of them on the View Mode.

That’s all for this time. In our next post you will read about the most often used components and try to add them to your page.

Rate the article

0 / 5. 0

Table of contents

Discover more articles!

AC Partner Marketplace Product Sheet

Download the fact sheet now to explore:
  • How the app streamlines the entire channel sales process, from onboarding to selling.
  • How it enhances partner management with a self-service platform, real-time updates, and lead generation.
  • How it supports network expansion and automates business workflows.
 

Complete the form to get your free copy.


By submitting this form, you agree to occasionally receive guides, tips, and tricks from AC. You can unsubscribe at any time.  


AC Knowledge Management Enterprise Product Sheet

Download the fact sheet now to explore:
  • Key features – See how AC Knowledge Management Enterprise empowers your support team.
  • Benefits – Understand the value it brings to your customers.
  • Real results – See the impact AC Knowledge Management Enterprise can have on your organization.


Complete the form to get your free copy.


By submitting this form, you agree to occasionally receive guides, tips, and tricks from AC. You can unsubscribe at any time.  


AC Ideas Ultimate Product Sheet

Download the fact sheet now to explore how AC Ideas Ultimate helps you:
  • Capture – Easily collect ideas from customers, team members, and stakeholders.
  • Evaluate – Use built-in tools to score, prioritize, and review ideas based on custom criteria.
  • Implement – Track progress, convert cases into ideas, and turn the best ideas into actionable projects.


Complete the form to get your free copy.


By submitting this form, you agree to occasionally receive guides, tips, and tricks from AC. You can unsubscribe at any time.  


AC MemberSmart Product Sheet

Download the fact sheet now to explore:
  • Key features – See how AC MemberSmart empowers your team.
  • Benefits – Understand the value it brings to your members.
  • Real results – See the impact AC MemberSmart can have on your organization.


Complete the form to get your free copy.


By submitting this form, you agree to occasionally receive guides, tips, and tricks from AC. You can unsubscribe at any time.  


AC Events Enterprise Product Sheet

Download the fact sheet now to explore:
  • Key features – Learn how AC Events Enterprise automates registration, marketing, and analytics.
  • Benefits – Learn how it improves attendee satisfaction and helps your event shine.
  • Proven results – See how the app transforms your event outcomes.
 

Complete the form to get your free copy.


By submitting this form, you agree to occasionally receive guides, tips, and tricks from AC. You can unsubscribe at any time.  


AC MemberSmart Live Demo at ASAE Demo Day!

See our app in action and discover how it helps hundreds of associations manage members and renewals, organize events, fundraise, network, engage with volunteers, and much more.

October 24 at 11:40 am EST