
How to Set Up Navigation Menu Variations and Tile Menu in Salesforce Experience Cloud Sites
Last Updated: July 8, 2026
If you’re looking to optimize the Salesforce Experience Cloud navigation menu variations and tile menu components, you’ve come to the right place. In this article, we’ll guide you through the process of setting up navigation menu variations and tile menus to enhance the user experience of your online community.
In Experience Cloud, navigation is not just a design detail. It directly affects how easily customers, partners, members, or employees can find the right pages, records, resources, cases, Knowledge Articles, events, or actions inside the portal.
A well-planned navigation structure can improve self-service, reduce user confusion, and create a more personalized experience for different audiences. A poorly structured menu, on the other hand, can make even a technically functional portal feel difficult to use.
With the help of our step-by-step instructions, you’ll be able to configure these components to your exact specifications, making it easier for your users to navigate your site and find the information they need. Whether you’re new to Salesforce Experience Cloud or an experienced user, this guide is designed to help you make the most of your site’s navigation menu and tile menu.
Quick answer
- Menu variations are multiple Navigation Menus that can be assigned to components and audiences (Guests, Members, Partners).
- Where to create/manage them: Experience Builder → Settings → Navigation → Navigation Menus (or Workspaces → Navigation, may differ depending on template).
- Tile Menu uses a Navigation Menu and displays each item as an image tile linked to a page, object, URL, or action.
When to use this: when different users need different entry points or when visual navigation improves task completion.
What Are Navigation Menu Variations in Experience Cloud?
Navigation menu variations allow you to maintain multiple structured menus and deploy them selectively across your site. Instead of one navigation structure serving everyone, you can tailor menus by context and audience.
Typical use cases:
- Guests vs Members: Guests see Login, Register, About; Members see Cases, Knowledge, Community.
- Partners vs Customers: Partner portals often surface Leads, Deals, Reports; customers see Support and Documentation.
- Page-specific navigation: A support landing page can display a focused menu different from the global header.
From a business perspective, menu variations help organizations avoid a one-size-fits-all portal experience. Instead of showing the same navigation to every visitor, teams can adapt the portal structure to specific user groups, roles, permissions, lifecycle stages, or engagement goals.
Menu variations are simply separate Navigation Menu records that components can reference. Components that support menu selection (Navigation Menu, Tile Menu) render whichever menu you assign.
Why Navigation Structure Matters for Portal UX
In Salesforce Experience Cloud, navigation defines how users move through the portal and how quickly they can complete key tasks. Customers may need to find support resources or submit cases. Partners may need access to deals, enablement materials, documentation, or marketplace resources. Members may need to manage profiles, register for events, renew subscriptions, or access exclusive content.
That is why menu variations and tile menus should be planned around real user journeys, not only around the site structure. Different audiences often need different entry points, different labels, and different levels of visibility.
When navigation is designed well during the Salesforce Experience Cloud implementation, users can find what they need faster, self-service adoption improves, and the portal feels more relevant to each audience group.
Before You Start
Before configuring menu variations and tile navigation, make sure the following prerequisites are in place:
- Permissions. These ensure you can create menus, edit components, and publish changes to the site:
- Access to the Experience Cloud site.
- Ability to open Experience Builder and publish changes.
- Rights to edit navigation (commonly Site Admin or equivalent).
- Environment. These are the platform conditions required to configure and test navigation components:
- An active Experience Cloud site configured in Salesforce.
- Access to Experience Builder and Workspaces.
- Tile images. Prepared images ensure your Tile Menu displays consistently and looks professional across devices:
- Consistent aspect ratio (square or 4:3 recommended).
- Optimized size (typically 400–800px width).
- Clear focal point; avoid text near edges.
How to Create Salesforce Experience Cloud Navigation Menu Variations On Your Site
By incorporating the Navigation Menu component into your Salesforce Experience Cloud website, you can expand the scope of your navigation beyond conventional topics. This component allows you to include a diverse range of items in your navigation menu, such as Salesforce objects, topics, pages within your site, external URLs, and menu labels. Furthermore, you can use menu labels as primary categories to organize and nest other menu items underneath them.
To create an Experience Cloud Navigation Menu variation:
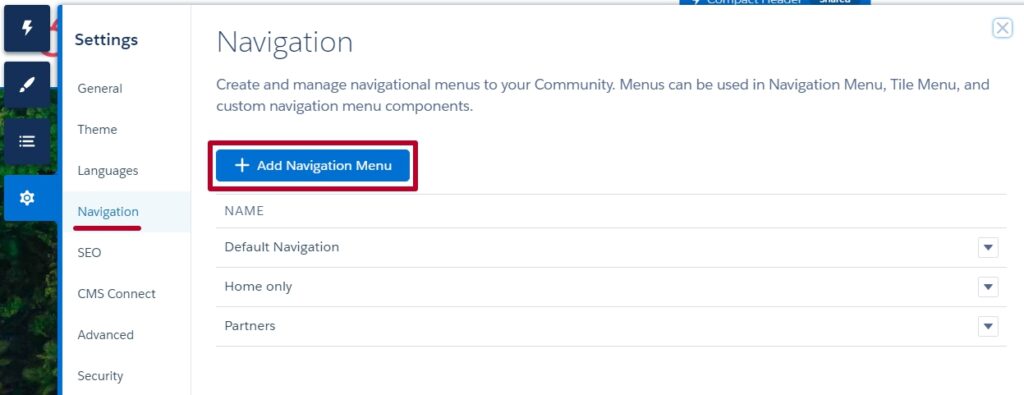
1. Go to your Experience site, then get to Settings → Navigation → Add Navigation Menu.
2. Enter a clear Name (e.g., Guests, Members, Partners).
3. Add Menu Items. It can be:
- Internal page
- Salesforce object or record
- External URL
- Menu label (used as a category for grouping items)
4. (Optional) Use Menu Labels in Experience Cloud to organize items into categories.
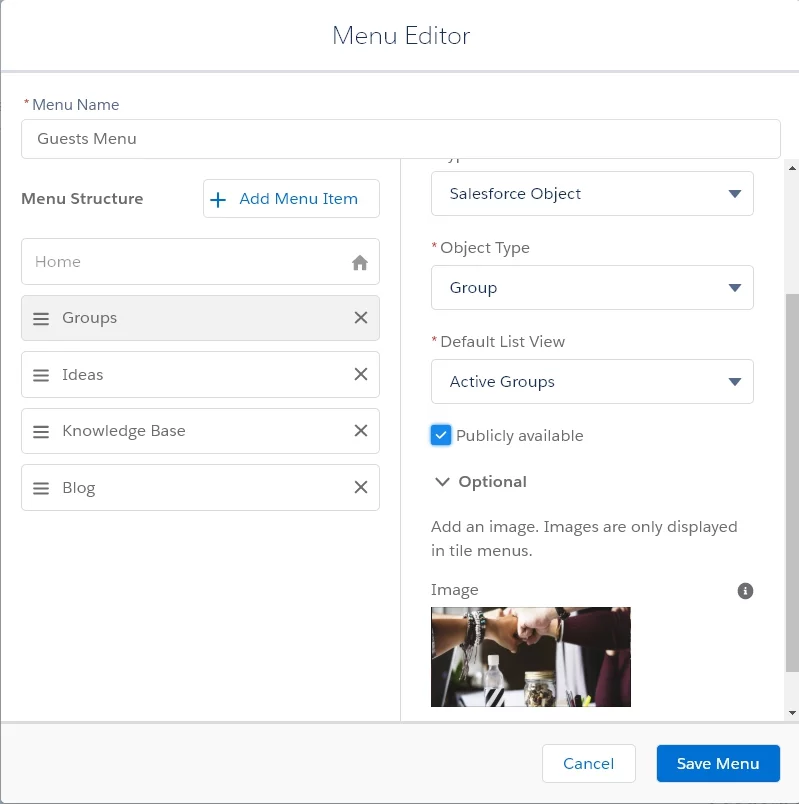
5. Save the menu.
6. Preview in Builder to confirm structure and links.
7. Repeat for additional audiences or contexts.
You can even use different navigation menus on different page variations by creating separate theme layouts for the page variation.
Useful Tip:
Use a naming convention like Header – Guests or Tiles – Members, so component selection stays obvious.
Data Access & User Permissions in Experience Cloud Sites

How to Use the Menus in the Navigation Menu Component
- In Experience Builder, select the Navigation Menu component on your page.
- In the property panel, choose the Navigation Menu you created.
- Adjust display settings (layout, alignment, style) if available.
- Save changes.
When changes appear?
- Component selection updates immediately in preview.
- Visitors see updates after you Publish the site.
How to Set Up Tile Menu Using Navigation Menus (step-by-step)
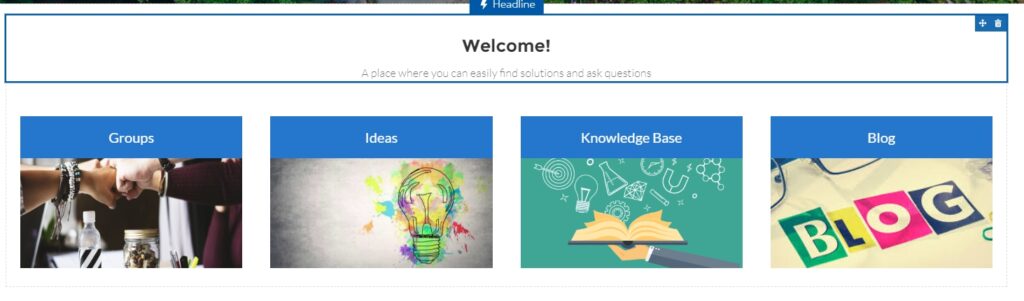
Add a Tile Menu component to the Experience Builder to add a visually bright navigation experience to your community.
To add the Tile Menu component to your website page:
1. In Experience Builder, navigate to the list of components and choose Tile Menu.
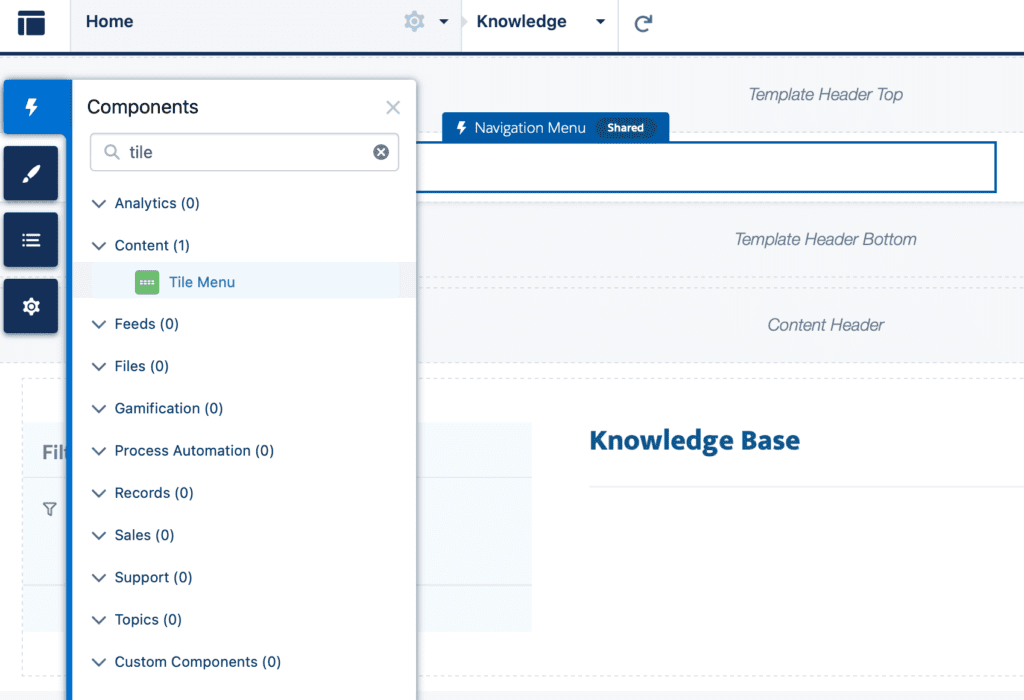
2. Drag the component and drop it onto the desired location on your page.
3. Select the Tile Menu component to access its property editor.
4. Customize various properties of the component to suit your requirements.
5. In the component properties, select the Navigation Menu to power the tiles.
6. Upload an image for each menu item (tile).
7. Verify each tile links to the correct destination.
8. Save and Publish.
9. Test as different users if audience targeting is applied.
Customers can use the Tile Menu images to access external sites, community pages, records, or global actions. You can set up a maximum of eight image-link combinations per Tile Menu component.
The Tile Menu component has been updated in the Summer ’20 release, and the latest version is now accessible in Experience Builder. If you are currently using the older version of the component, which is marked as Deprecated in the component properties, it will continue to work. However, if you opt to remove the deprecated component, you will be required to switch to the new version.
Navigation Menus for Support, Partner, and Member Portals
The best navigation structure depends on the type of Experience Cloud site you are building.
- For support portals, navigation should help users quickly access Knowledge Articles, case
submission, case status, FAQs, documents, and support resources. You can also use a dedicated Salesforce knowledge management tool for a smoother user experience. - For partner portals, menus should make it easy to find deal registration, leads, opportunities, enablement content, product documentation, training materials, and partner program updates. If you’re interested in even more features for PRM, you might think about Salesforce Partner Cloud implementation.
- For member portals, navigation should support member self-service by highlighting profile management, renewals, events, resources, directories, discussions, and exclusive content, significantly improving the Salesforce-native membership management for your company.
Tile Menus can be especially useful when users need a visual starting point for common tasks. Navigation Menu Variations are useful when different audiences need different paths through the same portal.
Need to improve navigation and user experience in your Salesforce Experience Cloud portal?
Advanced Communities helps organizations design and implement Experience Cloud sites, partner portals, member portals, and online communities with the right UX, permissions, navigation structure, and Salesforce-native functionality. Talk to an Experience Cloud Expert today.
Different Audience Targeting in Experience Cloud
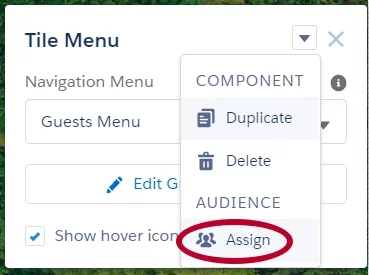
You can get even more: using the Tile Menu component, you can assign a different audience to view different Menu Variations.
Audience targeting is especially useful when a portal serves several user groups at the same time. For example, guests, authenticated customers, partners, members, and internal users may all need different navigation paths. By assigning menus to specific audiences, teams can reduce clutter and make the portal feel more relevant to each user group.
How it works:
- Select the component (Navigation Menu or Tile Menu).
- In properties, open Audience/Visibility.

- Choose the target group (Guests, Authenticated Users, specific criteria).
- Save and publish.
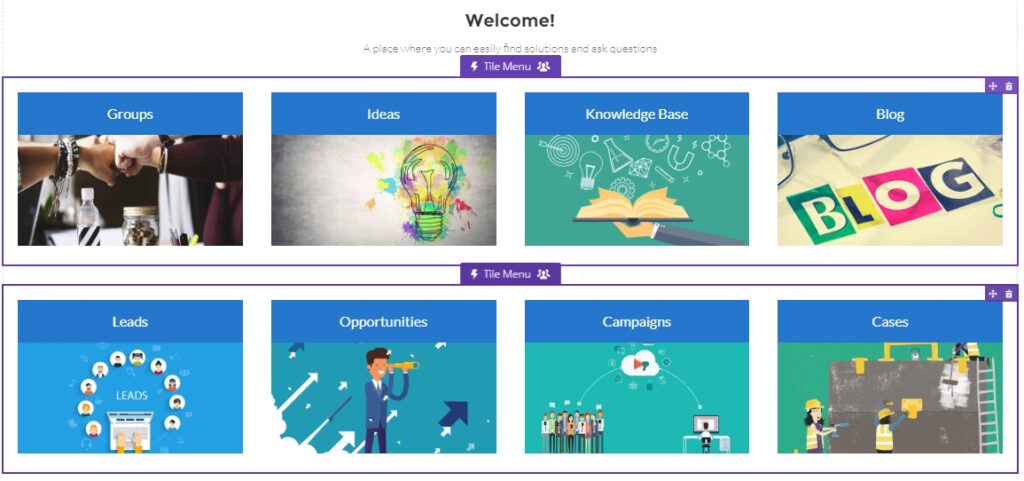
Now, you can have a few tile menu components on the same page. Each component will display the particular navigation you choose and will be visible only to a certain audience. Isn’t it nice?
Common Issues & Troubleshooting
- Changes not visible
Cause: Saved in Builder but not published.
Fix: Publish the site and clear the cache if needed. - Guests can’t access links
Cause: Page or object not visible to the guest profile.
Fix: Review guest user permissions and page visibility. - External links open incorrectly
Cause: Link settings or browser behavior.
Fix: Verify URL format and target settings (new tab vs same tab). - Tiles missing images or cropped poorly
Cause: Inconsistent aspect ratios or low resolution.
Fix: Standardize dimensions and re-upload optimized images. - The wrong menu appears for users
Cause: Audience rules overlap or component references the wrong menu.
Fix: Recheck component assignment and audience configuration.
Video Instruction on How to Add a Tile Menu to Your Experience Cloud Site
If you prefer a visual walkthrough, the video below shows how to add and configure a Tile Menu in an Experience Cloud site. Use it together with the UX and audience-targeting best practices above to avoid building navigation that works technically but feels confusing for users.
When to Ask for Expert Help With Experience Cloud Navigation?
Navigation issues in Experience Cloud are not always caused by the menu component itself. They can be connected to portal architecture, audience targeting, permissions, page visibility, content structure, or unclear user journeys.
You may need expert help if:
- Your portal serves several audiences with different needs;
- Users cannot find key pages, records, or resources;
- Menu items appear for the wrong users or do not appear at all;
- Navigation depends on complex roles, permissions, or criteria-based visibility;
- Your portal has grown and the original navigation structure no longer supports
the user journey; - You need to redesign the portal experience for customers, partners, or members.
Advanced Communities can help you review your Salesforce Experience Cloud site, improve navigation logic, configure audience-based visibility, optimize portal UX, and create a more scalable experience for your users. Book a call with our team.
Meet Advanced Communities at AppExchange.
FAQ
1. How do I Add a Navigation Menu in Experience Cloud?
Open your site in Experience Builder, go to Settings → Navigation → Navigation Menus, and create a new menu. Add pages, objects, URLs, or labels, save, then assign the menu to a Navigation Menu or Tile Menu component and publish.
2. How do I Change the Navigation Menu in Salesforce?
Select the Navigation Menu component in Experience Builder and choose a different Navigation Menu from the property panel. Save and publish. If changes don’t appear, confirm you edited the correct menu and that the site is published.
3. Can I create multiple navigation menus for different audiences?
Yes. Create separate Navigation Menus and assign them to components with audience targeting. This lets Guests, Members, and Partners see different navigation structures on the same page.
4. How do I assign a Tile Menu to a specific audience?
Select the Tile Menu component, open Audience/Visibility, choose the target audience, save, and publish. Ensure the linked pages are accessible to that audience’s permissions.
5. Why don’t my menu changes show up on the live site?
Most often the site wasn’t published after saving. Also check caching, component assignment, and whether you edited the correct menu variation used by the component.
6. What image size works best for Tile Menu tiles?
Use consistent aspect ratios (square or 4:3). A width of 400–800px typically balances clarity and performance. Optimize images for web and keep focal elements centered to avoid cropping.
7. Why is navigation important in Salesforce Experience Cloud portals?
Navigation affects how quickly customers, partners, members, or employees can find the right pages, records, resources, and actions. A clear navigation structure improves portal usability, self-service adoption, and overall user experience.
8. When should I use different navigation menus for different audiences?
Use different navigation menus when user groups need different content, actions, or portal journeys. For example, guests, customers, partners, and members may each require different entry points and visibility rules.
9. How can Tile Menus improve portal UX?
Tile Menus provide a visual starting point for common tasks, making it easier for users to navigate content-heavy portals. They are especially useful for portals with resources, events, directories, support links, or partner enablement materials.
10. When should I ask an Experience Cloud partner to help with navigation?
Expert help may be needed when navigation depends on complex permissions, multiple audiences, criteria-based visibility, or a large content structure. An Experience Cloud partner can help design navigation around real user journeys instead of only technical settings.