Tips for Successful Data Migration in Salesforce

There can be a lot of different reasons why companies need to move data from other platforms to Salesforce.

For example, a company may already be using Salesforce and then acquire another company that uses a different platform, so they want to collect all data in one place. Or a small company is working with a simple CRM platform that covers their basic needs, but over time has grown and all business processes have been scaled up, so they now need more advanced functionalities and customizations.

Data migration in Salesforce can be a very laborious task depending on the accuracy, volume, and format of the data you want to move. The data migration process includes several steps:

Preparation

This is the most time-consuming step and at the same time the most important one. If something is missed at this stage, you will notice it in the final steps and you will need to redo everything.

So here you need to prepare all your data for migration: choose what data to migrate, define the source where to extract it from, and delete unnecessary information and duplicates.

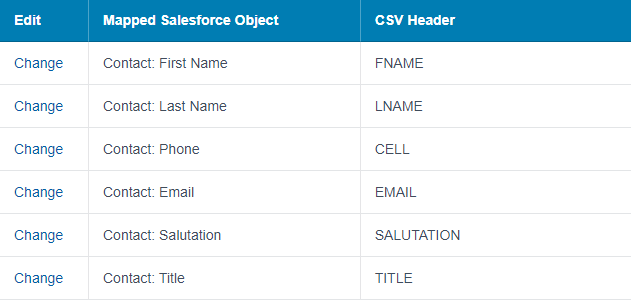
For this reason, you need to get metadata as a table from the source system. Then you need to map all fields in the source system to Salesforce fields. This is important because unmapped records won’t be imported.

map all fields in the source system to Salesforce fields

Migration

This process is actually data import to the Salesforce organization.

Depending on the type and volume of data you need to choose what method you will use for the import process. Salesforce offers two main ways to transfer the data: Data Import Wizard and Data Loader.

  • Data Import Wizard – this is a Salesforce build-in solution available in Setup with an easy-to-use interface to define data sources and map the fields in the import file with the Salesforce fields. You can import data in both standard and custom objects. Use this tool if you need to move up to 50,000 records at a time.
  • Data Loader – this is an app that will help you to import up to 5 million records at a time. The benefit of this solution is that you can operate it with a command line as well as with a user interface. The ability to use a command-line lets you automate the process of importing such a large number of records using API calls.

Quality Validation

After the import is complete, you need to make sure that all data was moved successfully. You can do spot-checks of the records, create custom reports to check the number of records, or see which records weren’t imported through the exception report.

The key to successful data import is good preparation. So don’t miss this step to save your time and avoid failed import attempts. 

We hope that now you know a little more about the complex process of data migration in Salesforce and that our post was useful for you.

Follow us on social media to make sure you get all our updates.

How to Set Up Multi-Factor Authentication in Salesforce: (2023 Update)

With the increasing prevalence of cyber threats, it’s crucial to protect your Salesforce organization from unauthorized access and data breaches, and Salesforce two factor authentication may not be enough anymore. One effective way to do this is by implementing Multi-Factor Authentication (MFA). MFA in Salesforce adds an extra layer of security, ensuring that only authorized users can access sensitive information and preventing identity theft.

More about the Salesforce MFA setup and how to enable MFA for Salesforce and Experience Cloud read in this blog post. 

What is it and how to set up MFA in Salesforce?

As an advanced authentication approach, multi-factor authentication in Salesforce ensures secure access by verifying users’ identities through the provision of multiple pieces of evidence, typically two or more factors, during the login process. One of the factors entails knowledge-based information like a username and password. Additional factors encompass possession-based elements like an authenticator app or a security key. By combining these multiple factors, Salesforce MFA enhances security and provides a robust defense against unauthorized access attempts.

Note!

Effective February 1, 2022, all Salesforce customers are contractually required to use multi-factor authentication to access Salesforce products. In 2023, Salesforce is automatically enabling and enforcing MFA. To avoid disruptions to your business and to protect your data, Salesforce strongly recommends enabling multi-factor authentication yourself as soon as possible. 

Types of multi-factor authentication verification methods in Salesforce:

●  Built-In Authenticator. Integrated authenticators utilize biometric readers, such as fingerprint sensors, iris scanners, or facial recognition technology, that are embedded within a user’s device to authenticate their identity. Examples of these authenticators include Touch ID, Face ID, or Windows Hello. 

●  Salesforce Authenticator mobile app. With this reliable solution, users can strengthen their login process by using their mobile device in addition to their password to verify logins. By utilizing the Salesforce Authenticator app, users receive a push notification on their mobile device, and can conveniently verify their logins with a simple tap response.

MFA salesforce

Salesforce authenticator setup

For a visual demonstration of how to use Salesforce Authenticator app for MFA logins, you can refer to this video guide: 

●  U2F or WebAuthn security keys. You can enable users to utilize a Universal Second Factor (U2F) or WebAuthn (FIDO2) security key when prompted to verify their identity. This allows users to forgo methods like Salesforce Authenticator or one-time passwords delivered via email or SMS. Instead, they can simply insert their security key into the designated port on their computer or mobile device to successfully complete the verification process.

●  Third-party time-based one-time passcode (TOTP) authenticator apps. These apps generate random, temporary verification codes based on the appropriate algorithm. The user gets this code on the phone or email and then they need to type it into a specific field while logging in.

Multi-Factor Authentication in Salesforce

How to enable MFA in Salesforce

With a single configuration, you have the ability to activate multi-factor authentication for all users within your org. Once it is enabled, internal users will be required to provide a secondary verification method when logging in with their username and password. This setting aligns with Salesforce’s plan to automatically enable and enforce this security mechanism.

Here is a step-by-step guide on how to setup MFA in Salesforce for all internal users in the org as of 2023:

  1. Navigate to the Setup menu and enter “Identity” in the Quick Find search box. Then, choose the option for “Identity Verification.”
  2. From there, select the checkbox that says “Require multi-factor authentication for all direct UI logins to your Salesforce org.”
Multi-Factor Authentication in Salesforce

Enable MFA in Salesforce Experience Cloud

MFA Salesforce setup is not mandatory for your company’s Experience Cloud sites, employee communities, help portals, or e-commerce sites/storefronts. You have the flexibility to choose whether or not to activate MFA for Salesforce Experience Cloud external users accessing these sites. External users can be identified based on the following types of licenses:

  • Community licenses
  • External Identity licenses
  • Employee Community licenses (consisting of either a Salesforce Platform license paired with a Company Community for Lightning Platform permission set license or a legacy Company Community license)

Salesforce MFA is not required for external users who have been issued non-community licenses by Salesforce or a Salesforce partner specifically for accessing employee or other communities.

It’s important to note that multi-factor authentication is required for internal users, which includes anyone with a standard user license, when logging into your company’s Employee Community or other Experience Cloud sites.

The Future of User Management in Salesforce: Switching From a Profile-Based Access Approach to Permission Sets

Salesforce has recently announced a significant change to the data access and user permission management, bringing a new era of user management in Salesforce.The company has reported the end-of-life (EOL) of permissions on profiles, which will take effect in the Spring ’26 release.
Post image

How to enable MFA in Salesforce Experience Cloud

Want to create an online community with Salesforce Experience Cloud and thinking about enabling multi-factor security mechanism for your site users? Use MFA user permission to enable multi-factor authentication for external users accessing your company’s Experience Cloud sites, employee communities, and other types of community portals.

MFA for community users step-by-step:

  1. Create a permission set for multi-factor authentication. From Setup enter Permission in the Quick Find box > select Permission Sets > Click New > Label the permission set > Use the auto generated API name > Click Save.
  2. Under System, click System Permissions > Click Edit > Select Multi-Factor Authentication for User Interface Logins > Click Save. 
  3. Assign the MFA Permission set to the appropriate users.
Multi-Factor Authentication in Salesforce
Note!

You can’t assign the Multi-Factor Authentication for User Interface Logins permission to users with the Salesforce Limited Access – Free license.

SMS as a verification method for multi-factor security mechanism in Experience Cloud sites

Salesforce doesn’t permit using emails, SMS, or phone calls as multi-factor authentication verification methods because email credentials are more easily compromised, and text messages and phone calls can be intercepted. However, it is possible to use SMS as a verification method for external users when setting up MFA in Salesforce for Experience Cloud sites, allowing them to authenticate themselves using SMS text messages. 

If you enable SMS one-time passcodes as the multi-factor authentication verification method on your Experience Cloud site, users will only be able to choose this method during the initial registration. Once registered, users can easily add any other supported verification method to their account through the Advanced User Details or Personal Information page. In the case where multiple verification methods are linked to a user’s account, Salesforce automatically utilizes the most secure method available for multi-step login mechanism.

How to use SMS as a verification method?

To enable SMS multi-factor authentication, you will require an Identity Verification Credit Add-On license. It is also necessary to reach out to Salesforce Customer Support in order to activate this feature. Additionally, you need to enable the option “Let external users verify their identity by text (SMS)” on profiles and permission sets.

Note!

Because one-time passcodes delivered via text messages are less secure than other verification methods, this option is only available for external users.

Looking for assistance? 

If you’re looking for help in enabling a multi-step login process for your community users, you’ve come to the right place! We’re here as your Salesforce ISV and SI partner, providing professional services to make your life easier. Whether you need to develop an Experience Cloud site, customize your Salesforce website or community, or get technical assistance to set up multi-factor authentication, our team of Salesforce certified Experience Cloud consultants is ready to lend a hand. We can even help enhance your Experience site with amazing third-party apps like member management solutions, event management accelerators, and knowledge management tools. Just let us know what you need, and we’ll be there to support you every step of the way!

Data Access and User Permission Management in Experience Cloud Sites

As organizations continue to adopt Salesforce's Experience Cloud, it becomes increasingly important to understand the various tools and techniques available for managing user permissions and data access within the platform. In this article, we will explore the concepts of permission sets and profiles, and provide you with best practices for securing your site and managing data access.
Post image

FAQs

  1. How do I know if Salesforce multi factor authentication is enabled? What Salesforce MFA settings do I need to configure? Navigate to the Setup menu and enter “Identity” in the Quick Find search box. Then, choose the option for “Identity Verification.” Ensure that the “Require multi-factor authentication (MFA) for all direct UI logins to your Salesforce org” checkbox is selected.
  2. How do I enable a multi-step login process for a specific user in Salesforce? Do it by assigning them a user permission. Select the appropriate custom user profile or permission set. Assign the “Multi-Factor Authentication for User Interface Logins” permission to the profile or permission set.
  3. Do all users need multi-factor authentication for Salesforce? Absolutely! Starting from February 1, 2022, Salesforce customers are contractually obligated to use a multi-step login process for accessing Salesforce products. This requirement applies to all internal users, including those accessing Salesforce products through the user interface, including partner solutions. Make sure a multi-step login mechanism is employed for every login to ensure compliance with these contractual obligations.

Subscribe to our Newsletter

Receive regular updates on our latest blog posts, news, and exclusive content!

    AC Knowledge Management Enterprise Product Sheet

    Download the fact sheet now to explore:
    • Key features – See how AC Knowledge Management Enterprise empowers your support team.
    • Benefits – Understand the value it brings to your customers.
    • Real results – See the impact AC Knowledge Management Enterprise can have on your organization.


    Complete the form to get your free copy.


    By submitting this form, you agree to occasionally receive guides, tips, and tricks from AC. You can unsubscribe at any time.  


    AC Ideas Ultimate Product Sheet

    Download the fact sheet now to explore how AC Ideas Ultimate helps you:
    • Capture – Easily collect ideas from customers, team members, and stakeholders.
    • Evaluate – Use built-in tools to score, prioritize, and review ideas based on custom criteria.
    • Implement – Track progress, convert cases into ideas, and turn the best ideas into actionable projects.


    Complete the form to get your free copy.


    By submitting this form, you agree to occasionally receive guides, tips, and tricks from AC. You can unsubscribe at any time.  


    AC MemberSmart Product Sheet

    Download the fact sheet now to explore:
    • Key features – See how AC MemberSmart empowers your team.
    • Benefits – Understand the value it brings to your members.
    • Real results – See the impact AC MemberSmart can have on your organization.


    Complete the form to get your free copy.


    By submitting this form, you agree to occasionally receive guides, tips, and tricks from AC. You can unsubscribe at any time.  


    AC Events Enterprise Product Sheet

    Download the fact sheet now to explore:
    • Key features – Learn how AC Events Enterprise automates registration, marketing, and analytics.
    • Benefits – Learn how it improves attendee satisfaction and helps your event shine.
    • Proven results – See how the app transforms your event outcomes.
     

    Complete the form to get your free copy.


    By submitting this form, you agree to occasionally receive guides, tips, and tricks from AC. You can unsubscribe at any time.  


    WEBINAR

    UNLOCKING MEMBERSHIP SUCCESS
    WITH SALESFORCE
    Strategies from the experts

    Thursday , Sep 12, 2024 at 04:00 PM GMT
    Location: Zoom