How Using Agentforce for PRM is a Winning Combination for Your Business 

The rules of partner engagement have changed. Static portals and infrequent emails are no longer enough to keep partners (and potential leads) informed, motivated, and productive. That’s where Agentforce comes in, offering a dynamic solution for modern Partner Relationship Management (PRM). 

This article explores how this powerful technology can help you cultivate stronger partner relationships, enhance communication, and drive greater business success.

Why Use Agentforce for PRM?

Real-time communication and personalized engagement are no longer optional for organizations—they’re essential. For PRM, this means moving beyond stale communities and generic emails to create dynamic, interactive experiences. 

Agentforce empowers you to take a proactive approach to partner management, anticipate partner needs, and provide timely, much-needed support. This translates to stronger partner relationships, increased engagement, and ultimately, long-term results and a significant boost in channel sales.

PRM Playbook – Now Available!

Introducing our free to download PRM Playbook. Featuring insights from Salesforce, Canalys, Matillion, She Sells and Advanced Communities, this playbook is the ideal introduction to partner relationship management (PRM) and the partner portal.

Download Now

5 Key Use Cases for Leveraging Agentforce in PRM 

The power of Agentforce lies in its flexibility. Here are some common examples of how you can leverage it for partner relationship management. It all depends on how you configure your agent: provide it with all the necessary information, certain “tasks”, and specific instructions. 

1. Streamlined Partner Registration and Personalized Onboarding

Engage potential vendors or website visitors interested in becoming partners from the moment they express interest. Instead of making them wait for a sales representative, you can provide instant answers to their questions and guide them through the registration process.

For instance, there is a company that wants to join your partner community and they navigate your website. You can add a knowledge base section to your Agentforce assistant so that the company finds the answers faster.

V: We would like to become partners with your company. What are the requirements?

Thanks to its in-depth natural language processing, Agentforce analyzes the query, locates a related knowledge base on how to become a partner with [the company], and answers:

Agentforce:You can check out the relevant information in this article [link]. To proceed, there is also an opportunity to talk to one of our managers. Would you mind leaving your contact details so that a manager can get back to you ASAP?”. If a person/company clicks “Yes”, a form appears and they need to specify:

  • Full name
  • Business email
  • Company name

Once a new company registers its interest, an agent will create a partner lead record in your Salesforce org, send recommended materials & legal paperwork, and create a task for the channel manager. 

Furthermore, instead of overwhelming new partners with generic materials, Agentforce can deliver tailored onboarding content based on their specific needs and tier, accelerating their ramp-up time. 

2. Partner Self-Service 

Agentforce can significantly improve partner satisfaction by providing seamless self-service options. Imagine a partner is working on a deal for a new product and needs quick access to sales enablement resources. They approach you through a partner community and interact with an Agentforce-powered assistant: 

P: “I communicate with a prospect who shows interest in [the product]. What resources can help me close this deal?”

After that, the Agentforce assistant accesses your dedicated Salesforce library of materials and provides recommendations:

Agentforce: Great! There are following assets tailored for [the product]: a concise one-pager, a detailed deck, a recent webinar recording, a success story showcasing its impact.”

This instant access to relevant, product-specific materials empowers partners to quickly find the tools they need, accelerating the sales cycle and increasing their effectiveness.

3. Partner Summary for Channel Managers

Suppose you are a channel manager who would like to get a complete summary of your partner’s status. For that, you can turn to Agentforce (which should be programmed to process such tasks beforehand):

CM: “Please provide the status of [partner] or the level of their engagement”

Agentforce: “[Partner] is registered on August 17 2024 with [their partner tier, for instance Gold, Silver, or Bronze], has closed 2 deals, last time visited the partner portal on February 1, 2025, has attended 3 webinars, their level of engagement – 48%”.  

This is how we programmed Agentforce for a summary and the results we got:

member summary

4. Certification Programs for Partners 

Teach your Agentforce to assist partners in structuring their learning materials for certification available at your company, receiving up-to-date information about the certification process, and accessing their knowledge.

P: “I am getting certified in [the name of the certification or the product] and forgot the deadline for the exam. Please remind me of the date of my certification exam.”

Agentforce: “Sure. Here is the date of your certification exam – May 15th, 2025. Would you like to receive additional info?”.

P: “I have questions concerning the [topic]. Can you connect me with a dedicated subject matter expert to help clarify it?”

Agentforce: “Absolutely. You can reach out to [an SME]. Their contact details are [phone, email]. It’s also possible to arrange a video call. Anything else I could help you with?”

P: “Yes. Are there any community forums I might join to debate the certification program?”

Agentforce: “As a matter of fact, there are. Here are the links to forums in your partner community so that you can join, share tips, get, or offer support.”

5. Deal Summary and Guidance

Similar to a partner engagement summary, Agentforce can provide deal summaries, track engagement and even suggest next steps, such as sending relevant case studies or marketing assets to prospective clients. This benefits both partners and channel managers.

Final Thoughts

Leveraging Agentforce for PRM can provide significant improvements to partner registration, onboarding, and self-service. External agents can guide partners through the processes of different complexity and internally they can assist channel managers to ensure partner success, quicker sales process, and higher closing rate. 

Need further assistance with Salesforce Experience Cloud? Advanced Communities is the best solution. As we’re the experts in all things Salesforce and help global businesses implement user-friendly PRM portals, we’ll make sure your partner relationship management brings real value. Reach out to us for details.

Subscribe to Our Newsletter

Receive regular updates on our latest blog posts, news, and exclusive content!

    Beyond Membership Dues: A Roadmap to Financial Growth [Infographic]

    Looking for ways to boost your association’s financial situation? We at Advanced Communities know how to change the situation for the better!

    We’re excited to share our latest infographic, “Beyond Membership Dues: A Roadmap to Financial Growth.” As we understand the challenges associations like yours might face, we’ve designed this infographic to provide clear, actionable solutions. This visual guide offers practical strategies for diversifying your revenue beyond just membership dues.

    Inside, you’ll find a wealth of information, including a breakdown of the top seven non-dues revenue streams that are working for associations right now. Moreover, you’ll find the Non-Dues Revenue Pyramid, a strategic framework to help you build a solid financial foundation and explore new income opportunities.

    Find out how platforms like Salesforce and AC MemberSmart – a 100% native-to-Salesforce solution – can empower your association to achieve sustainable growth.

    Alternative Sources of Revenue for Associations Ebook – Now Available!

    There are so many opportunities for you to generate more income through various sources. Check our exclusive ebook for more practical strategies and start transforming your revenue strategy today!

    Download ebook

    Increasing Engagement through Gamification in Salesforce Experience Cloud

    More often than not Experience Cloud users are struggling to stay engaged. If you can relate to the situation and would like to motivate users to fully utilize the platform’s features, gamification customer engagement best practices are a compelling solution.

    By incorporating game mechanics and reward systems, you can create a more dynamic and motivating environment that drives user participation and delivers measurable improvements in customer experience.

    This article will guide you through setting up gamification in your Experience Cloud, showing you how to turn user apathy into enthusiastic involvement.

    What is Gamification?

    Gamification refers to the strategic application of the game design elements and principles to non-game contexts. Moreover, it is more than just adding a layer of fun. It’s a powerful tool for driving user engagement, motivating users, achieving specific business objectives, and building brand loyalty.

    Plus, implementing gamification can transform user interaction with your website, mobile app, or service. Try incorporating gamified elements like points, badges, leaderboards, progress bar, and challenges.

    The core principle is simple: Users are rewarded for completing desired actions, fostering a sense of accomplishment and encouraging continued participation.

    Leveraging Gamification for Customer Engagement: Common Benefits

    Does gamification increase engagement? It sure does! When implemented the right way, a gamification strategy can deliver a range of impressive benefits. Let’s explore some key ones:

    • Boost customer retention: what usually keeps you coming back to a website or online community? Often, it’s engaging content and a sense of fun. Gamification elements tap into this psychology, motivate users to return, and interact with others or within the community more frequently. By incorporating game elements like badges, progress bar, and points, you create a dynamic environment that encourages repeat visits and deeper user engagement.
    • Elevate user satisfaction: let’s face it, nobody enjoys slogging through text-heavy content. Gamification injects a dose of fun and interactivity into the user journey. Even if a user just sees that progress bar going forward, the odds are high that they would be satisfied with the overall process. This playful approach increases enjoyment and satisfaction, leading to a more positive overall impression.
    • Foster collaboration: to encourage users to a friendly competition, you cultivate a stronger sense of belonging. Users are encouraged to contribute their expertise, participate in discussions, and connect with other members. This nurtures a thriving community where everyone benefits.
    • Drive revenue growth: gamification isn’t just about fun and games. It can also have a direct impact on your bottom line. Sales teams can also leverage gamification for their purposes internally across the team. Gamification can improve employee engagement and performance, accelerate deal closures, and attract new customers. By framing sales targets and customer interactions within gamification techniques, you can shape a more engaging and motivating user experience that ultimately drives revenue growth. The key is to tailor the gamification strategy to your specific sales goals and target audience.

    Examples of Salesforce Gamification in Action

    Building a Salesforce gamification strategy might easily throw you off balance. We’ll provide you with some common examples of how you can enhance customer engagement in your Experience Cloud community using game mechanics:

    • Community engagement: to improve user engagement in your Salesforce Experience Cloud community, you can reward users with points or badges for contributing to discussions, creating blog posts/articles, uploading helpful files to the community, sharing best practices, or answering questions in a forum.

      Effective membership management in Salesforce can also be gamified, incentivizing members to renew their memberships, participate in exclusive events, or refer new members through targeted rewards and recognition. Besides, such gamification techniques might also boost employee engagement if you have an internal community and configure gamification for your team;
    • Idea submission and voting: gamify the idea submission process by awarding points for submitting innovative ideas or voting on other users’ suggestions. This can help you surface valuable ideas and drive product development;
    • User adoption & activity: to increase user engagement, reward them for actively engaging with the community, such as logging in regularly, completing profile information, or participating in events. This can increase user adoption and platform usage.

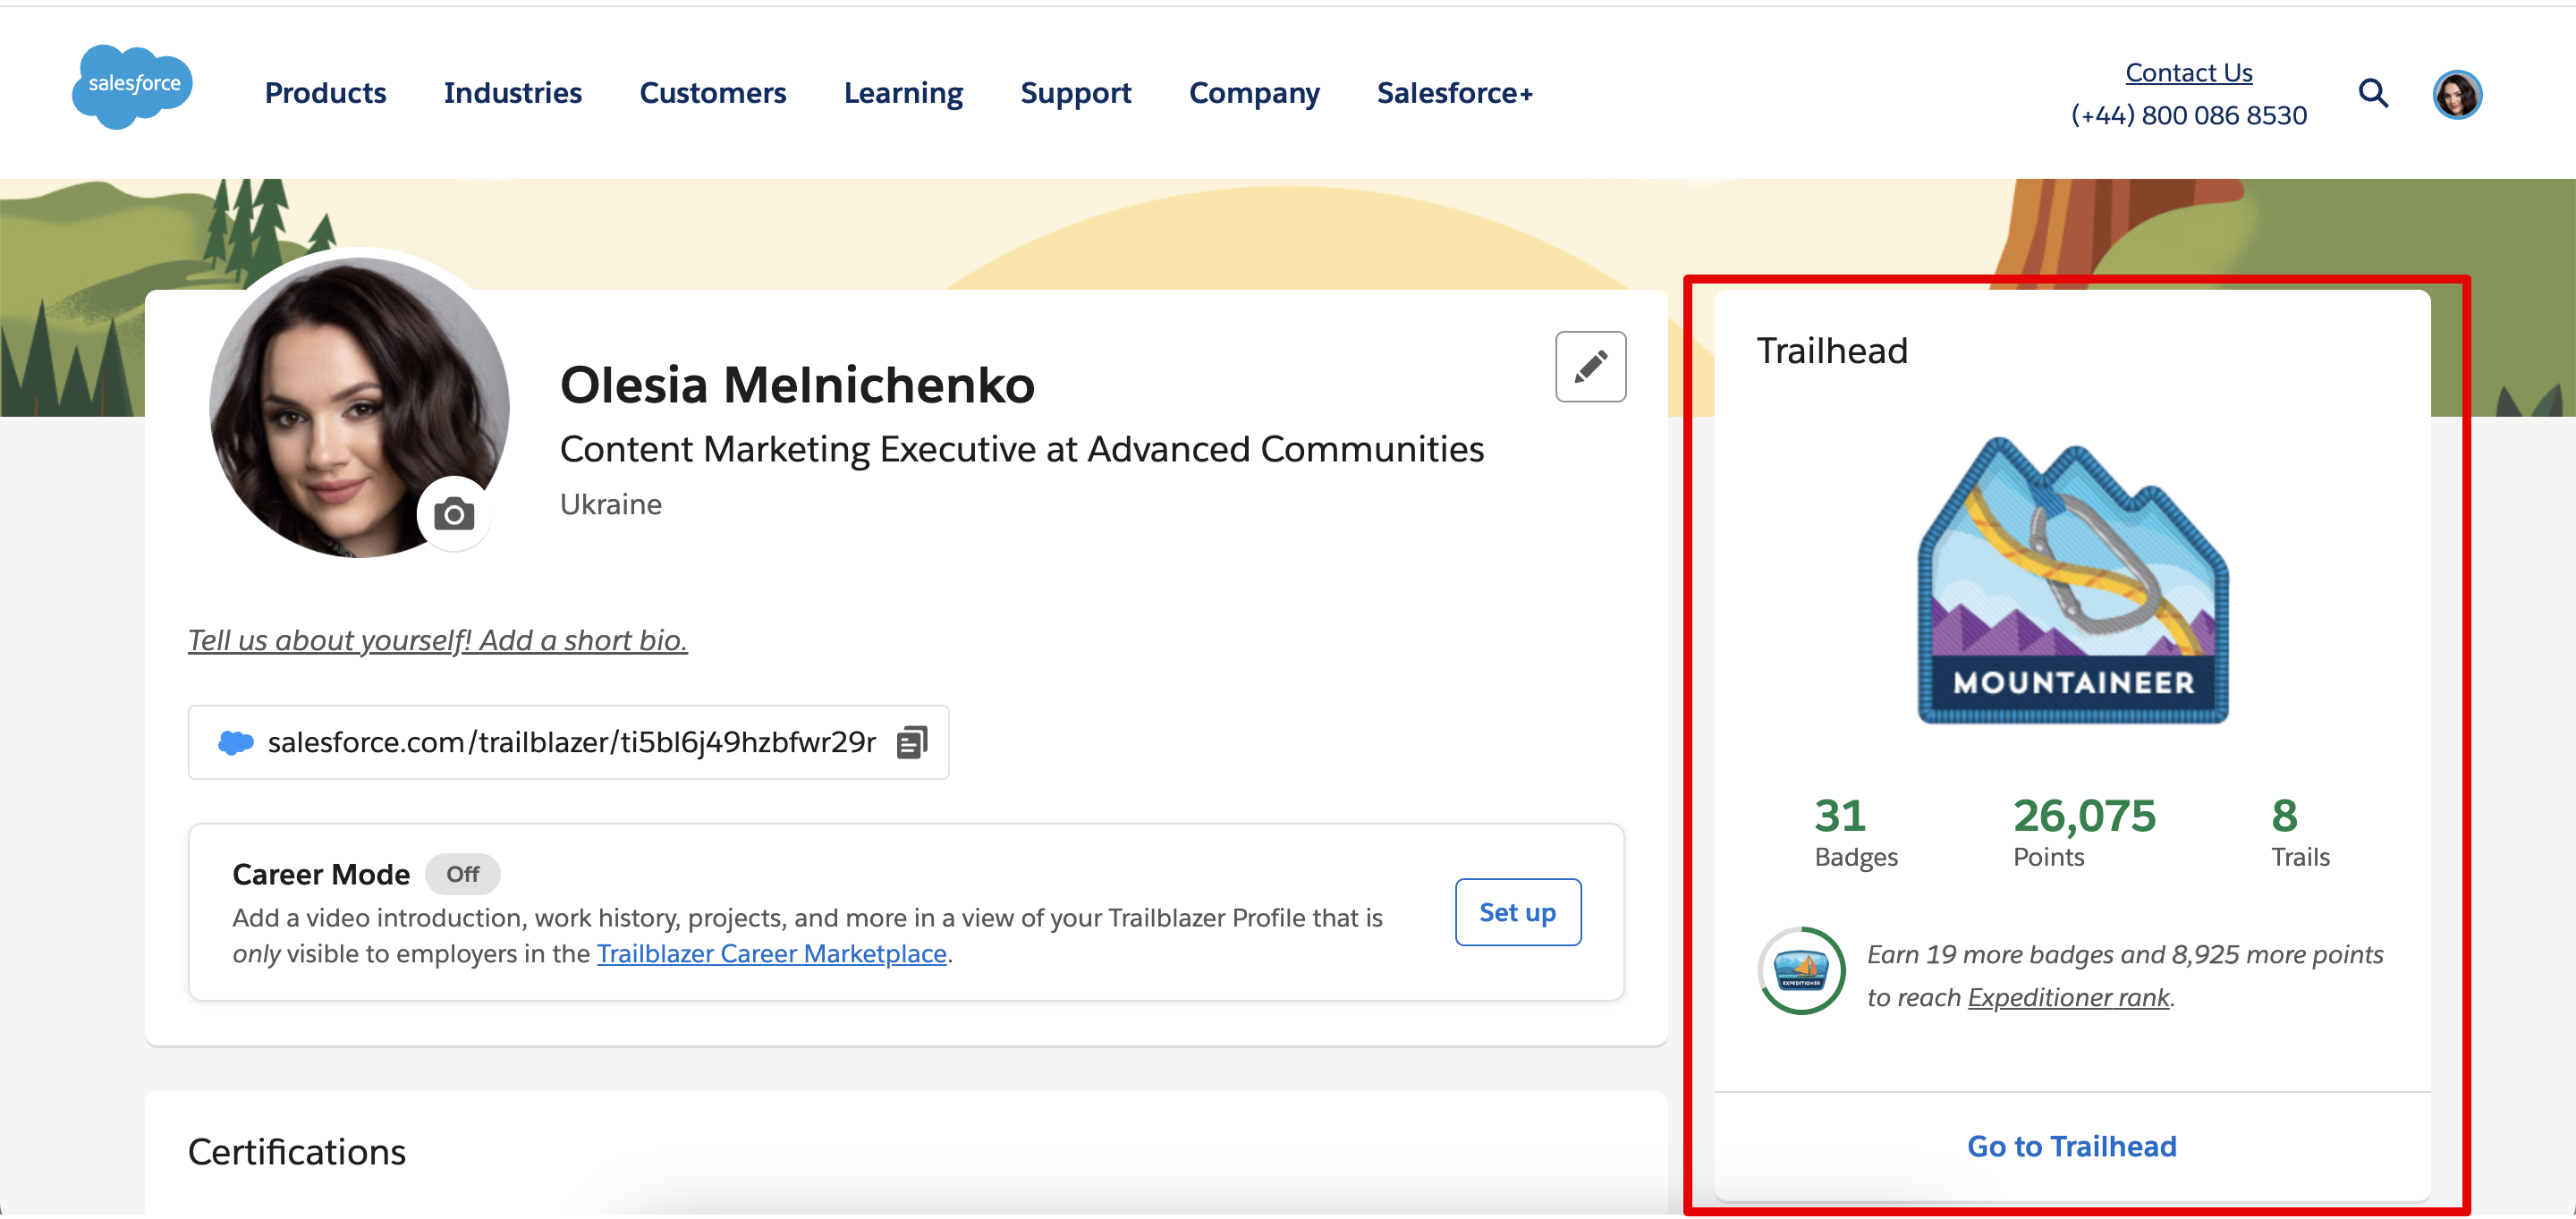
    A prime example of effective gamification is the Salesforce Trailhead platform. Users progress through learning trails and modules, earning badges and points as they acquire new skills.

    This system fosters a sense of achievement and incentivizes users to continue learning and advancing their Salesforce expertise. Even better than loyalty programs. The clear progression and visible rewards (badges, points, ranks) make learning engaging and fun.

    For instance, a user might start as a “Scout” and progress through ranks like “Mountaineer” and “Expeditioner” by accumulating points and badges. These gamification features and a structured approach to learning, combined with the recognition of achievements, make Trailhead a highly effective platform for Salesforce training and adoption. This is what my Trailhead looks like – I have a so-called progress bar (or more of a progress circle with 19 more badges to go).

    Olesia Melnichenko Trailhead account

    Core Components of Gamification in Salesforce Experience Cloud

    Gamification in Salesforce Experience Cloud offers a multifaceted approach to driving user engagement. Three core components form the foundation of a successful gamification strategy are Recognition Badges, Missions, and Reputation Leaderboards (Levels):

    1. Recognition Badges for Celebrating Achievements

    Recognition badges are virtual awards to reward users for achieving specific goals and milestones within the Experience Cloud. They provide positive reinforcement and serve as tangible symbols of accomplishment. Here are some examples of how badges can be used:

    • Community contribution: use these game elements when your members contribute helpful posts, insightful comments, or actively assist their peers. For instance, award a community user with “The Helper” badge for answering 10 questions.
    • Task completion: recognize users for completing specific tasks, such as updating their profile, joining a group, or attending a webinar. Or you can also add a special progress bar so that they track their achievement and milestones as they go.
    • Expertise recognition: showcase expertise in a particular area by awarding badges for sharing knowledge, answering complex questions, or creating valuable content. Let’s say, you created a “Salesforce Guru” badge for providing 20 accepted answers on Salesforce-related topics.
    • Leadership & mentorship: acknowledge users who take on leadership roles, mentor others, or contribute significantly to the community’s growth. For example, “Community Leader” for starting 5 discussions.

    2. Missions for Guiding User Engagement

    With gamification, engagement might come in different flavors. That’s why Salesforce Experience Cloud also provides Missions. They are structured challenges or quests that guide users towards specific actions and reward them with points, badges, and other incentives upon completion. Missions provide a clear path for users to follow and encourage active participation. Such game elements automate the awarding of badges, saving community managers valuable time. Each mission should have a well-defined goal, such as:

    • Content creation: you can develop a “Share your knowledge” mission. A user needs to write a blog post for the community or create a video tutorial.
    • Community interaction: build an “Engage and connect” mission. Encourage users to comment on 5 posts and like 3 others.
    • Problem solving: this one can be a “Helpful hand” mission. A user has to answer 2 questions and have one marked as the best answer.
    • Profile enhancement: A “Get to know you” mission where a user should upload a profile picture and complete their profile information.

    3. Reputation Leaderboards for Healthy Competition

    Leaderboards introduce game elements of healthy competition, recognizing top performers of an Experience Cloud community and building customer loyalty. They display users based on accumulated points, badges, and other relevant metrics (or gamification elements, if you will). This visibility provides a powerful incentive for user engagement and contribution.

    • Tiered recognition: leaderboards can be segmented by reputation levels (e.g., Beginner, Rising Star, Expert) to create a more inclusive and motivating customer experience.
    • Point system: a points system is typically tied to the leaderboard, awarding points for various actions like posting, commenting, answering questions, and receiving “best answer” marks.
    • Influence board: a user’s reputation level is often displayed on their profile in an “Influence Board,” showcasing their standing within the community.

    By combining these three core components – Recognition Badges, Missions, and Reputation Leaderboards – you can create a dynamic and engaging gamification strategy within your Salesforce Experience Cloud, driving user participation, fostering collaboration, and ultimately achieving your business objectives.

    Implementing Gamification in Salesforce Experience Cloud: An Easy Tutorial

    Now that we’ve covered the core components of gamification, let’s walk through the process of setting it up in your Salesforce Experience Cloud. It’s a straightforward process, so follow these simple steps:

    Step 1. Finding Gamification Elements in the Experience Builder

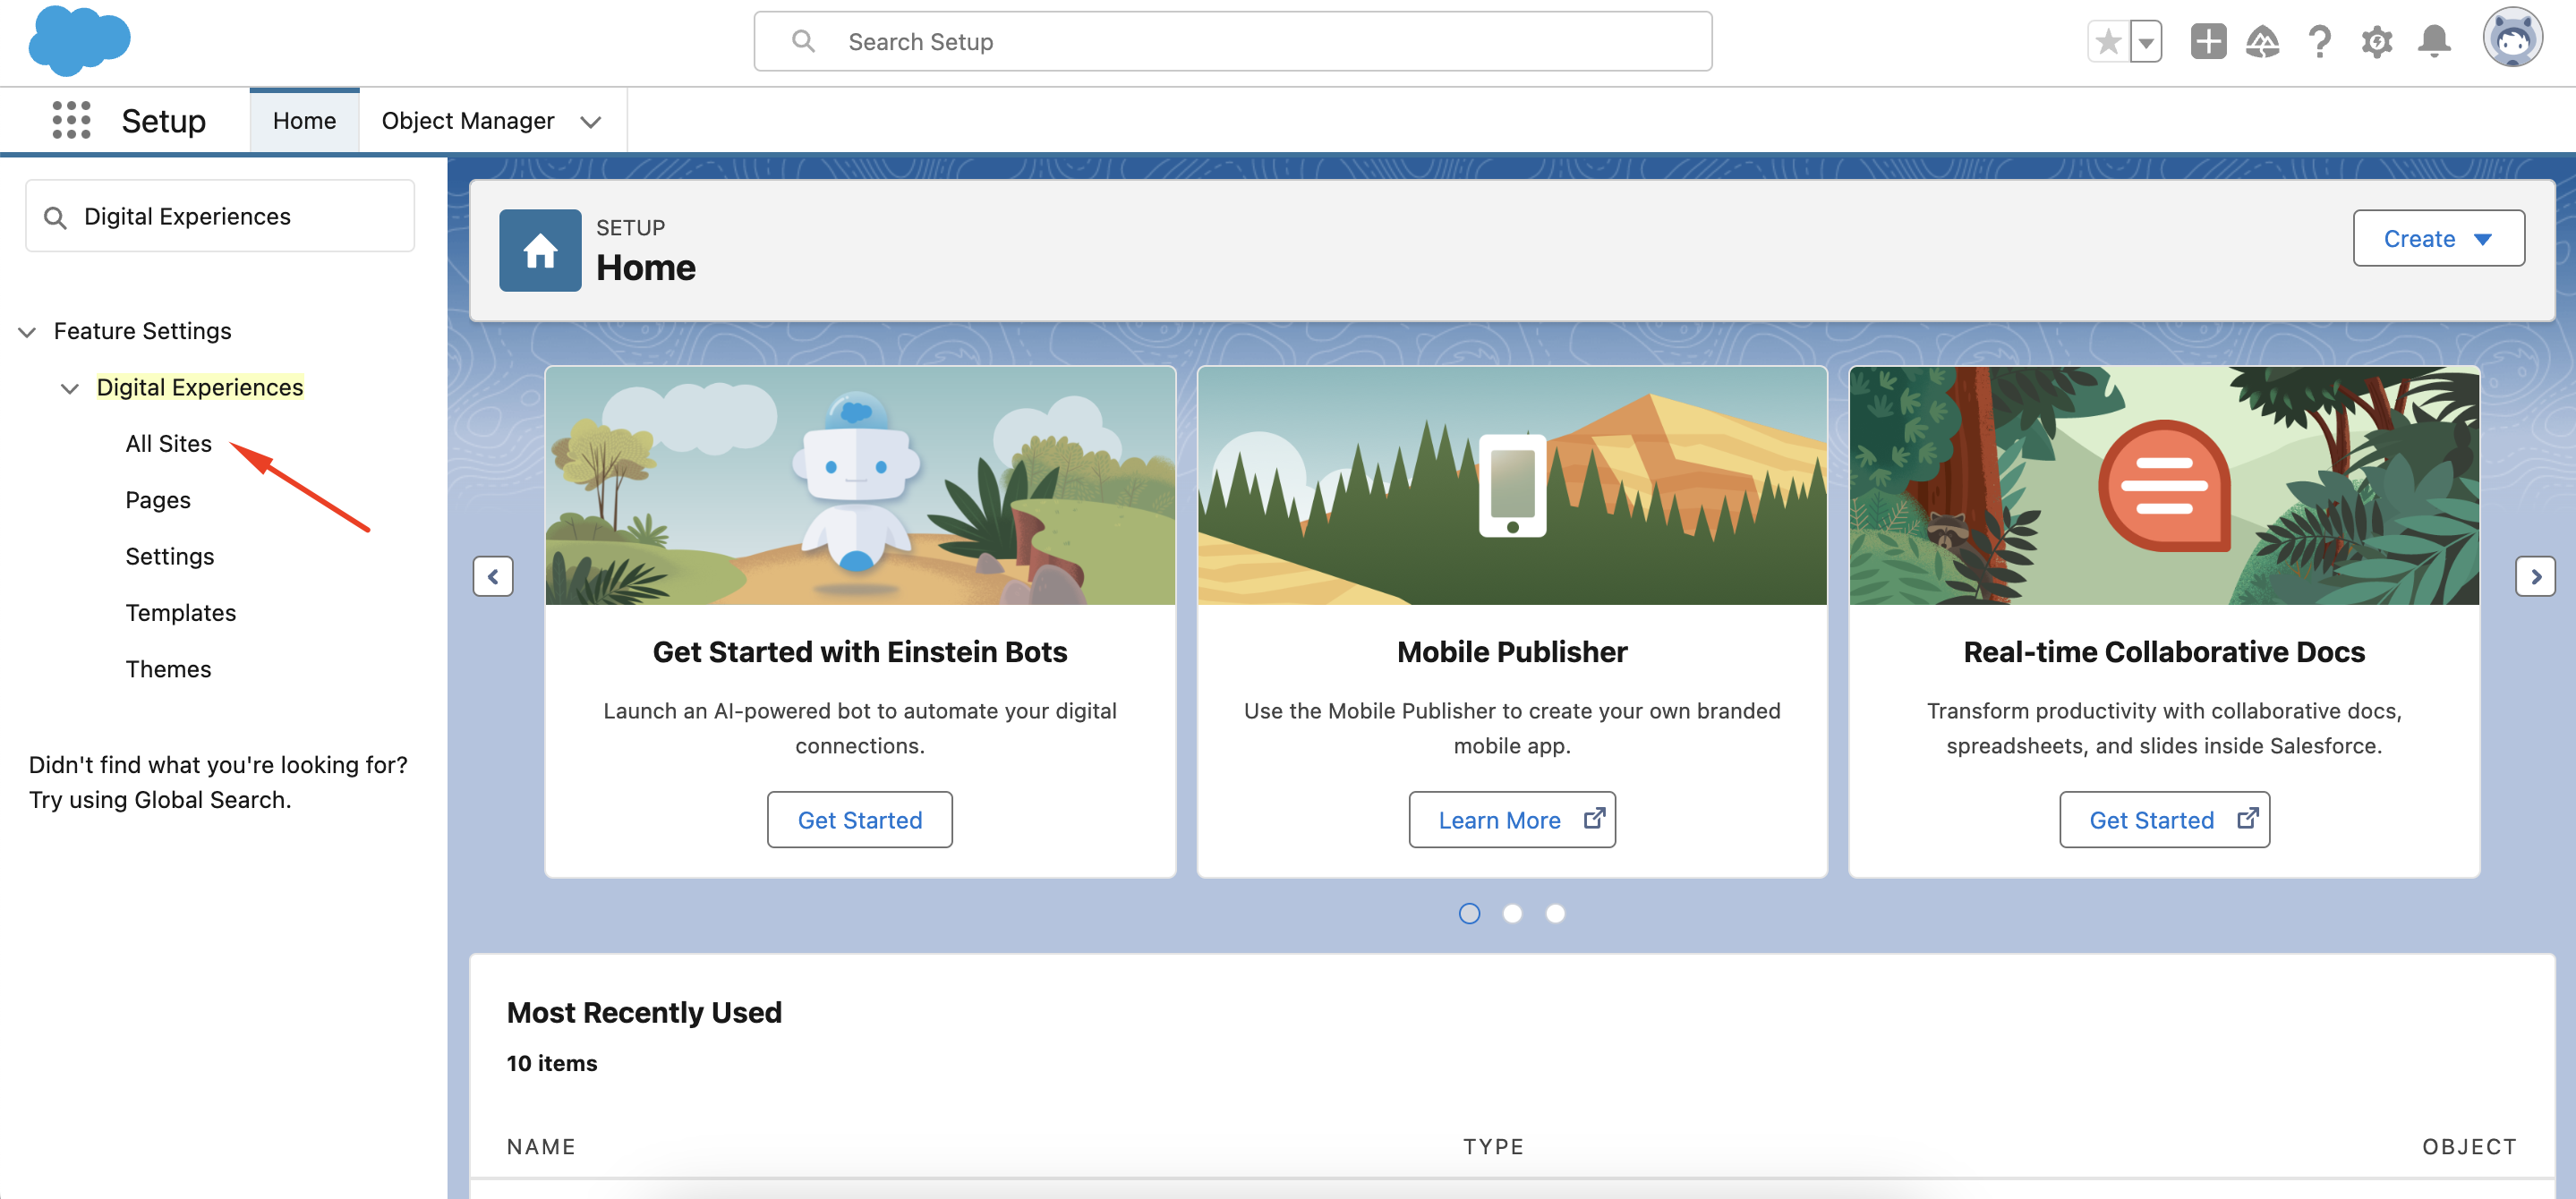
    Log in to your Salesforce organization. In the Quick Find box on the Home tab, type “Digital Experiences” or “All Sites”. After that, select “All Sites” to view a list of your Experience Cloud sites.

    Digital Experience_Gamification

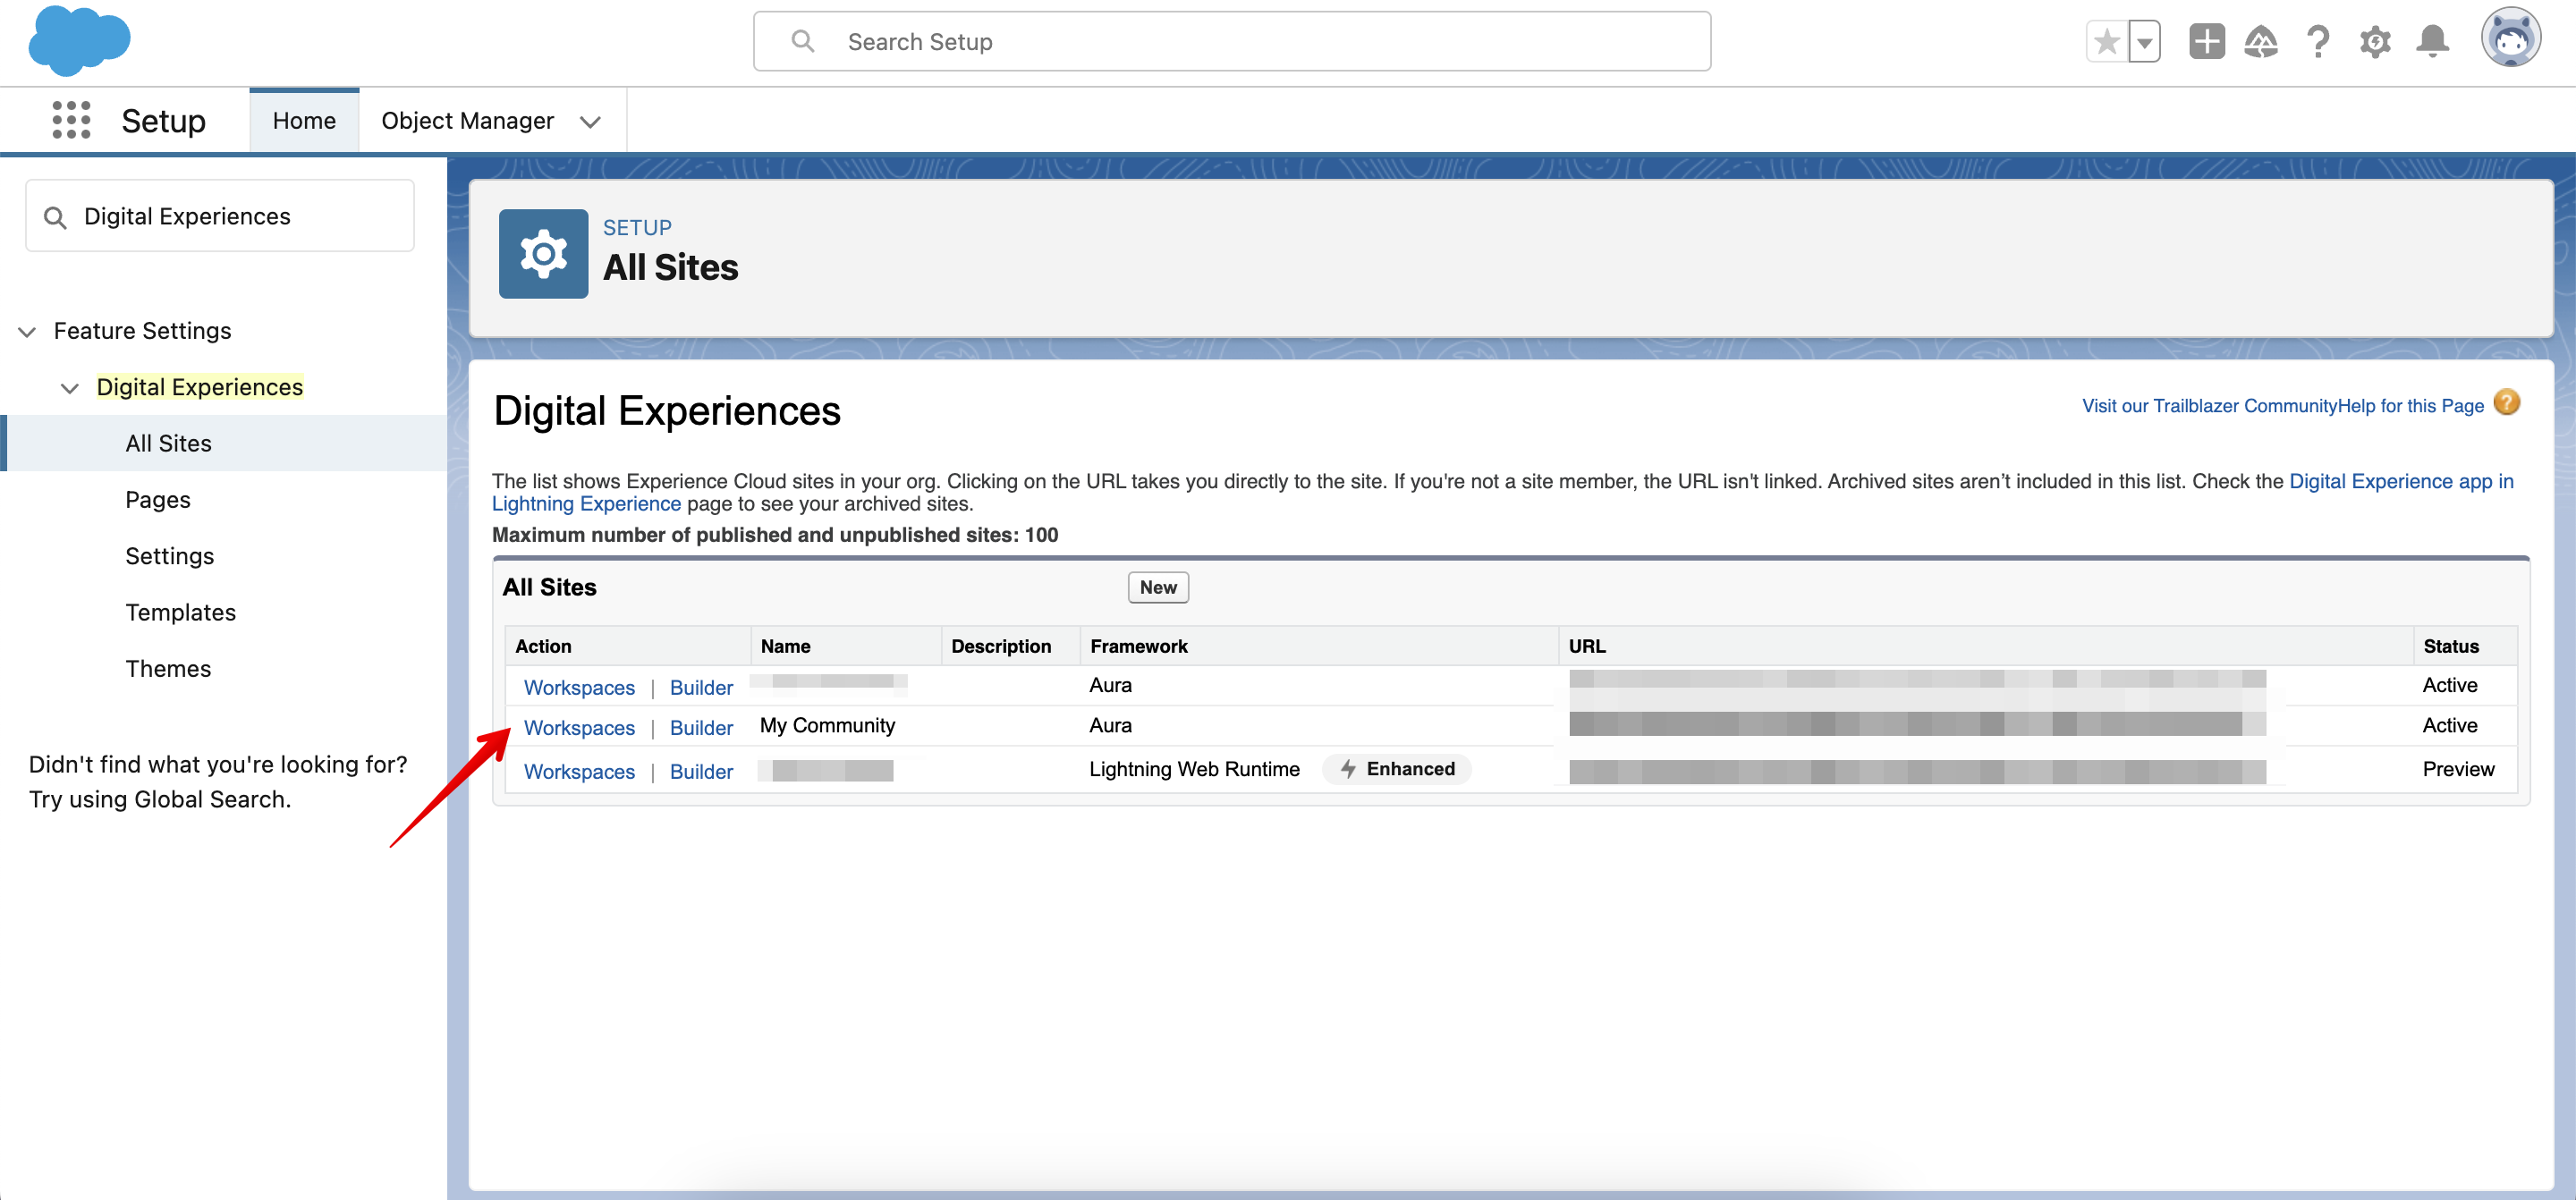
    Once you choose All Sites, you will see the list of all your Experience Cloud sites (aka digital experiences) you’ve ever built. Decide on the Salesforce customer portal you’d like to set up gamification on and locate the Workspaces tab, hit it.

    Gamification_finding workspaces

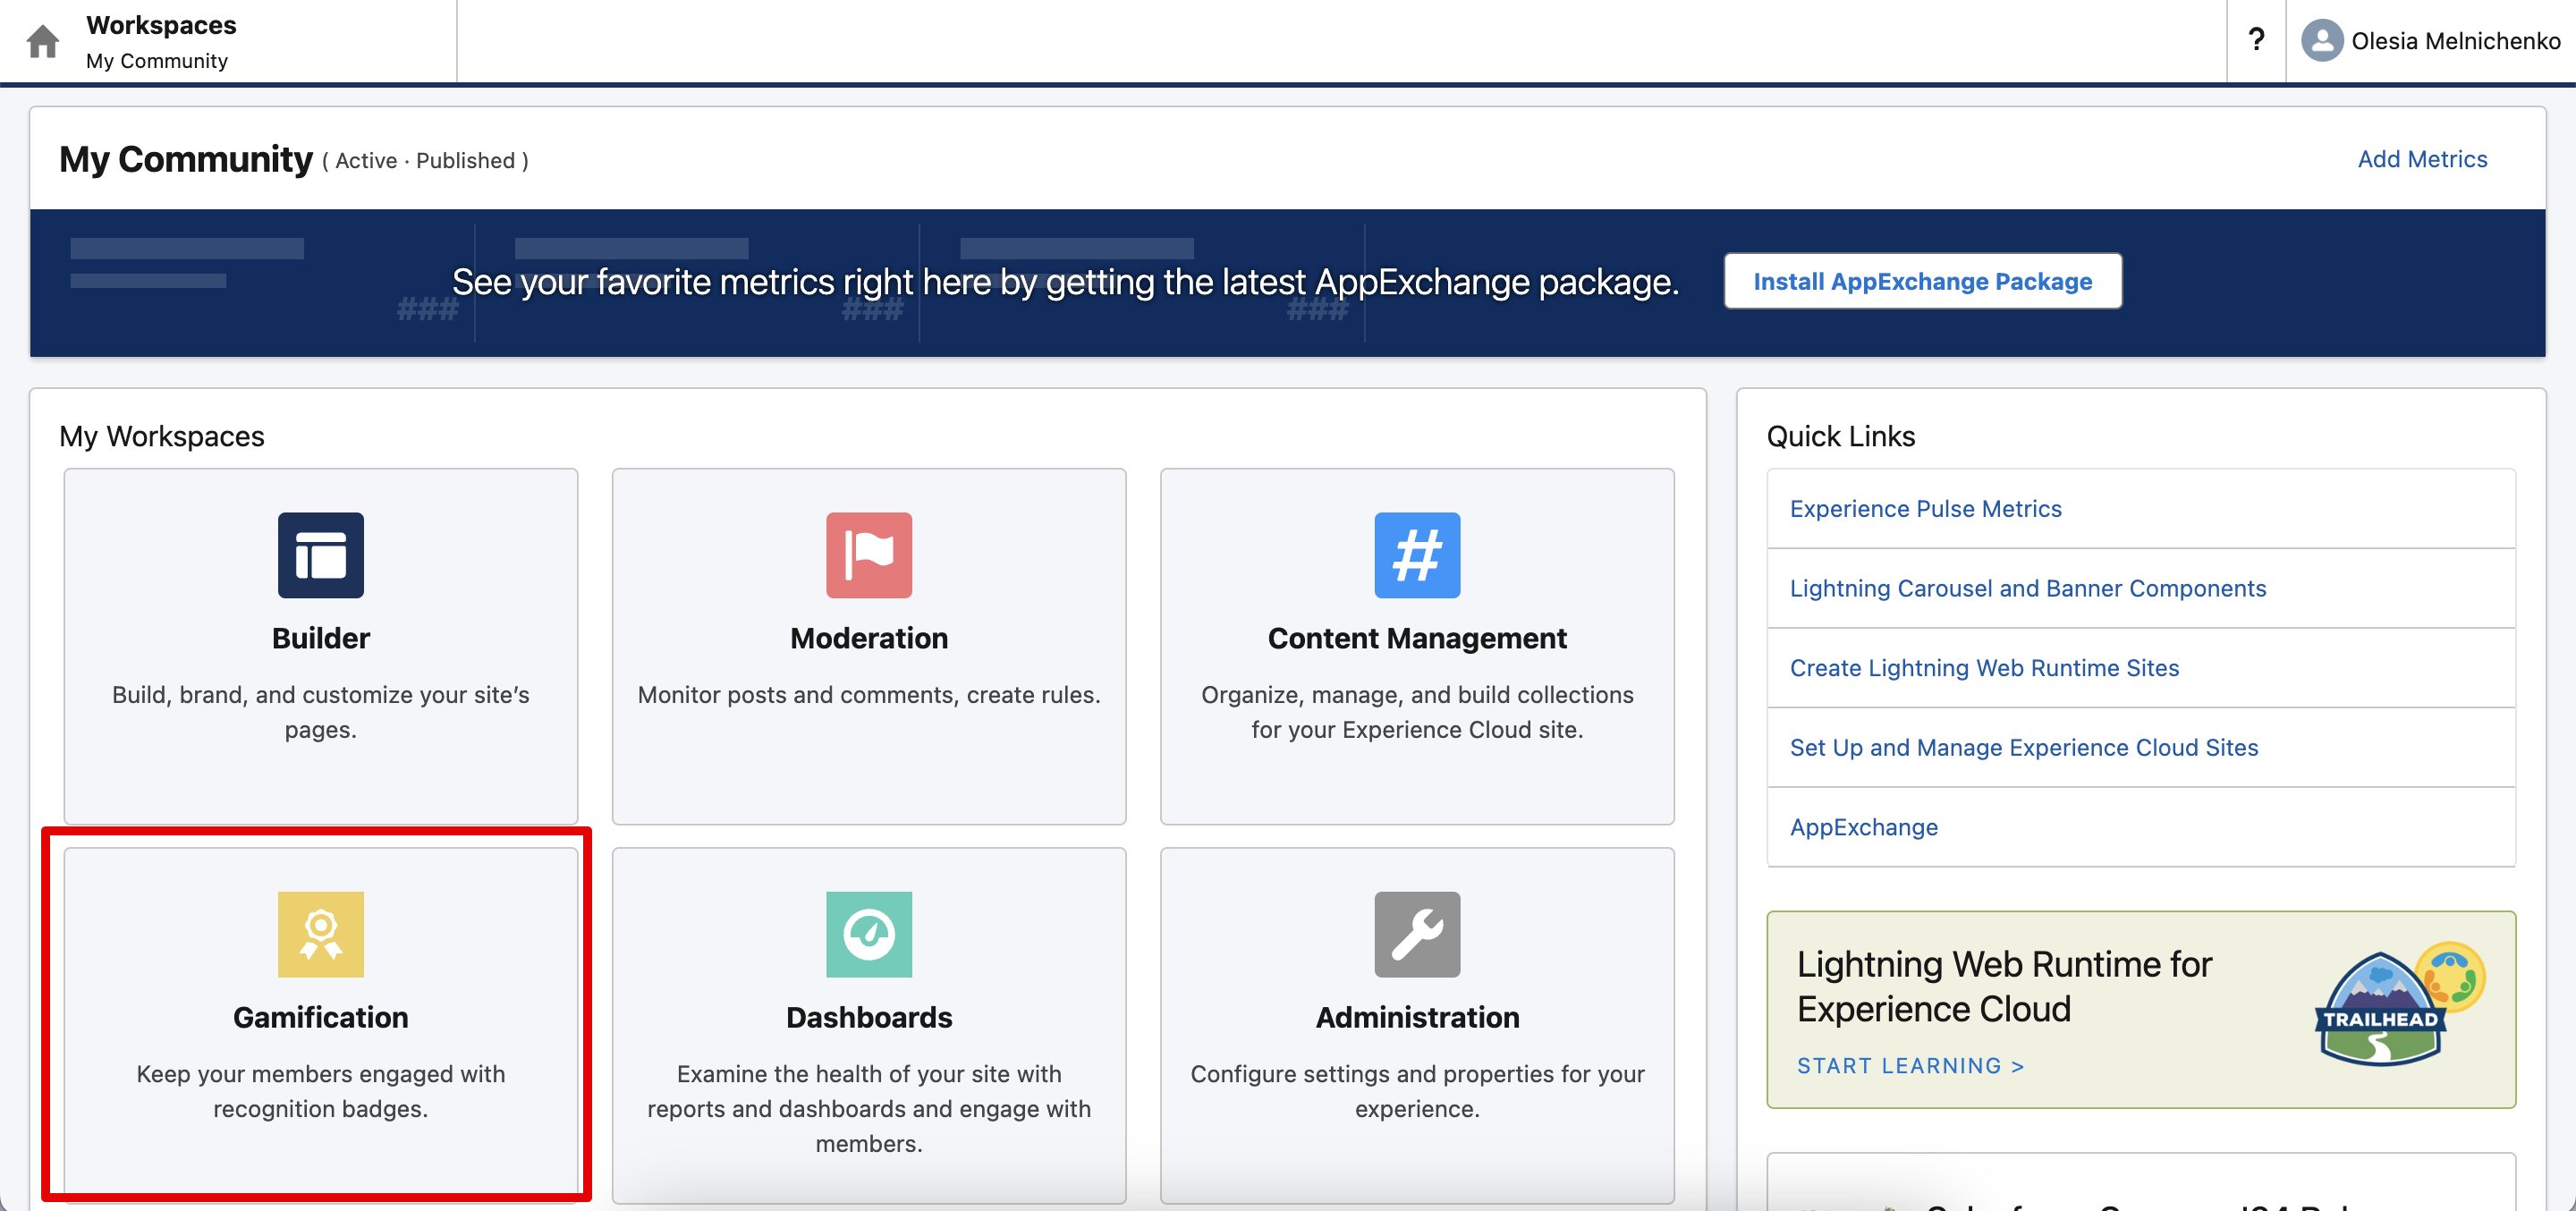
    You’re now inside the Experience Builder for your chosen site. Locate the Gamification tab within the My Workspaces tile to begin configuring your gamification settings.

    Gamification tile

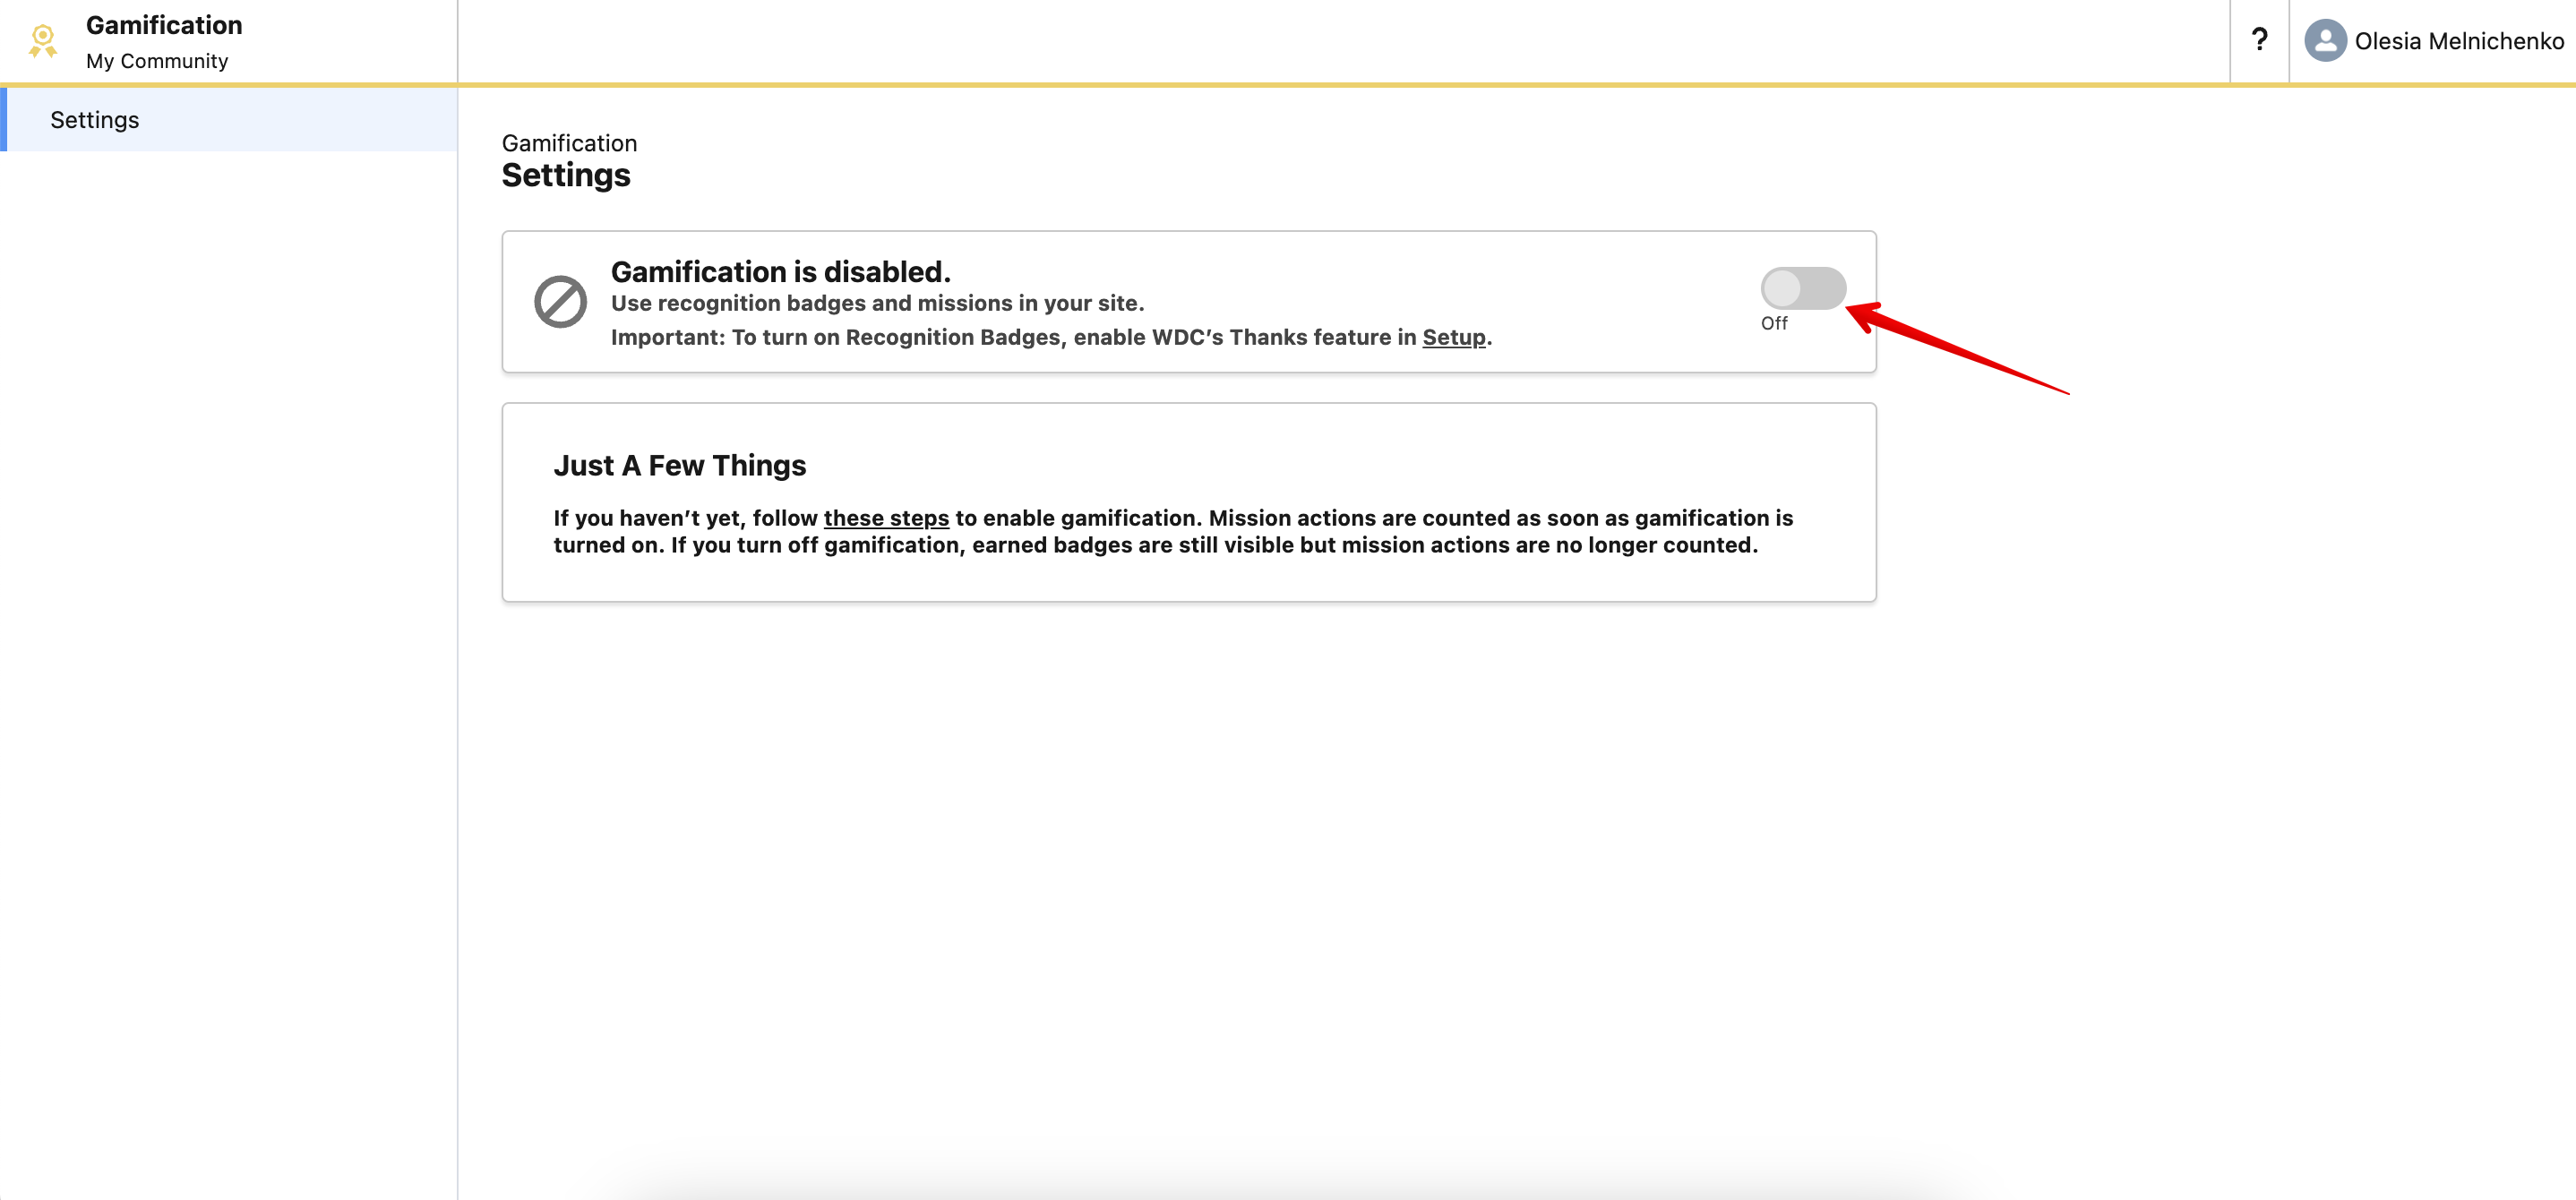
    If gamification hasn’t been activated for your site, you’ll need to enable it before you can start working with Recognition Badges, Missions, and Leaderboards. Let’s proceed with enabling this feature, which we’ll cover in the next step.

    enabling gamification for Experience Cloud

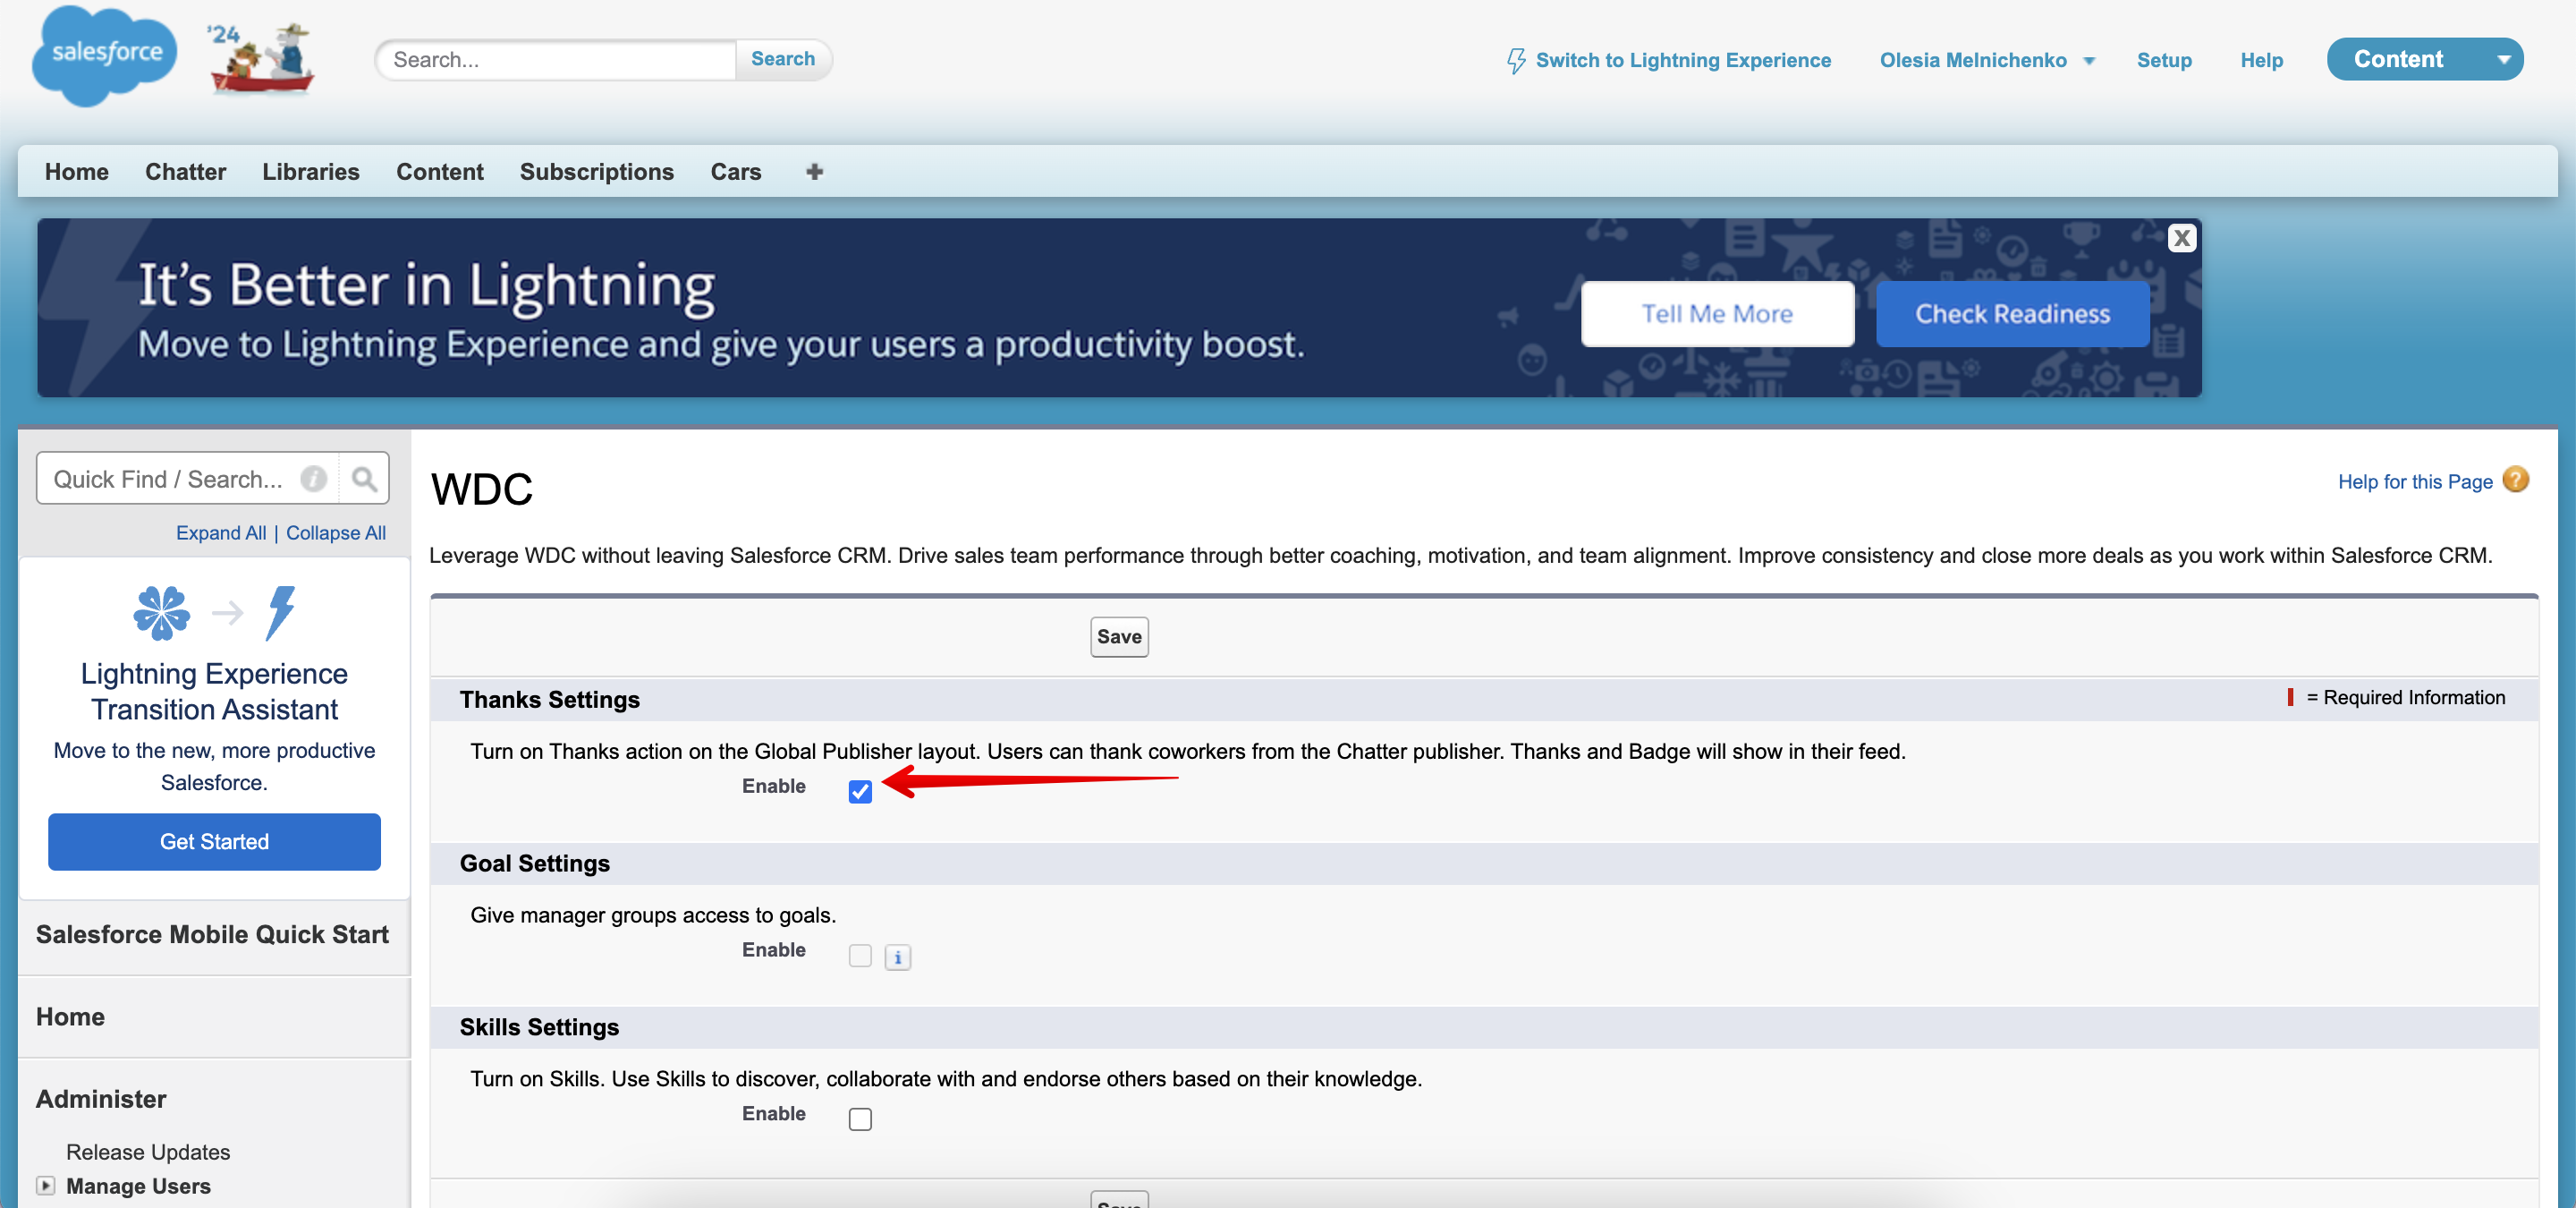
    Step 2. Enabling the Thanks Setting

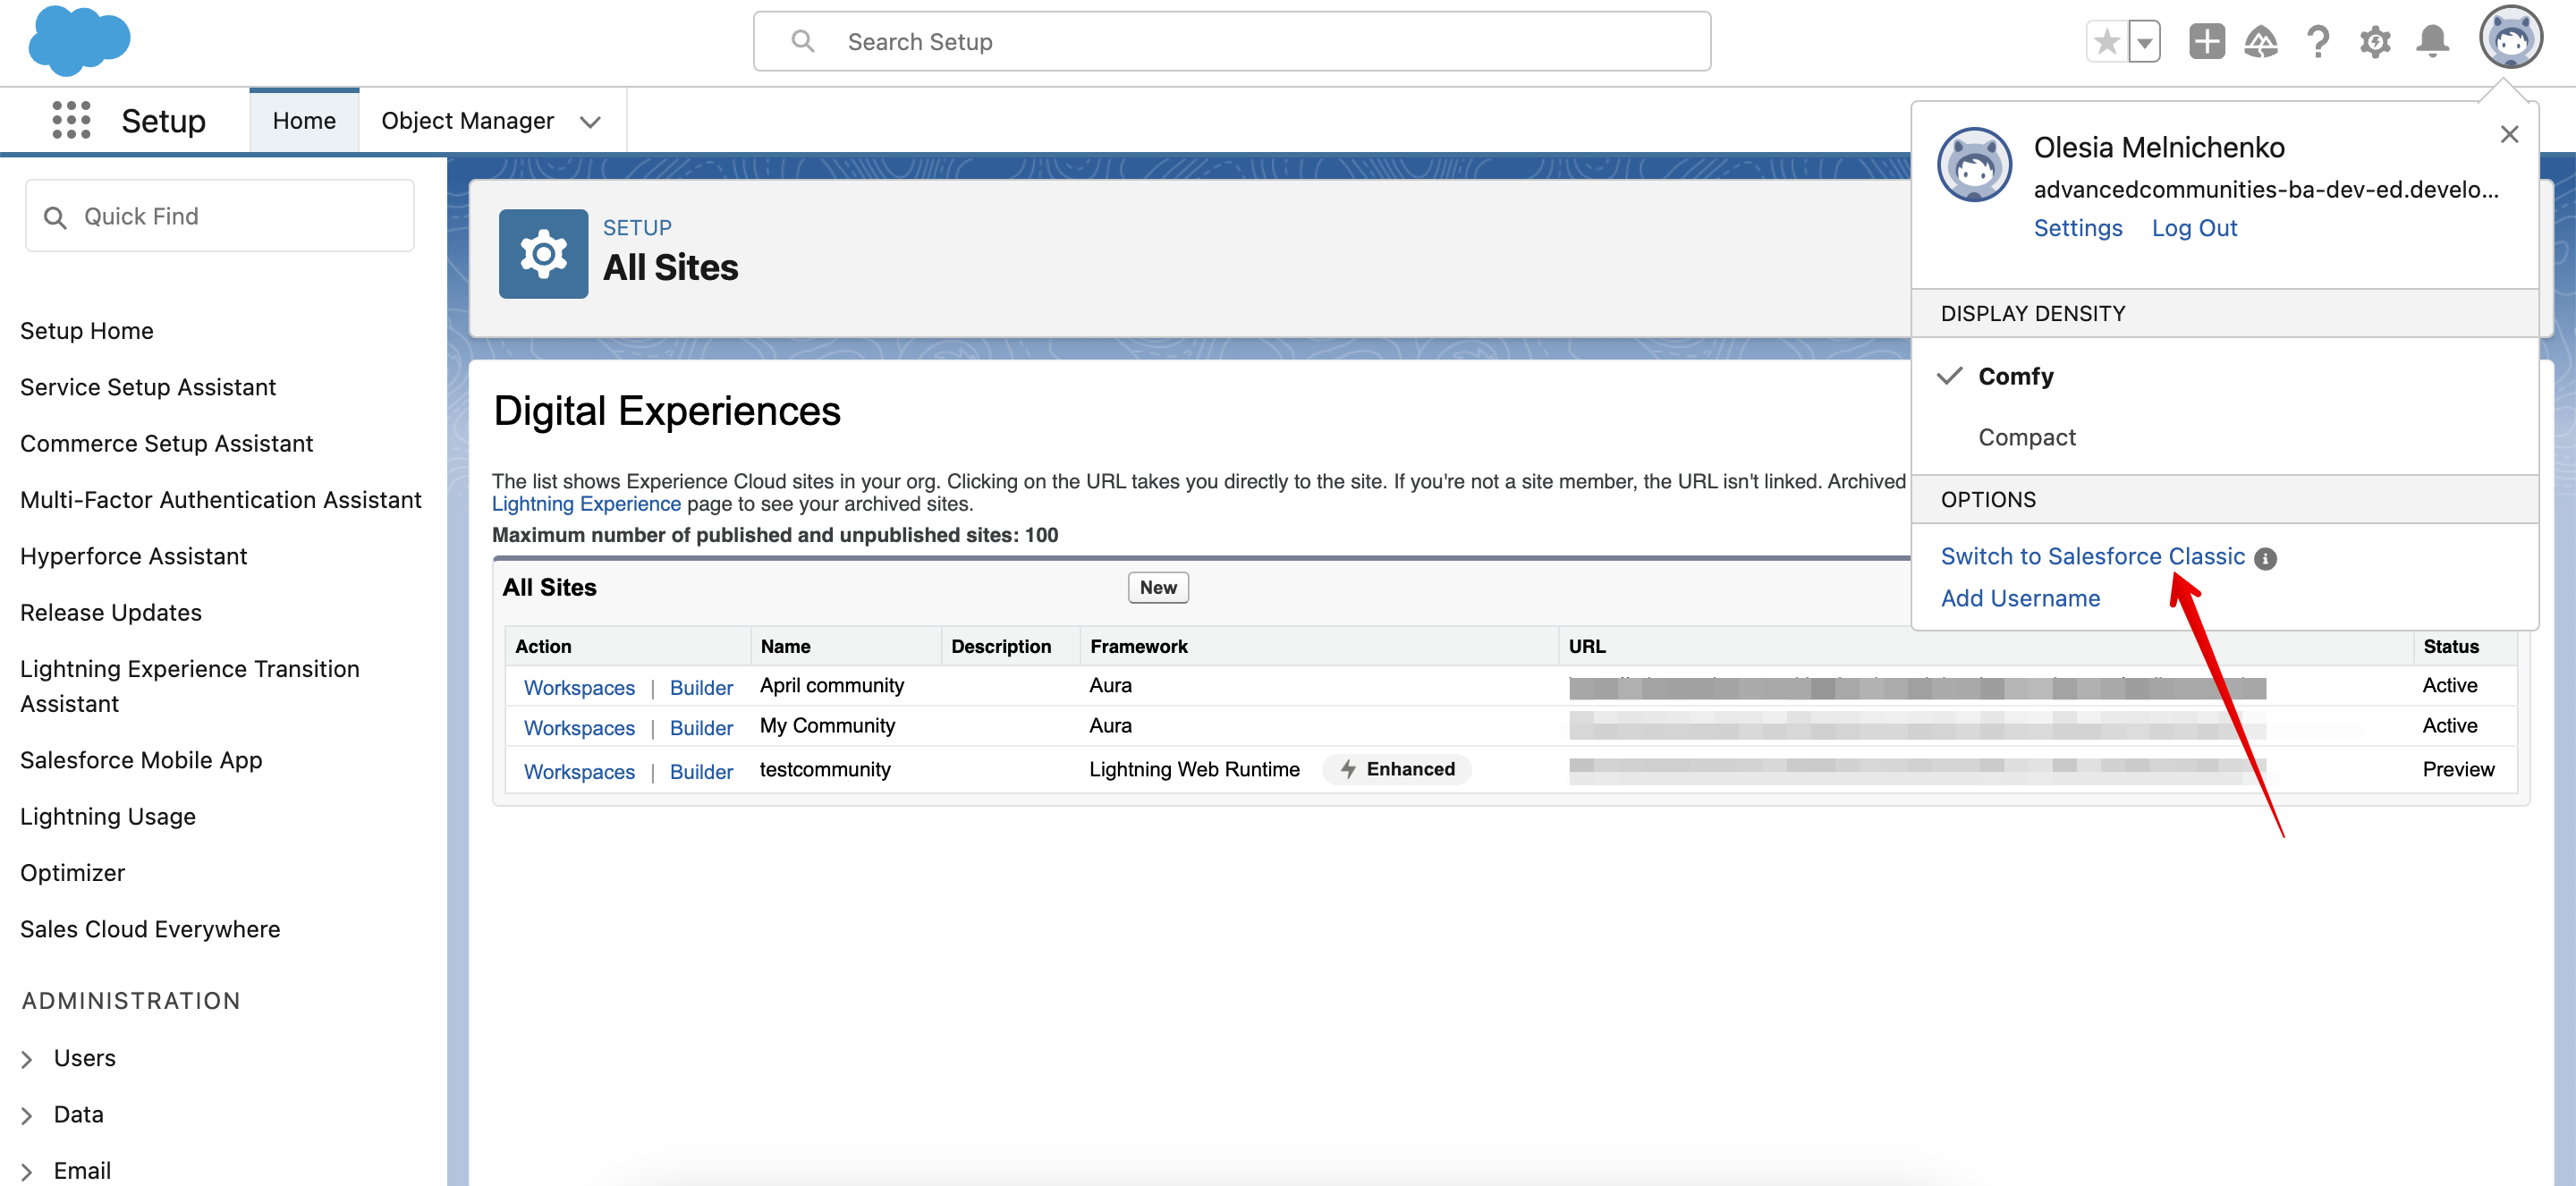
    While you might expect to configure gamification within Lightning Experience, the settings are currently managed in Salesforce Classic. Don’t worry, it’s a quick switch. From your current view (Lightning Experience), navigate to the top right corner of your Salesforce org, click on your profile picture or name, and select Switch to Salesforce Classic. This will take you to the Classic interface where we can enable the necessary settings.

    switch to salesforce classic

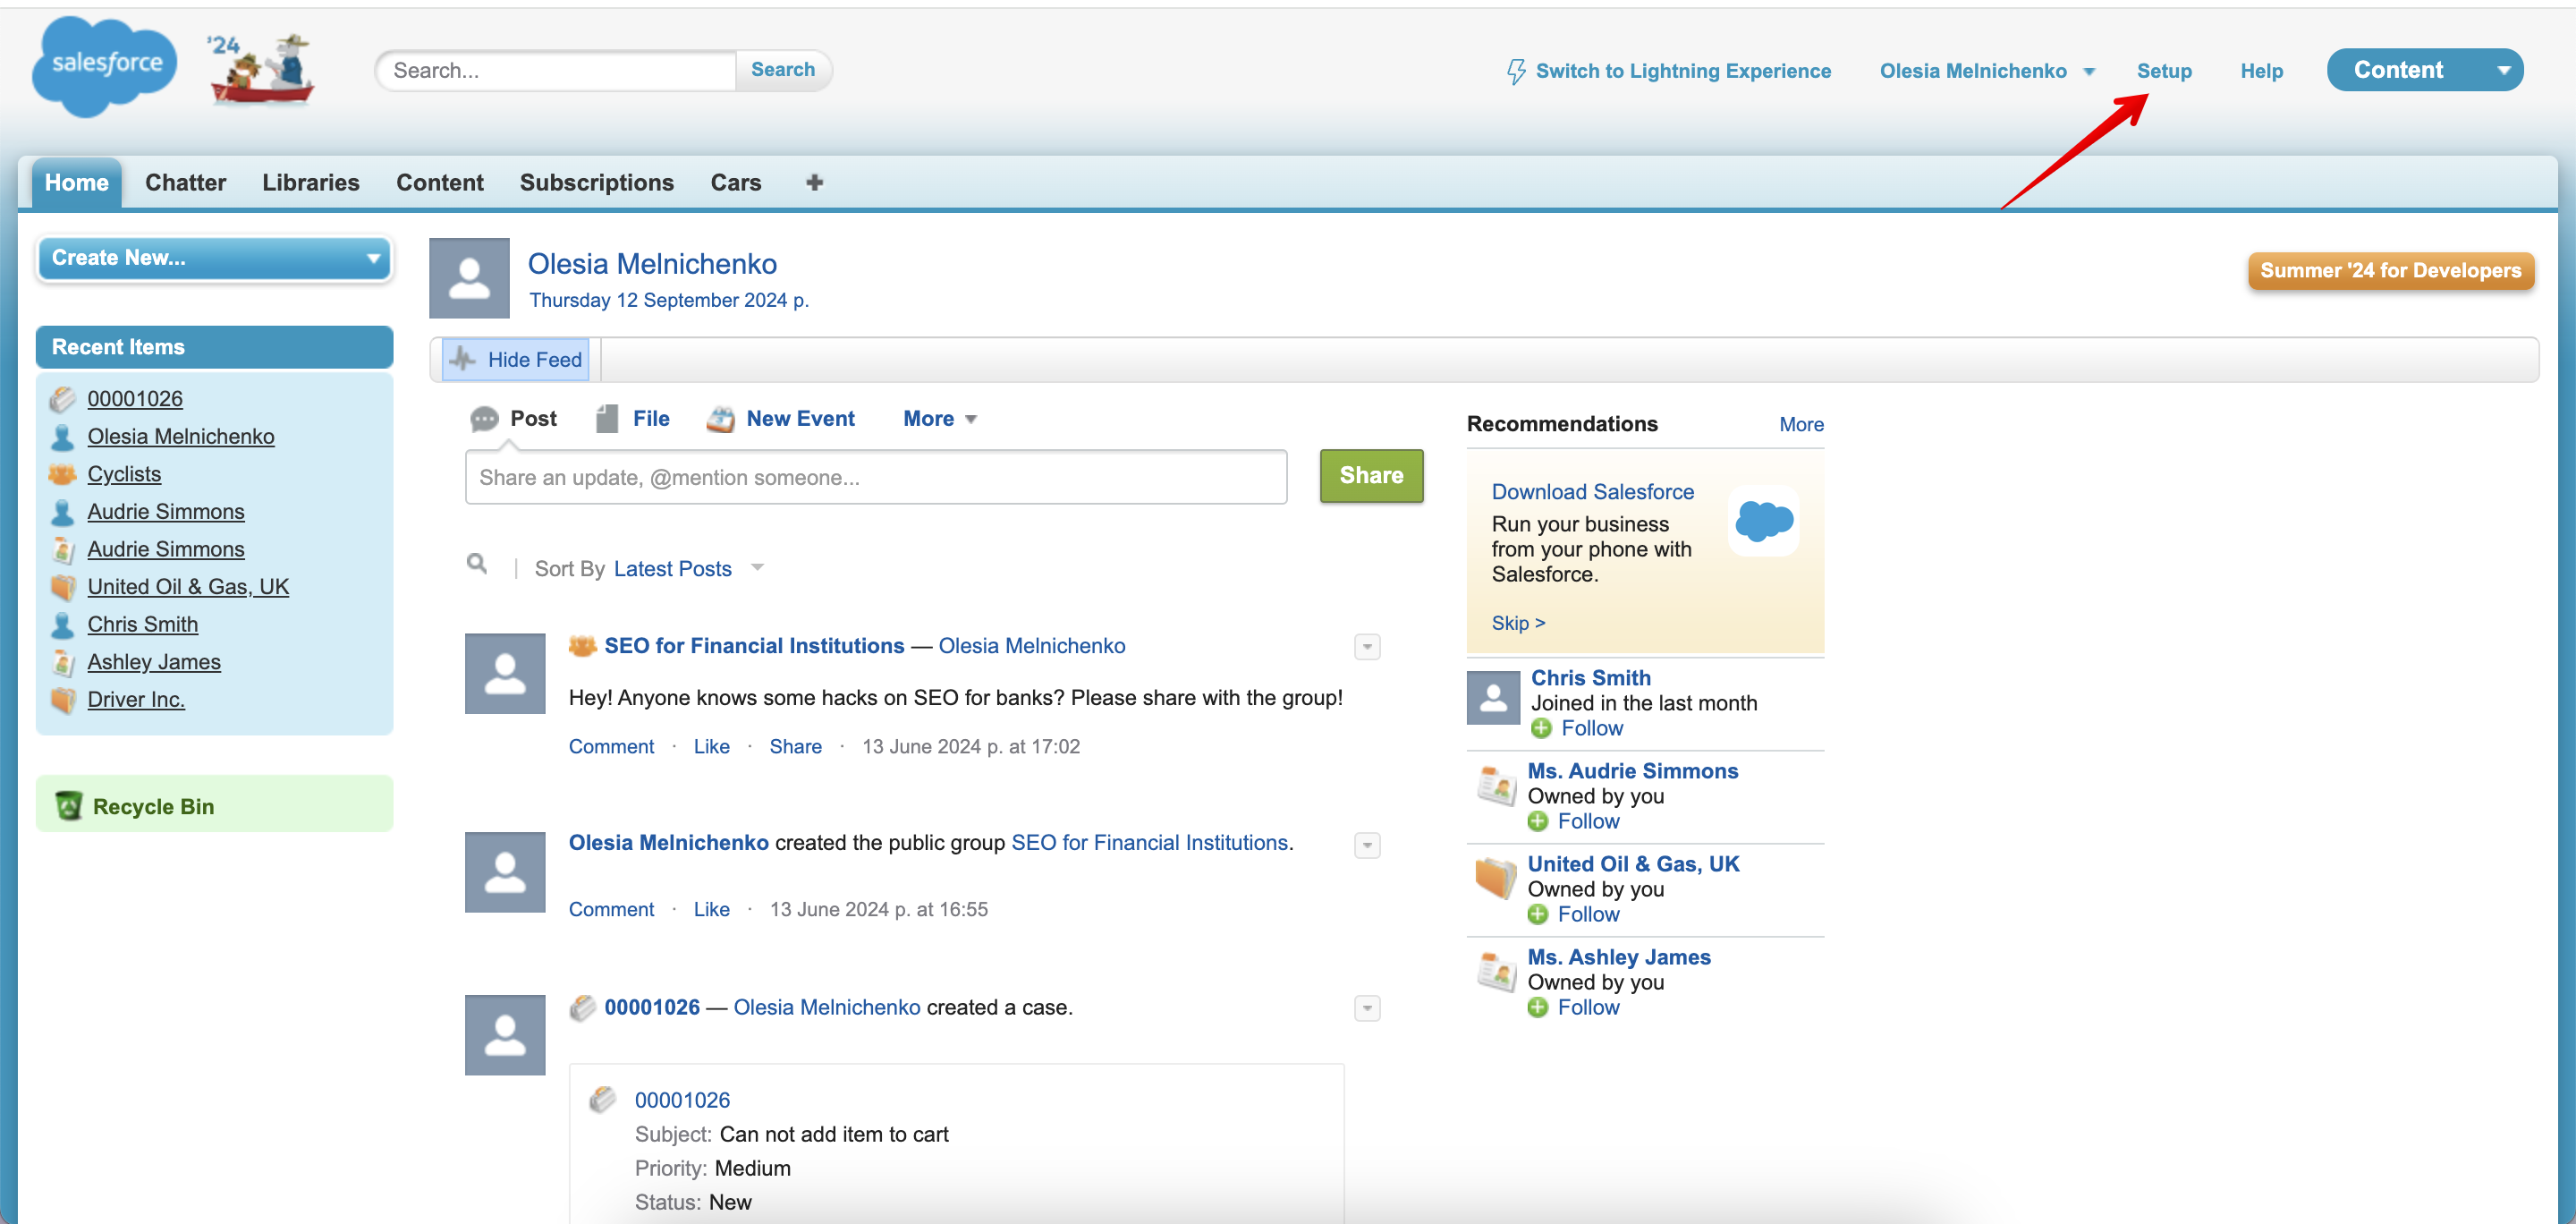
    Once you’re transferred to the outdated layout, find Setup.

    switch to setup in Classic

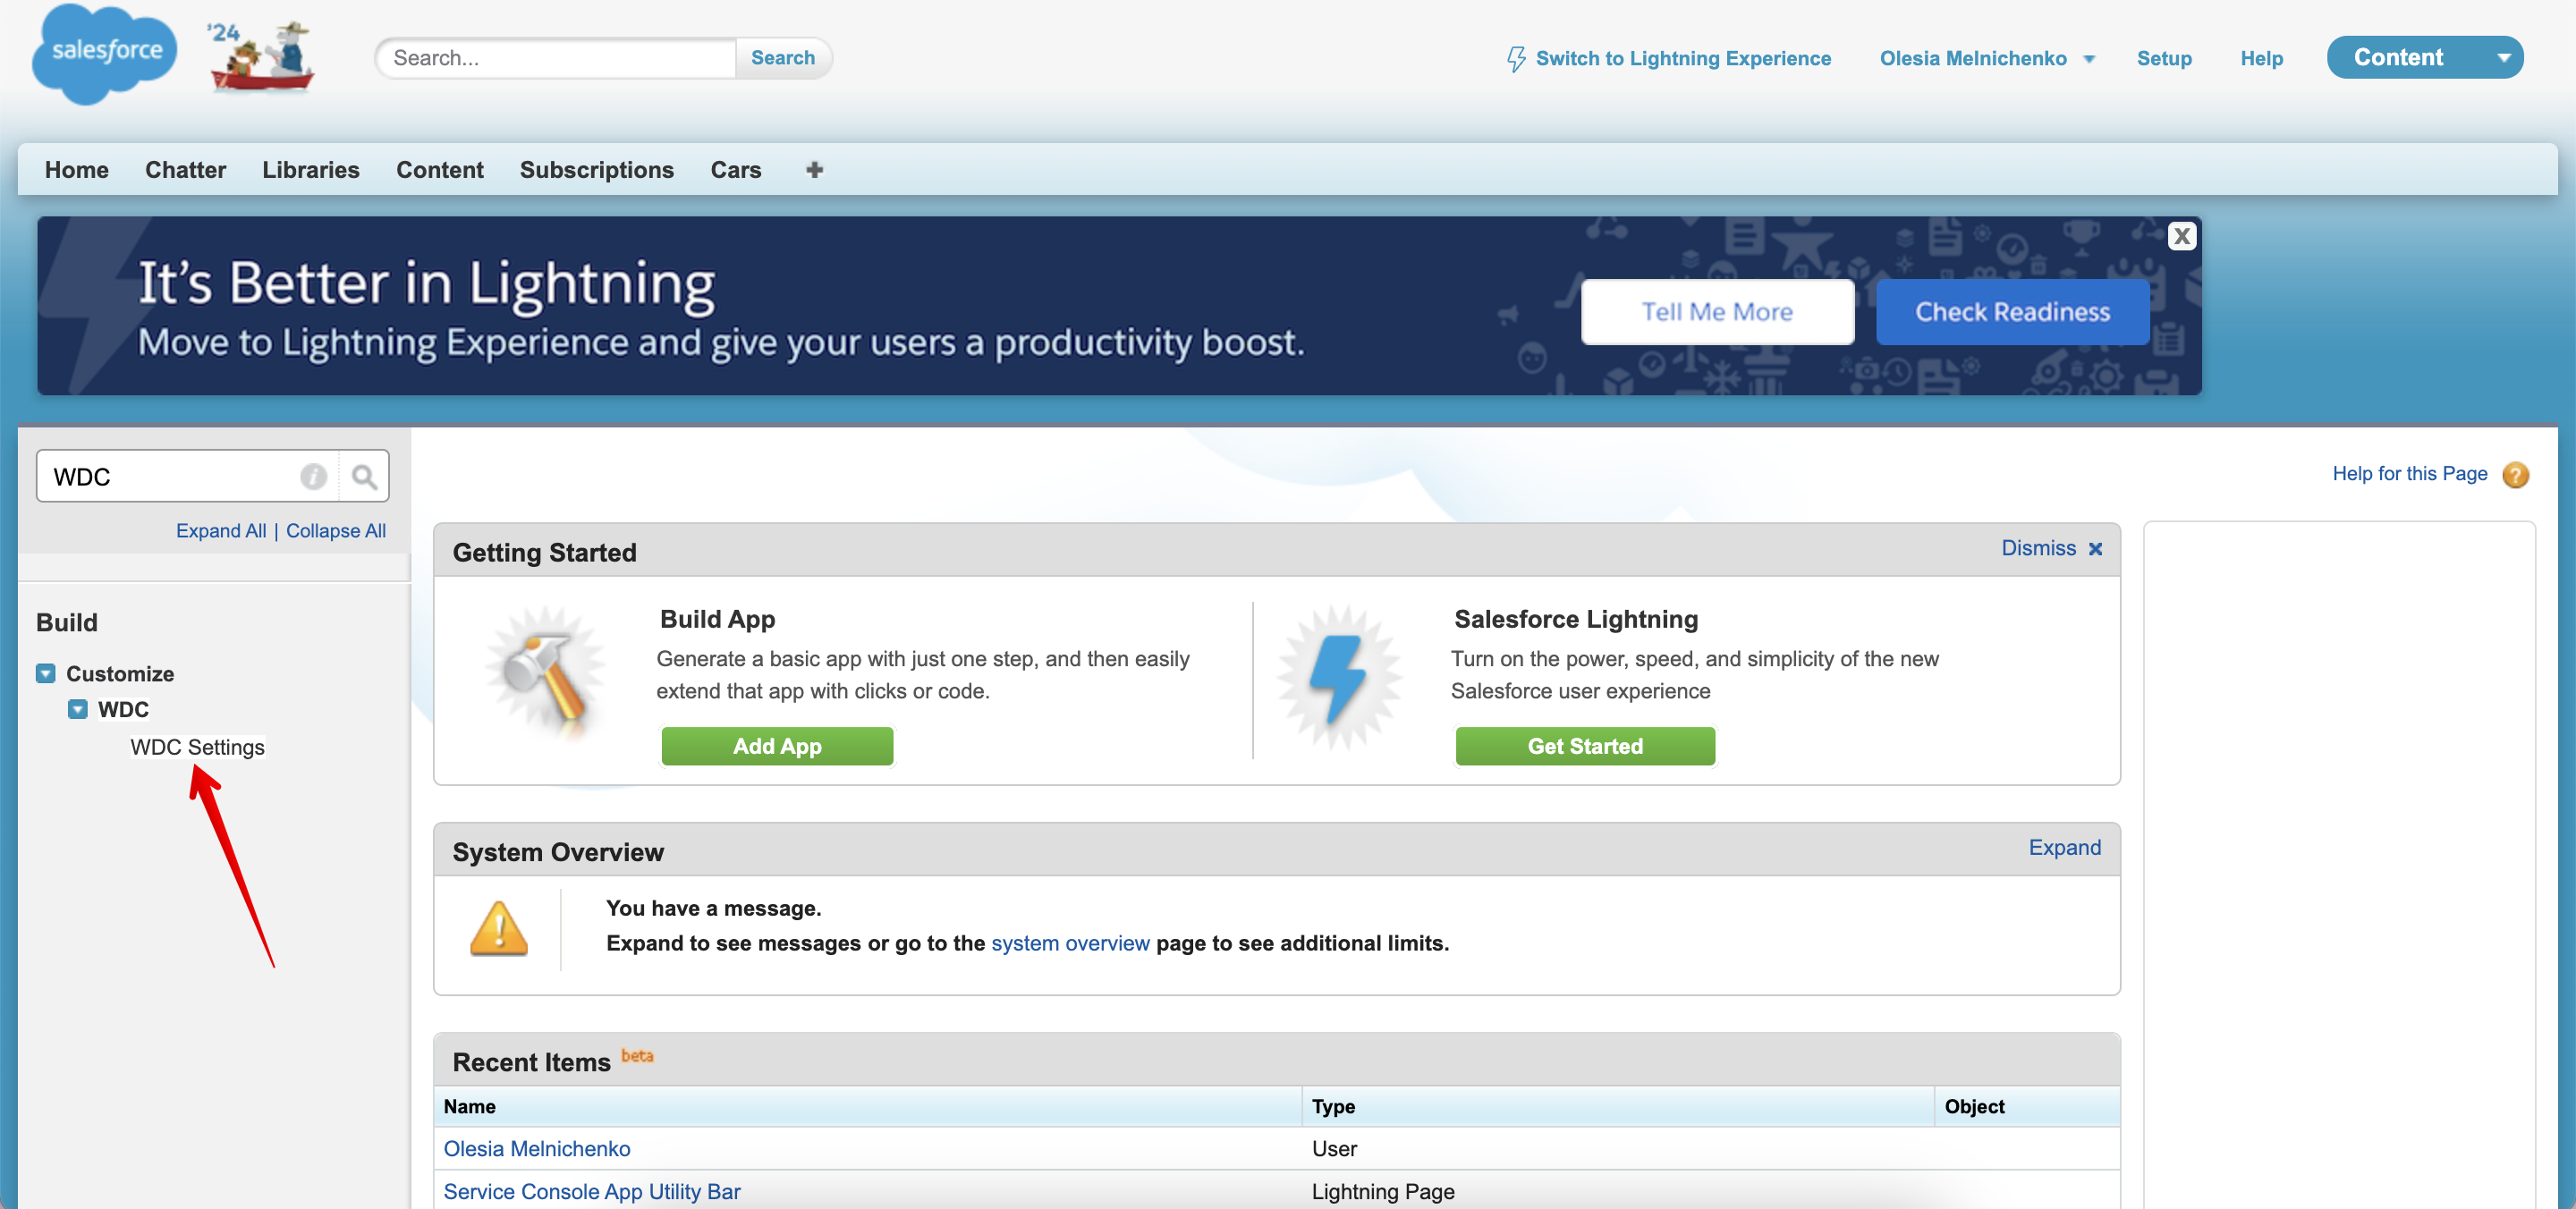
    In the Setup, type in WDC in the Quick Find box on your left and choose WDC Settings.

    WDC settings

    The crucial next step is to enable Thanks Settings. This is essential for setting up gamification in your Experience Cloud site, as it unlocks the functionality for creating Recognition Badges and Missions.

    enabling wdc settings

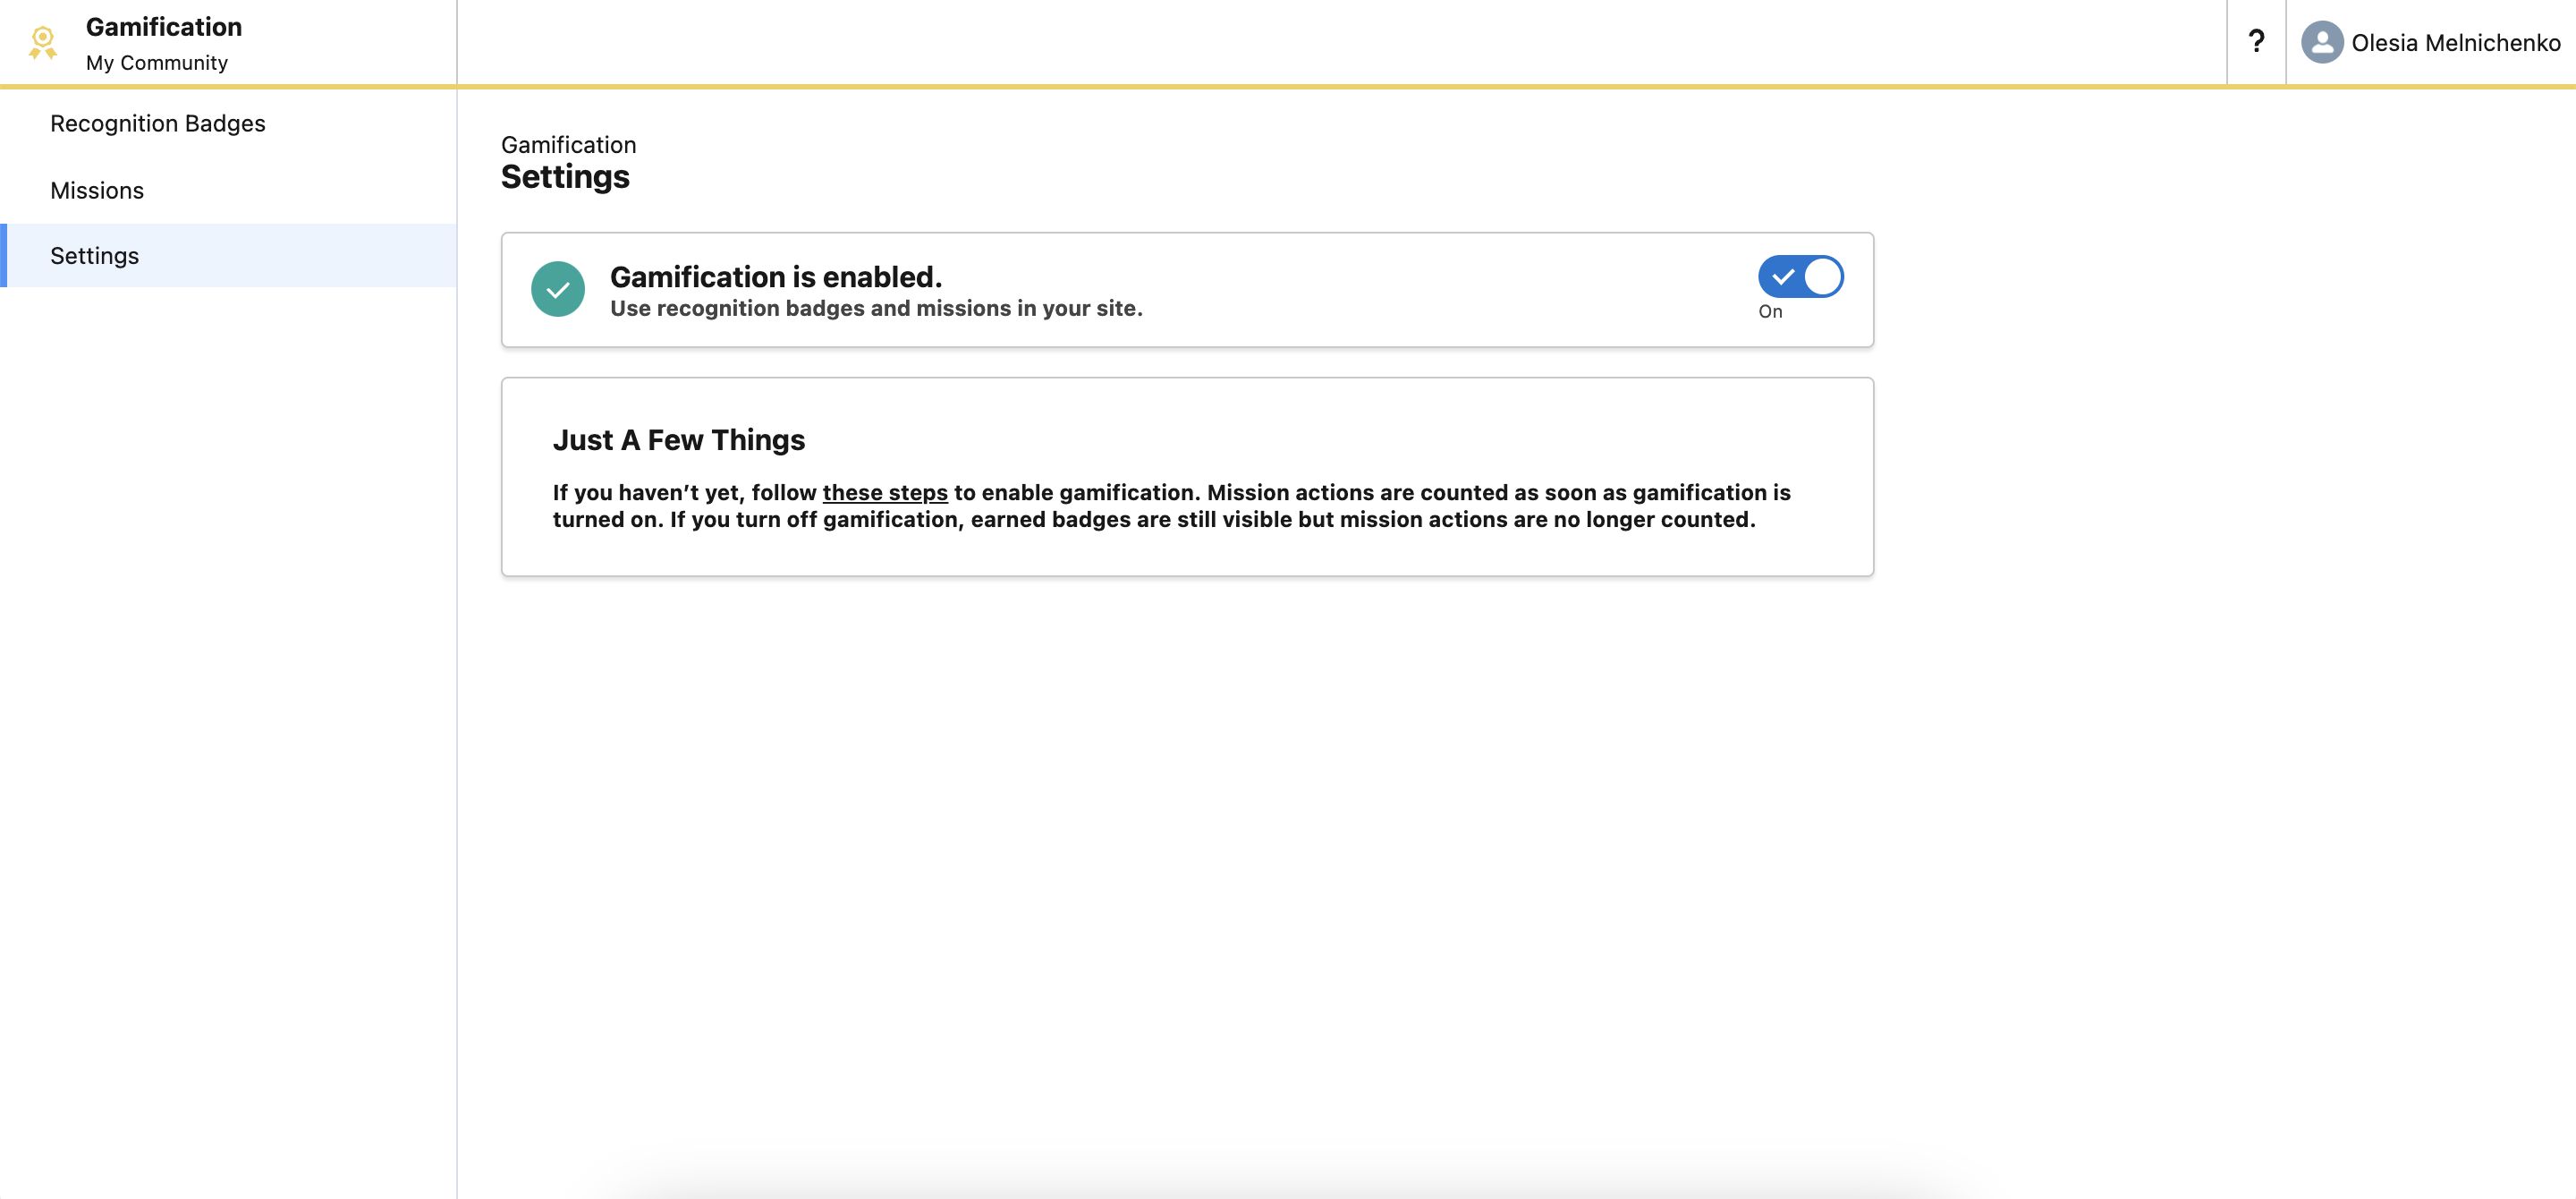
    Once you’ve enabled the “Thanks Settings,” return to your Experience Builder workspace, navigate to the “Gamification” tab, and refresh the page.

    Excellent! Gamification is now active on your Experience Cloud site. Now the fun part begins – let’s get creative!

    gamification is enabled

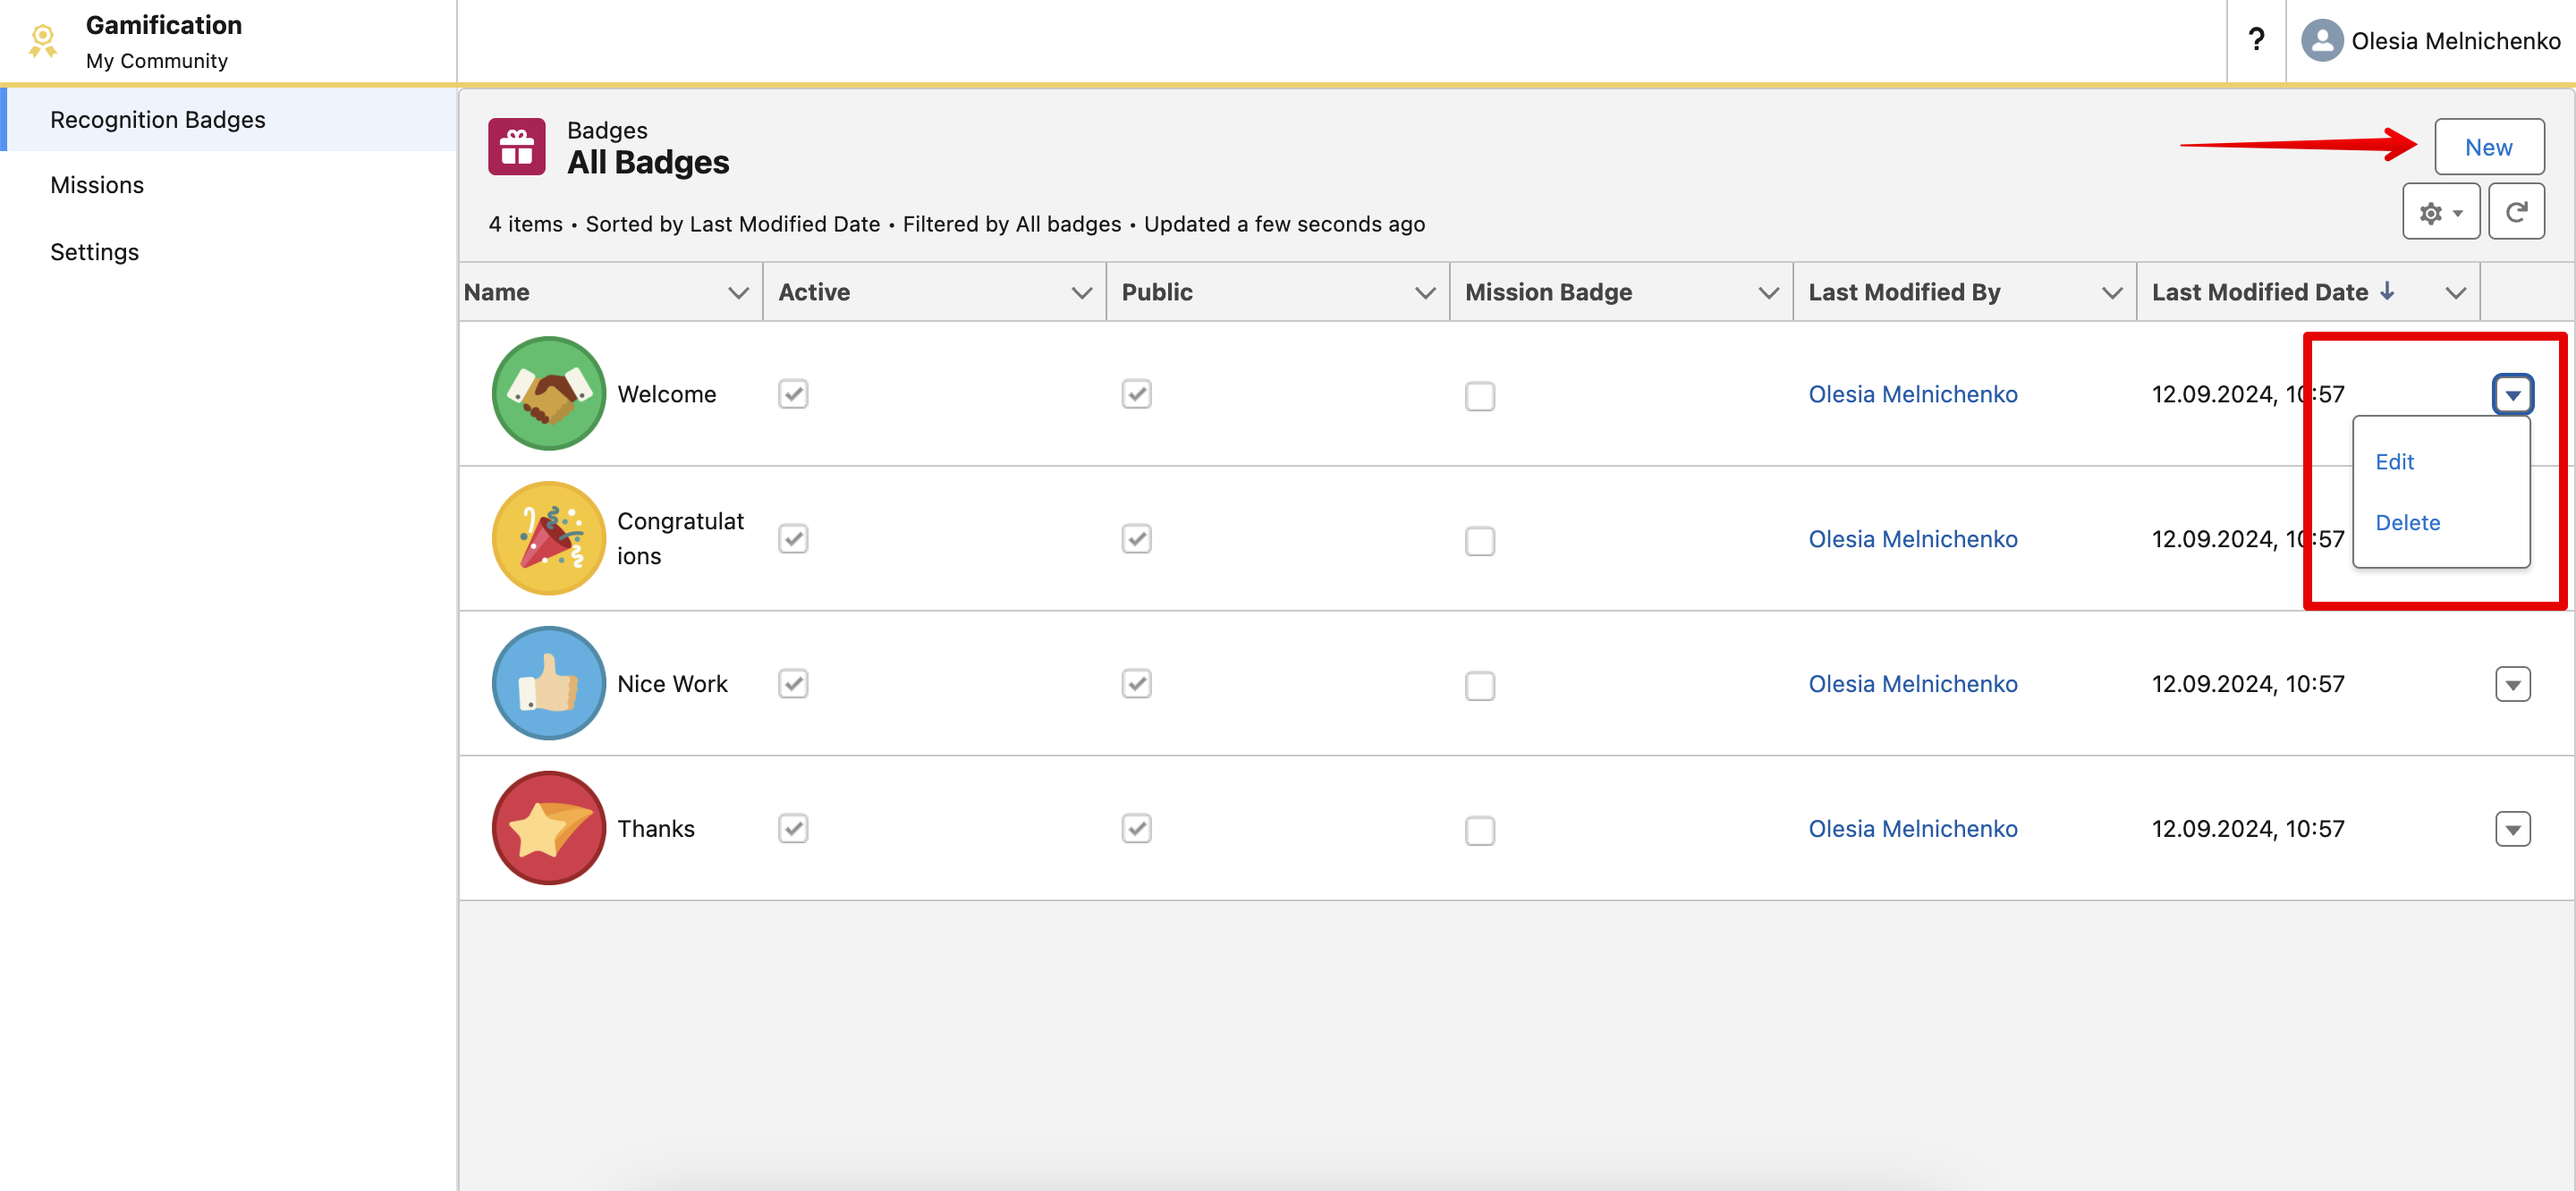
    Step 3. Creating a Reputation Badge

    As you can see in the screenshot above, the Recognition Badges and Missions features are now ready for configuration. Let’s start by creating a Recognition Badge.

    Note! You’ll need to assign a Badge to a Mission before you can create the Mission itself.

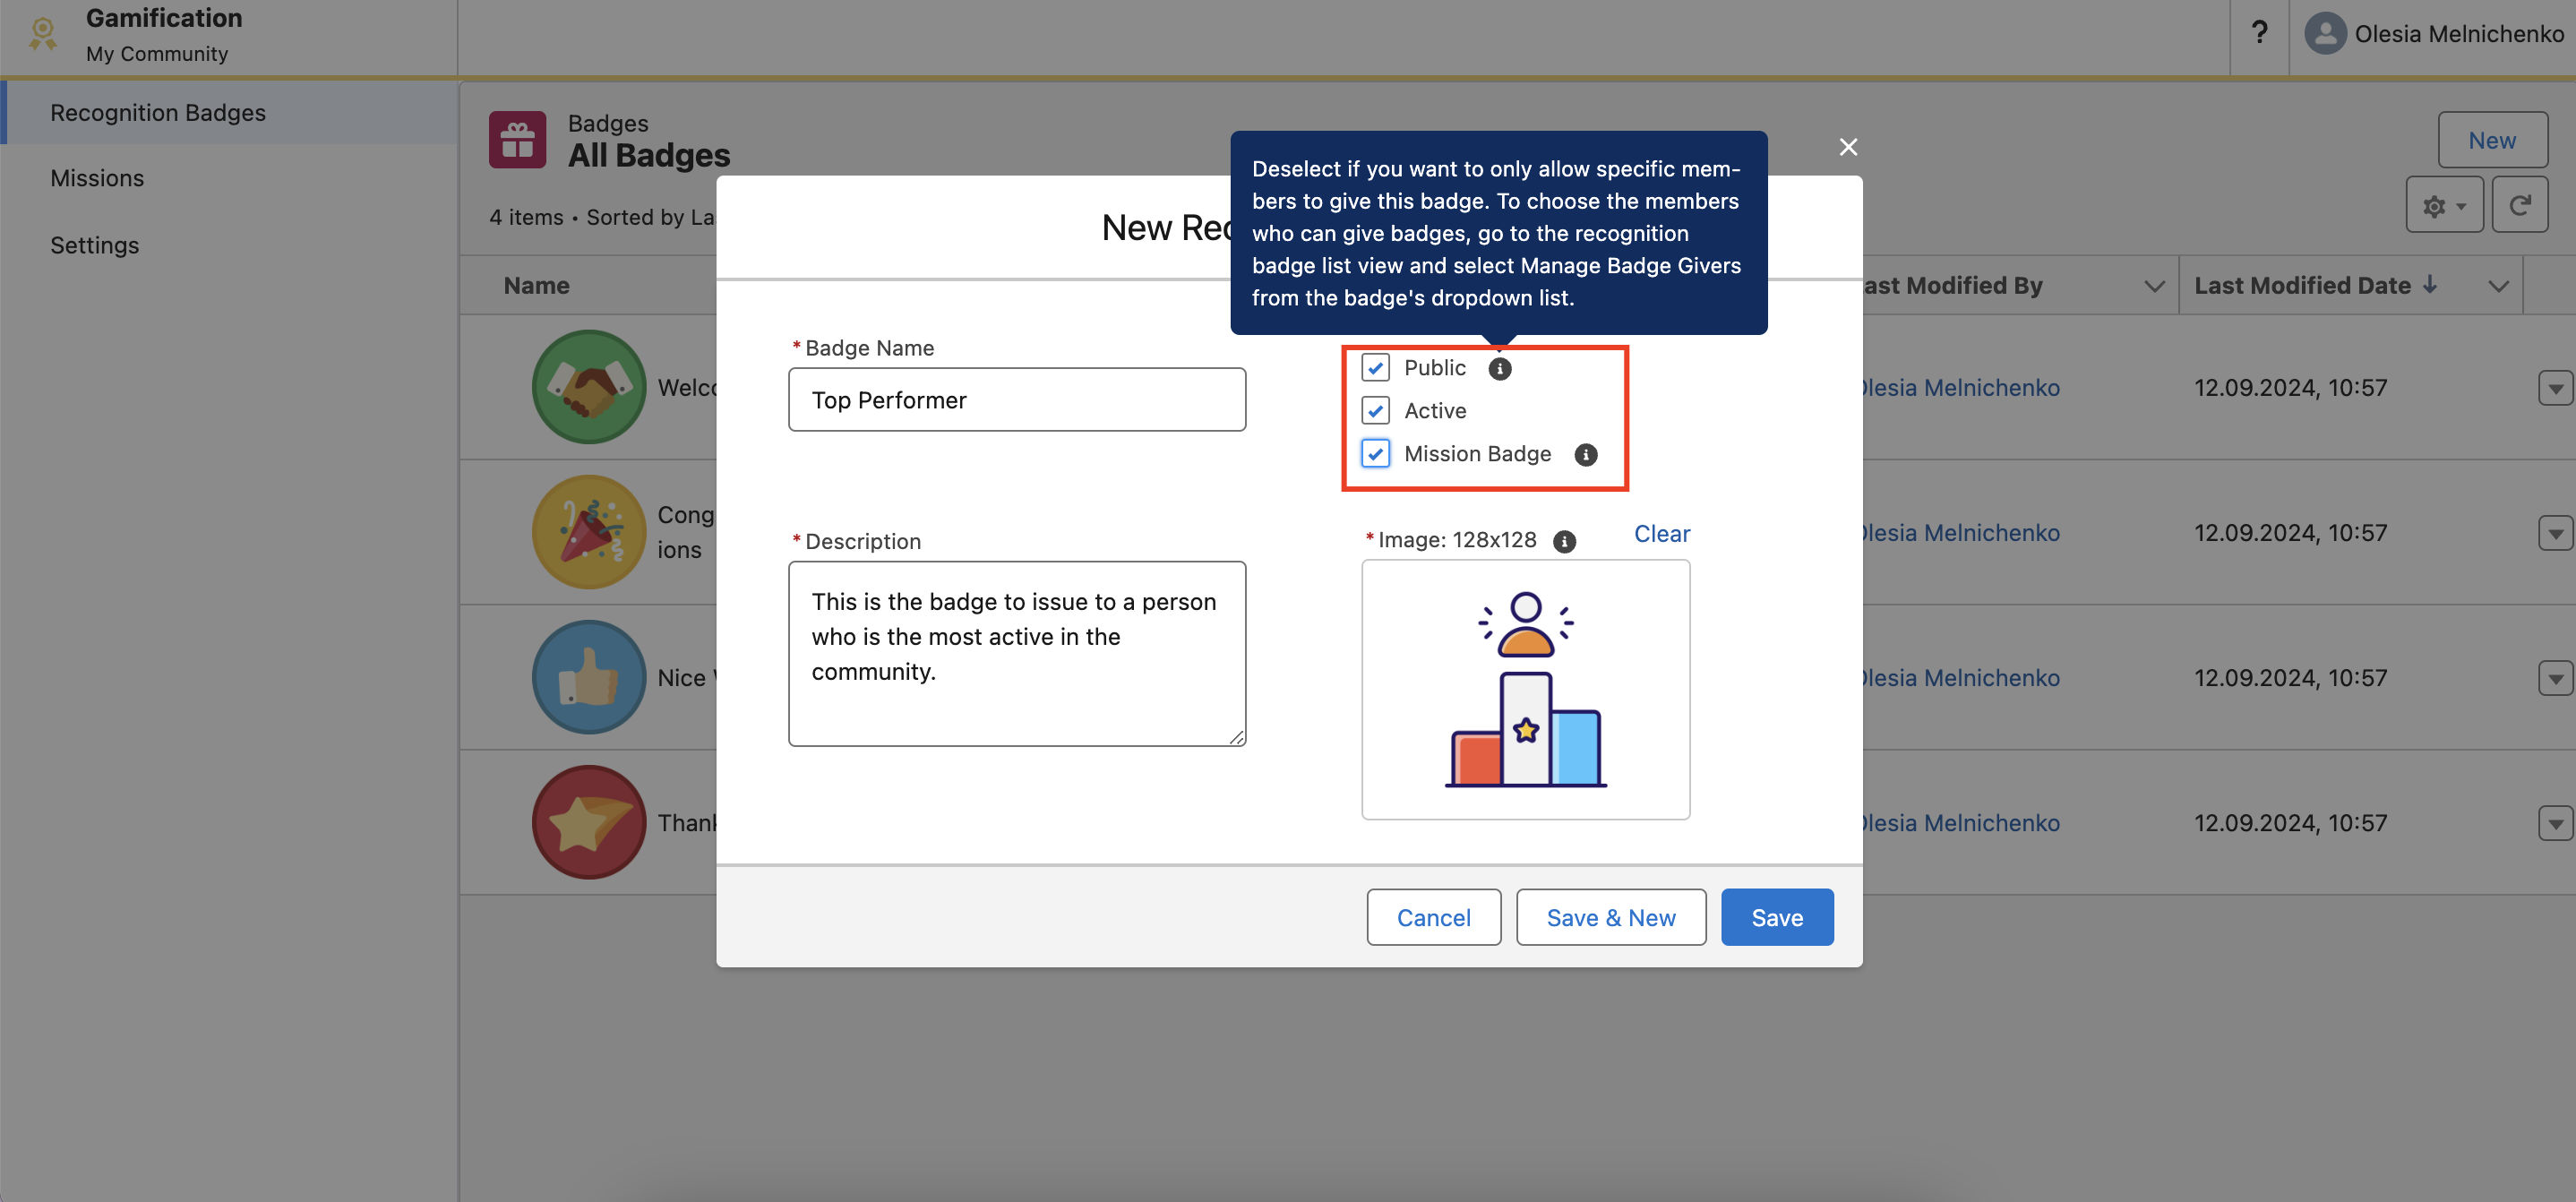
    Salesforce provides some pre-built badges to get you started, such as “Welcome,” “Congratulations,” “Nice Work,” and “Thanks.” You can customize or delete these existing badges, or create your own from scratch. I’m going to create a new badge, so I’ll click the “New” button in the top right corner.

    creating badges for gamification

    I’m going to name my badge “Top Performer,” and it will be awarded to the most active and engaged member of our community. You have the option to make a badge public, allowing other community members to award it (though you can choose to disable this). You can also set the badge’s status to active and link it to a specific Mission for automatic assignment. I’ll go ahead and save this badge. Now we’re ready to create our first Mission!

    new recognition badges

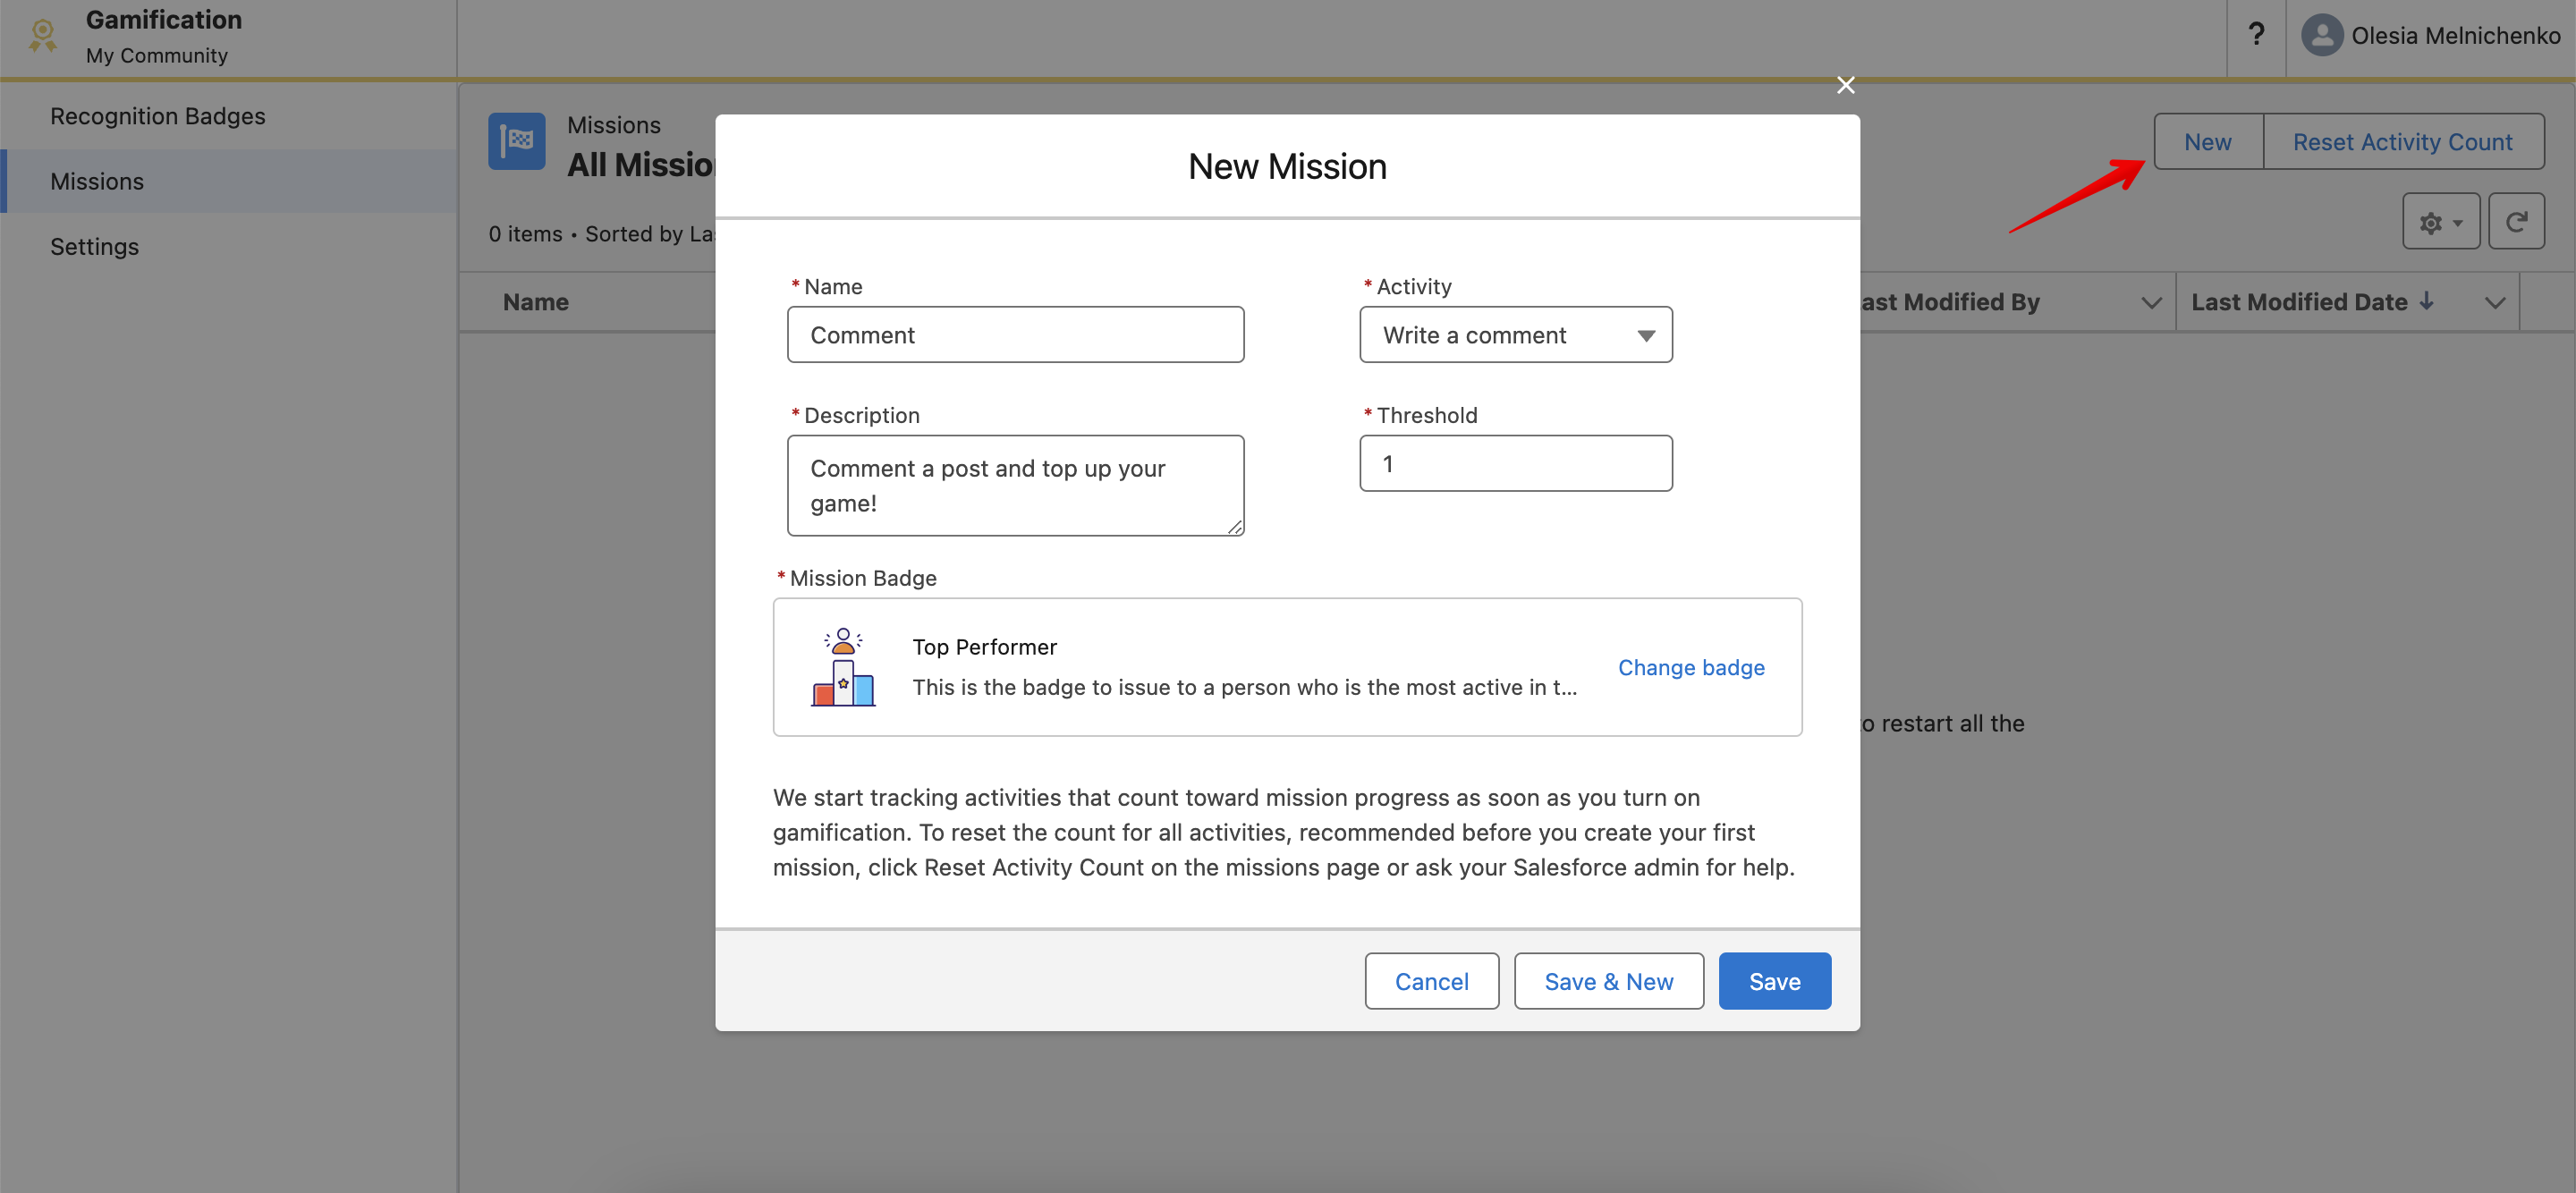
    Step 4. Creating a Mission and Assigning the Badge

    To encourage engagement in my community, I’ve created a new Mission called “Comment.” This mission will be completed each time a member posts a comment, and they’ll receive the “Top Performer” badge we created earlier. To create a similar mission, click the “New” button and fill in the mission details.

    new mission_comment on experience cloud

    Step 5. Enabling Reputation Levels and Leaderboards

    Remember the Reputation Leaderboards we talked about earlier? Now, I’ll show you how to enable the reputation feature and set up reputation levels for your Experience Cloud site to strengthen gamification customer engagement.

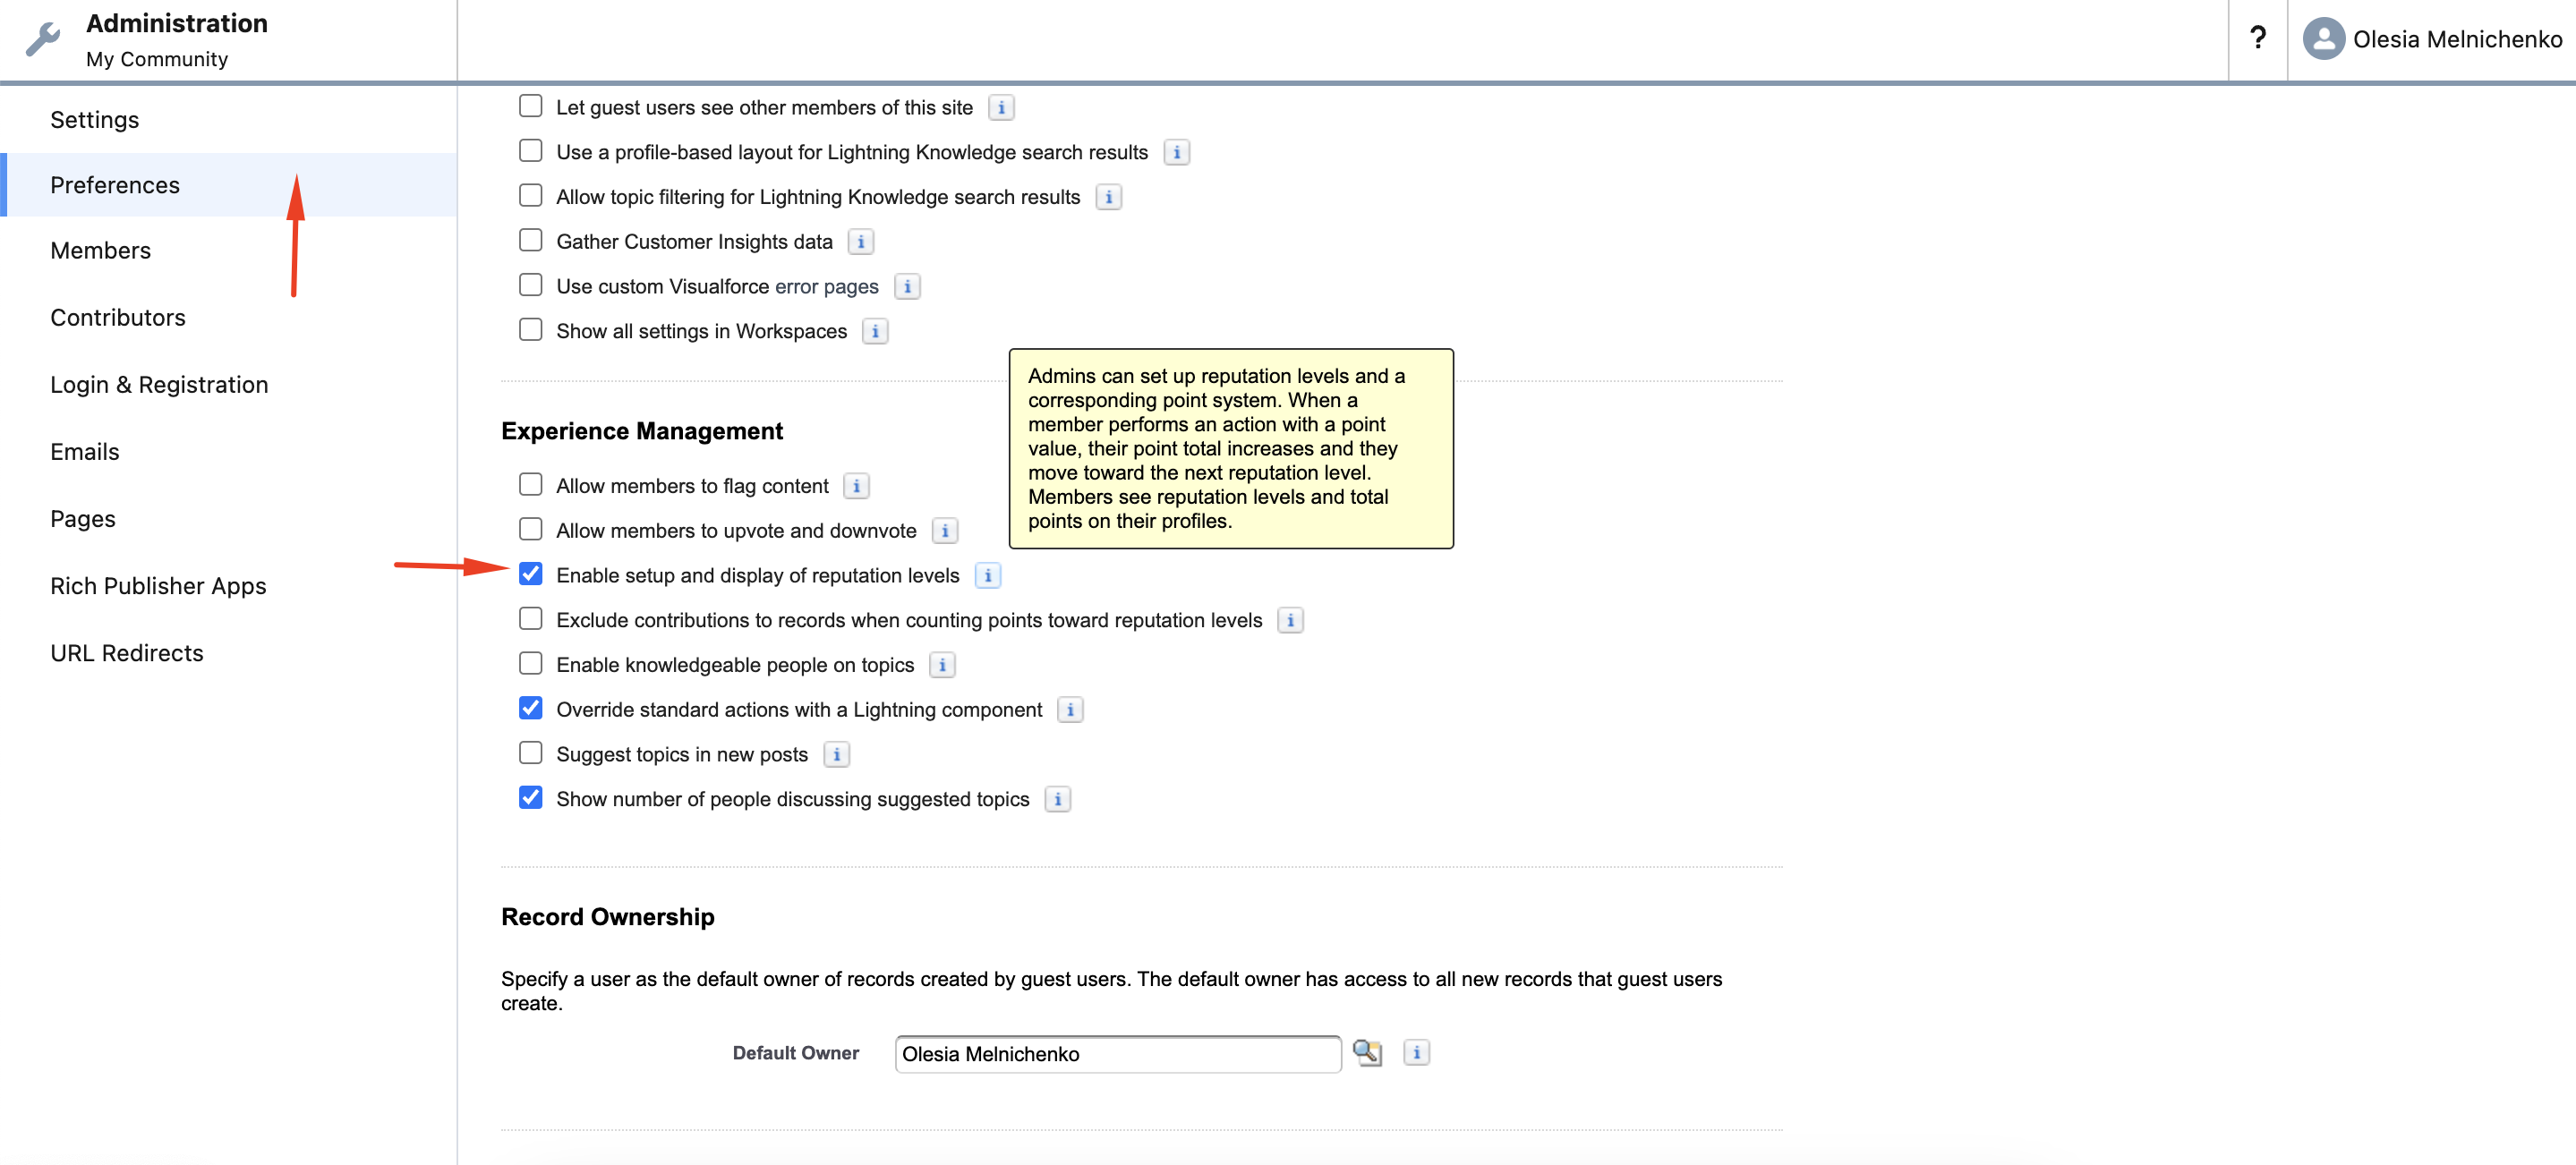
    Go to your Experience Workspaces and navigate to Administration → Preferences. Under the “Experience Management” section, check the box next to “Enable setup and display of reputation levels,” and then click “Save” at the bottom of the page.

    Administration_enable reputation levels

    Note! The Reputation section won’t appear if Chatter isn’t enabled on your Experience Cloud site. To make the Reputation section visible, go to Administration → Preferences and select “Show all settings in Workspaces.”

    Step 6. Customizing Reputation Levels and Points

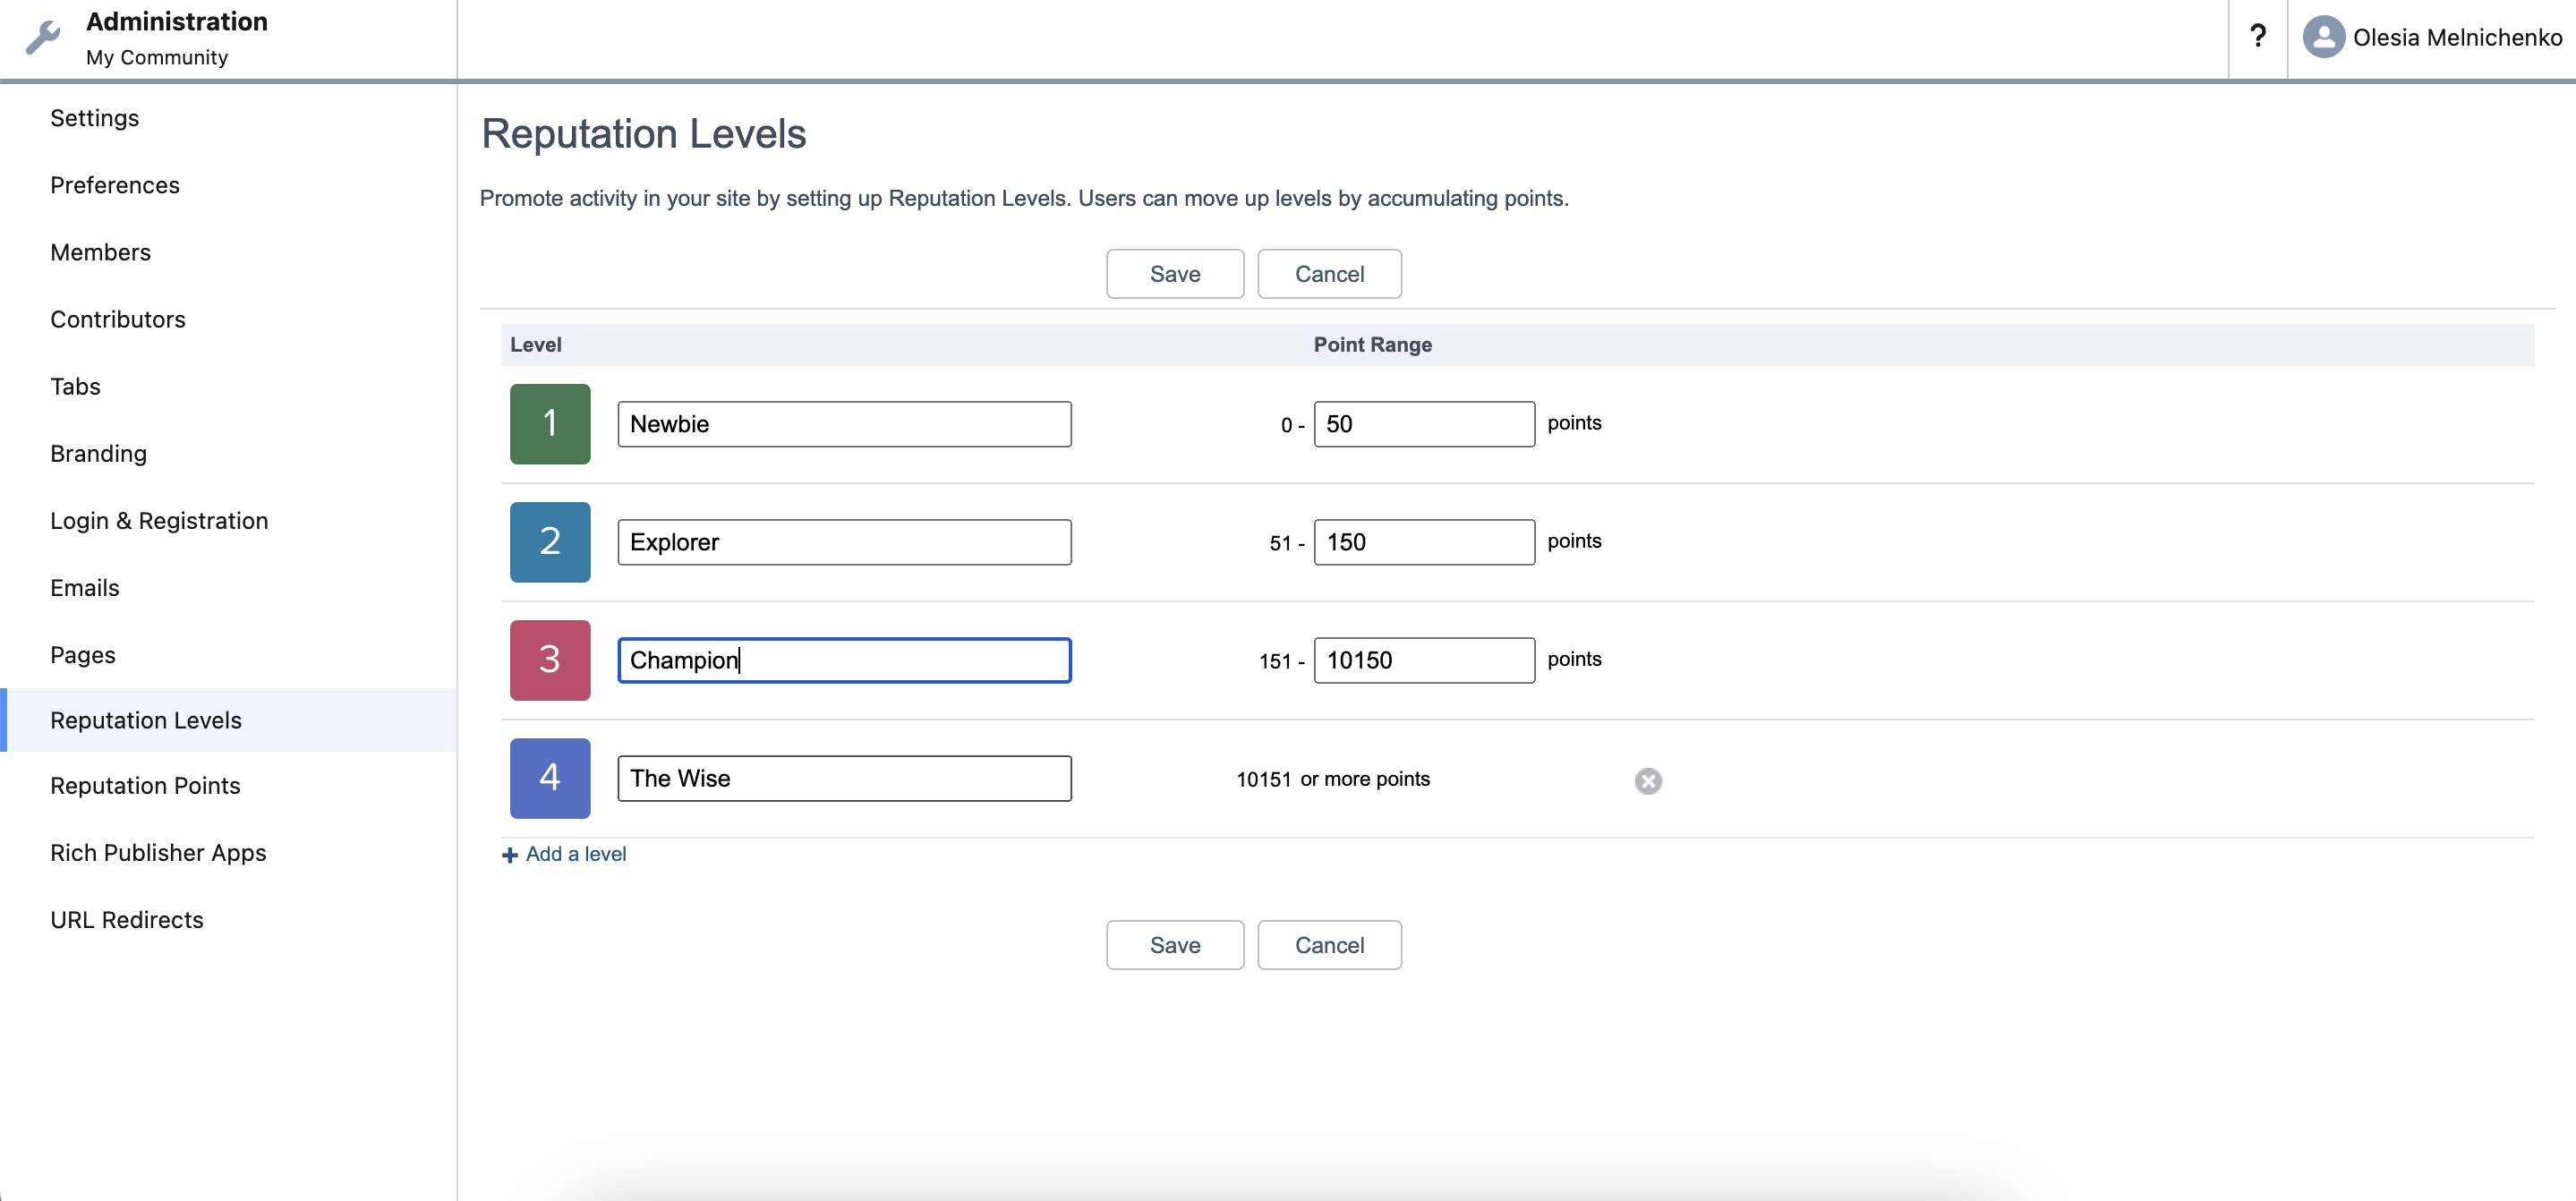
    Let’s configure the reputation levels and point system. To motivate user activity, Salesforce provides 10 default reputation levels, which you can customize to align with your brand and site identity. To enable and personalize these levels, go to Experience Workspaces → Administration → Reputation levels. Once you’ve made your changes, click “Save.”

    reputation levels

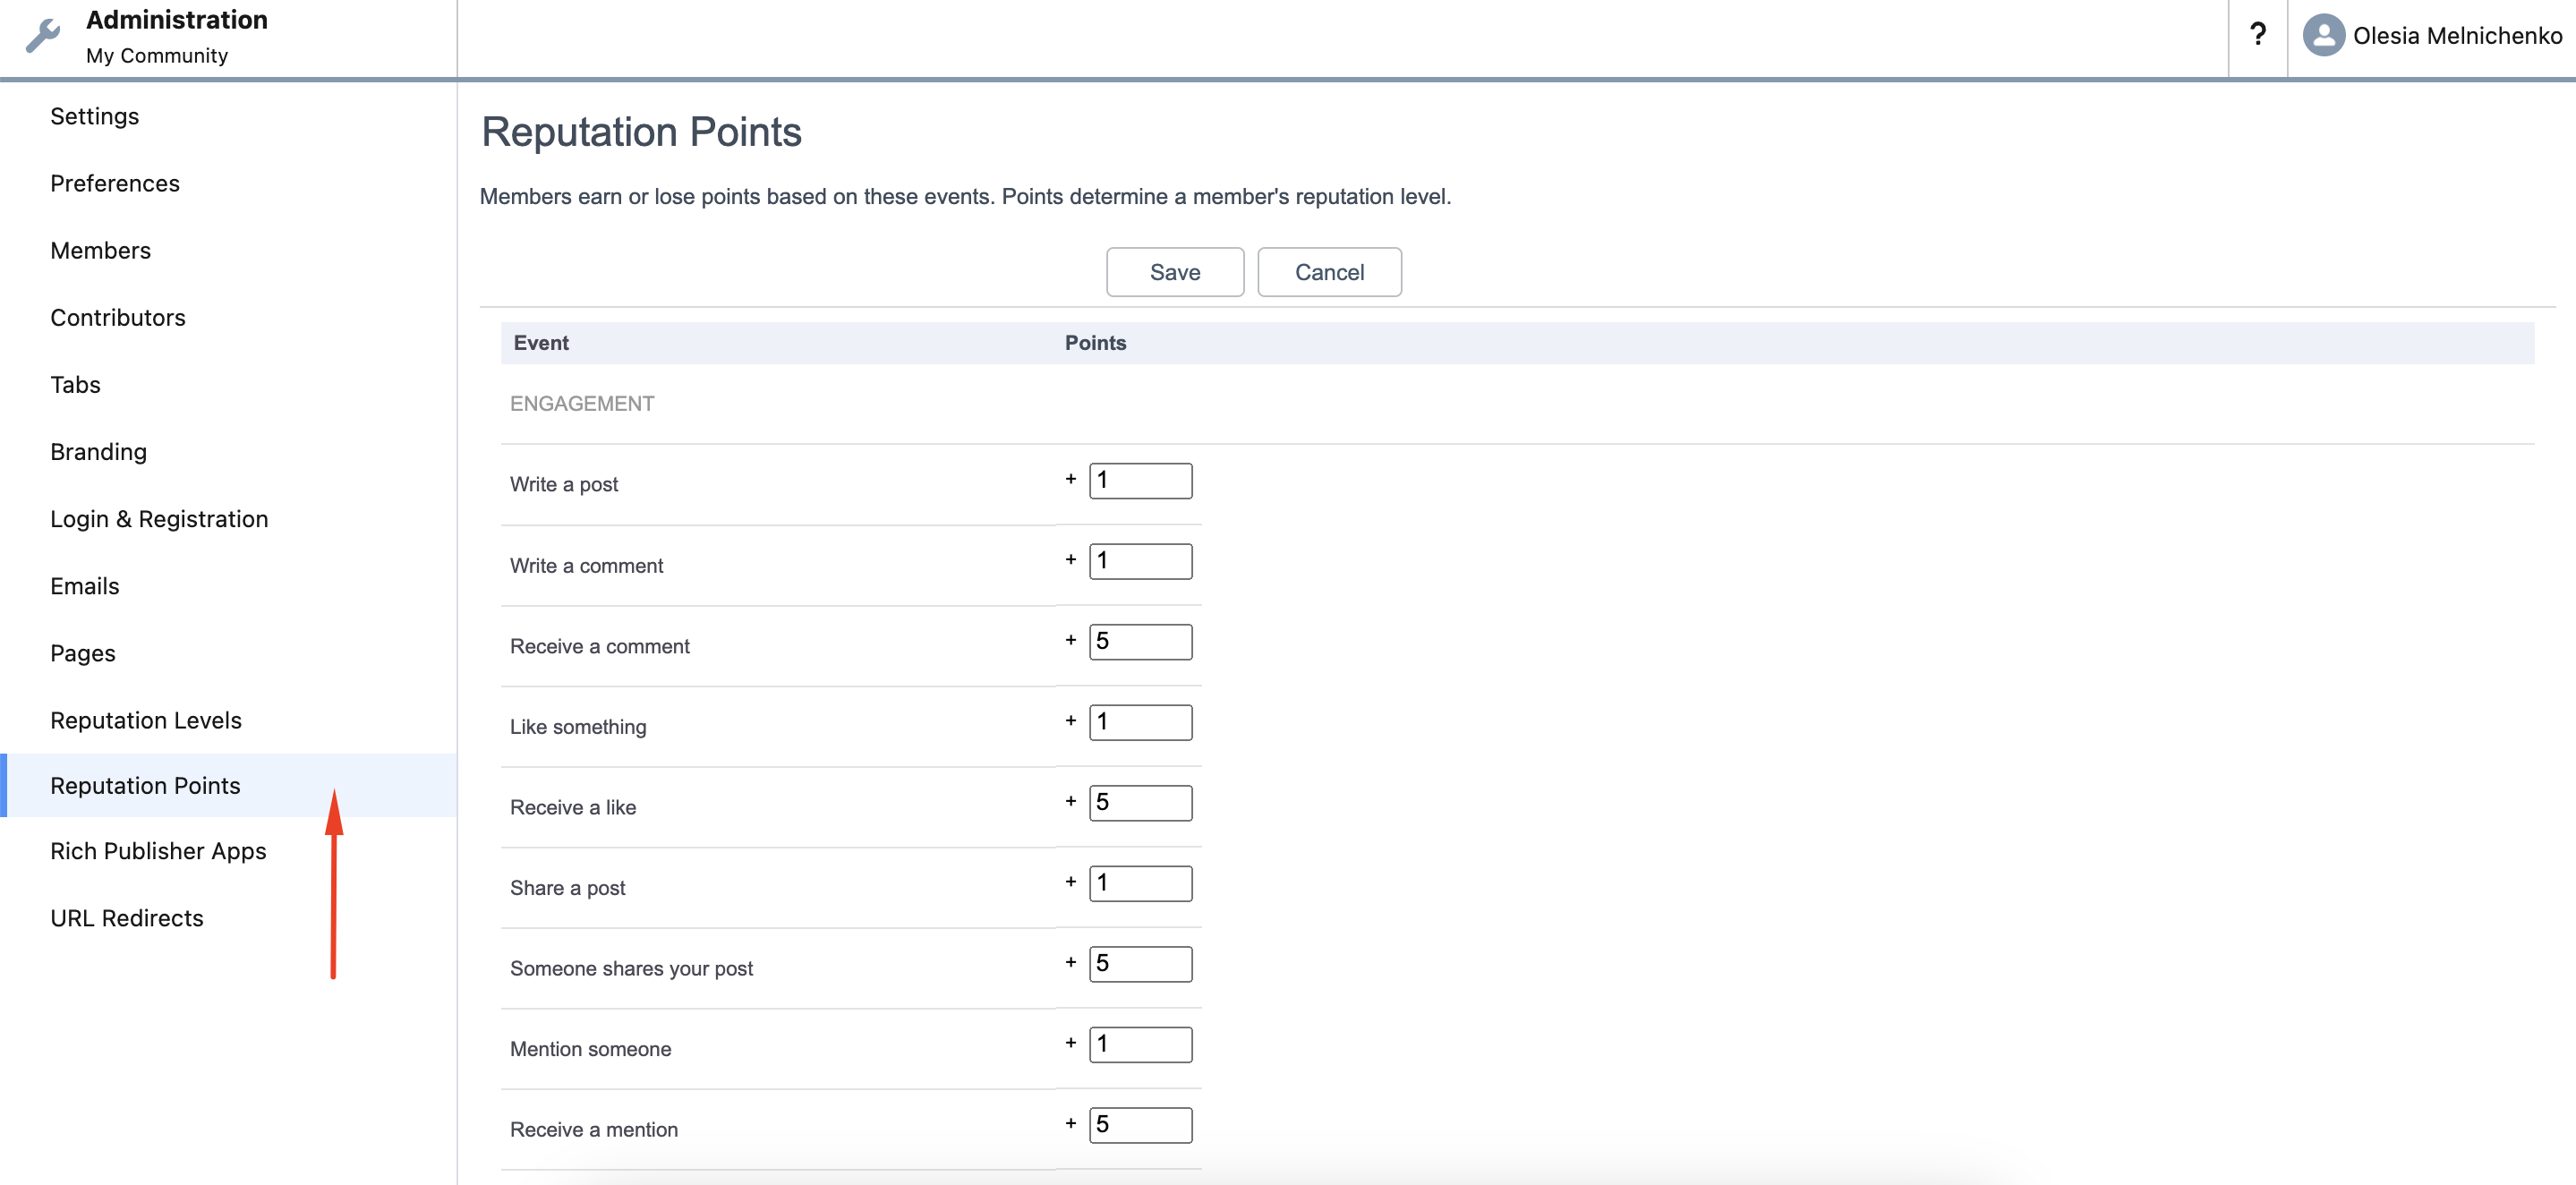
    The process for setting reputation points is similar. Navigate to Experience Workspaces → Administration → Reputation Points and specify the number of points users earn for various activities on your site. If you don’t want users to receive points for a particular action, simply enter “0” in the points field.

    reputation points

    Step 7. Adding Gamification Components to Your Site Layout

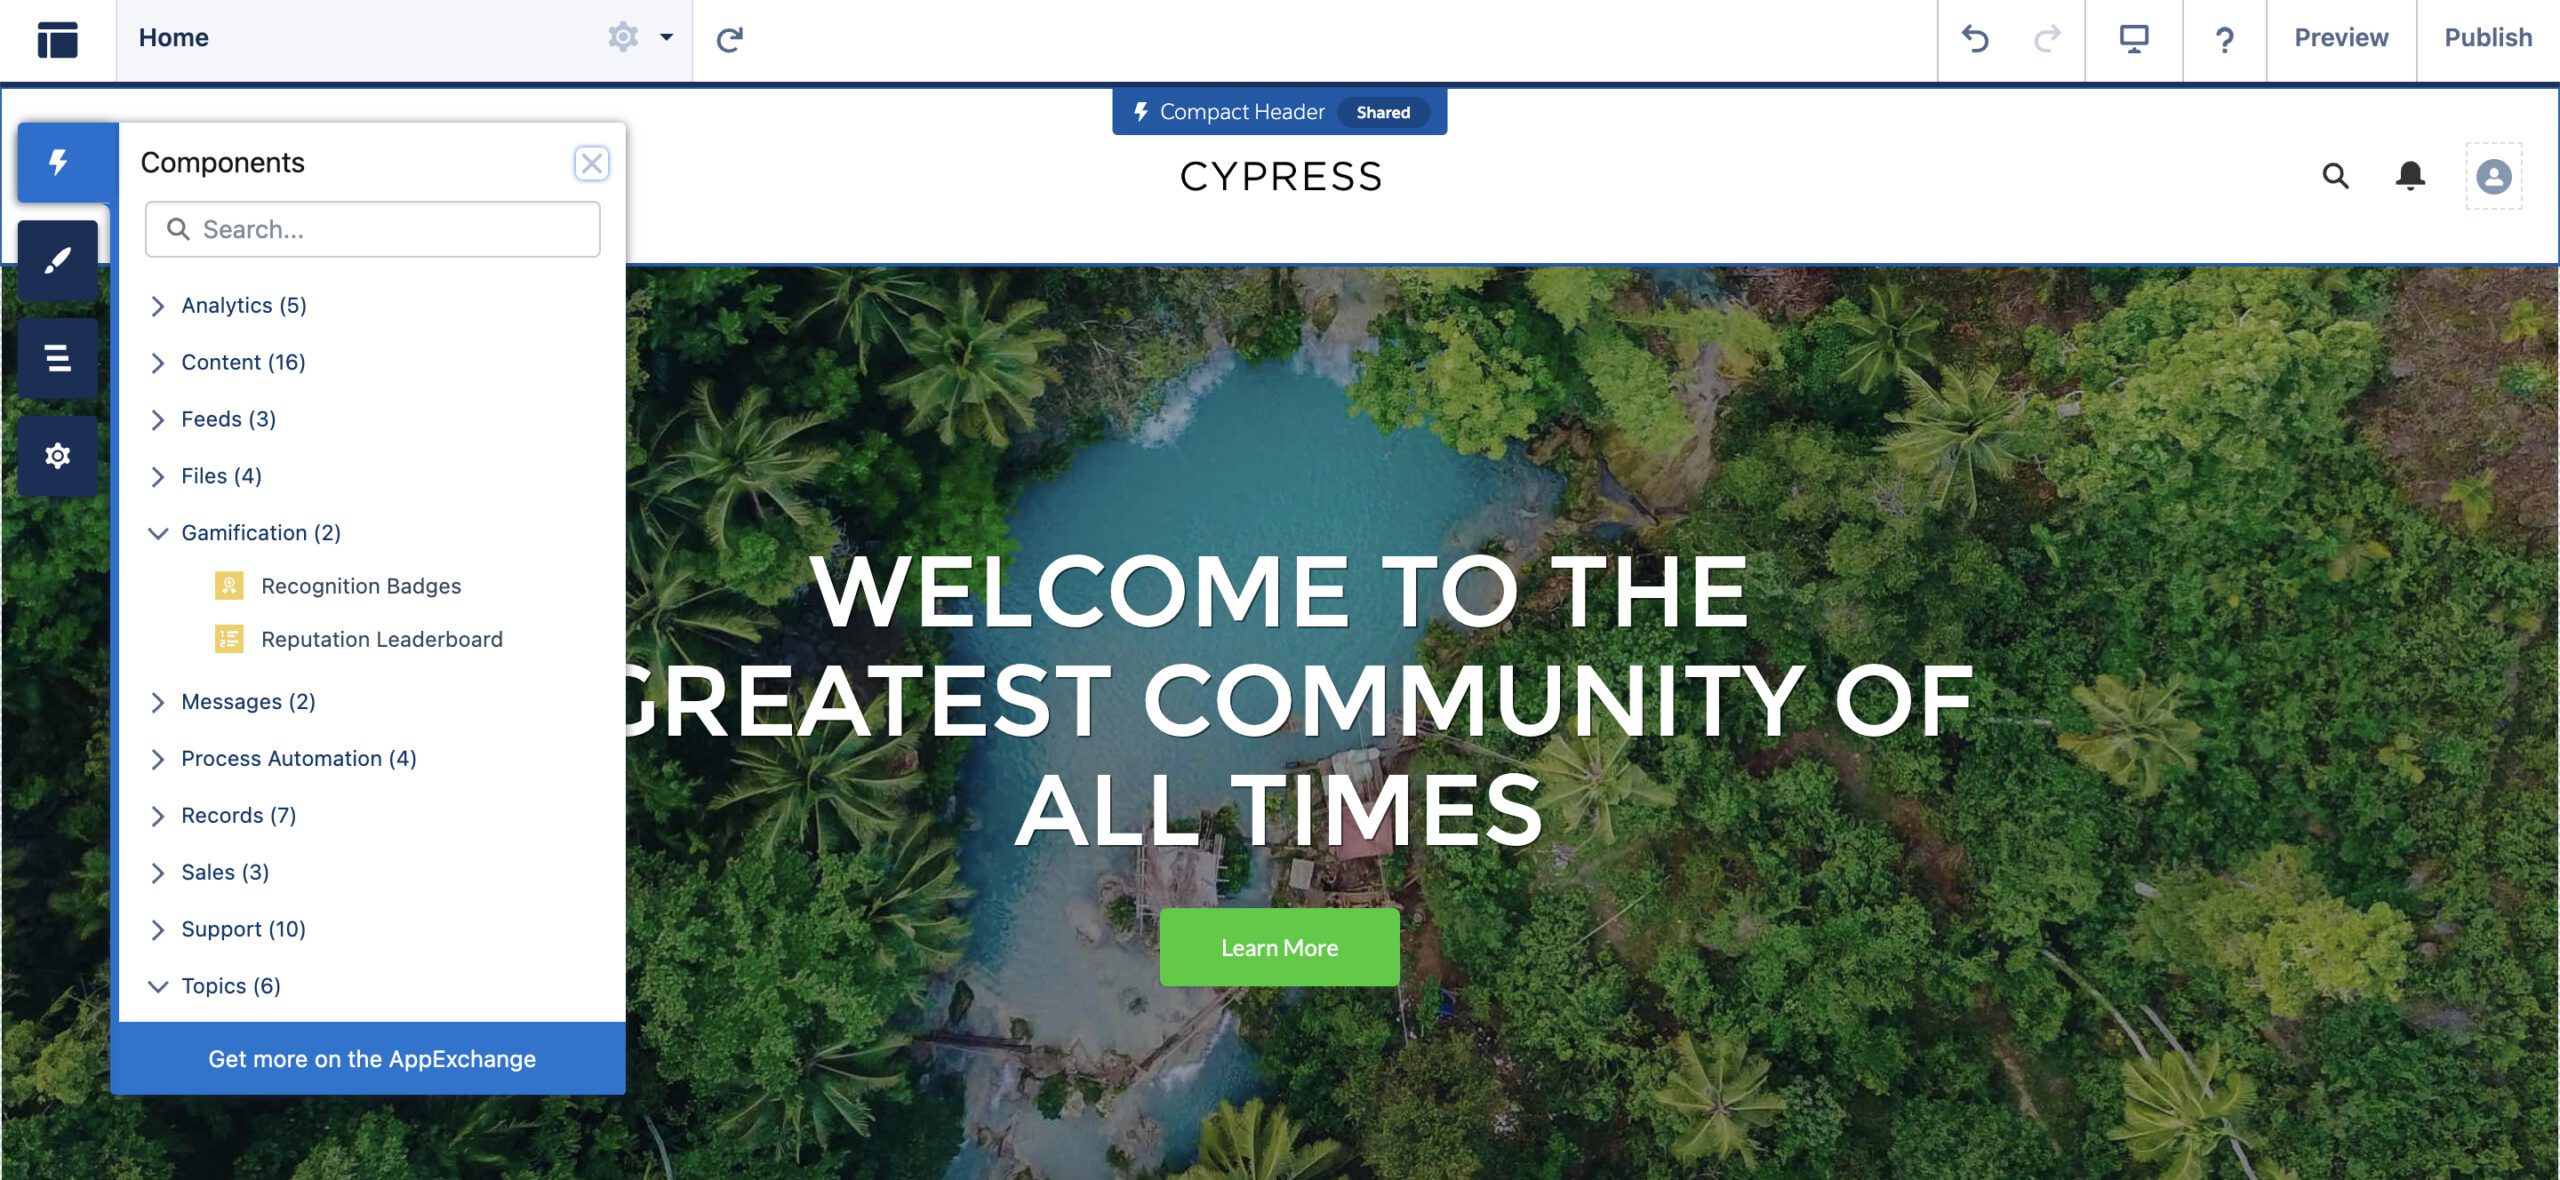
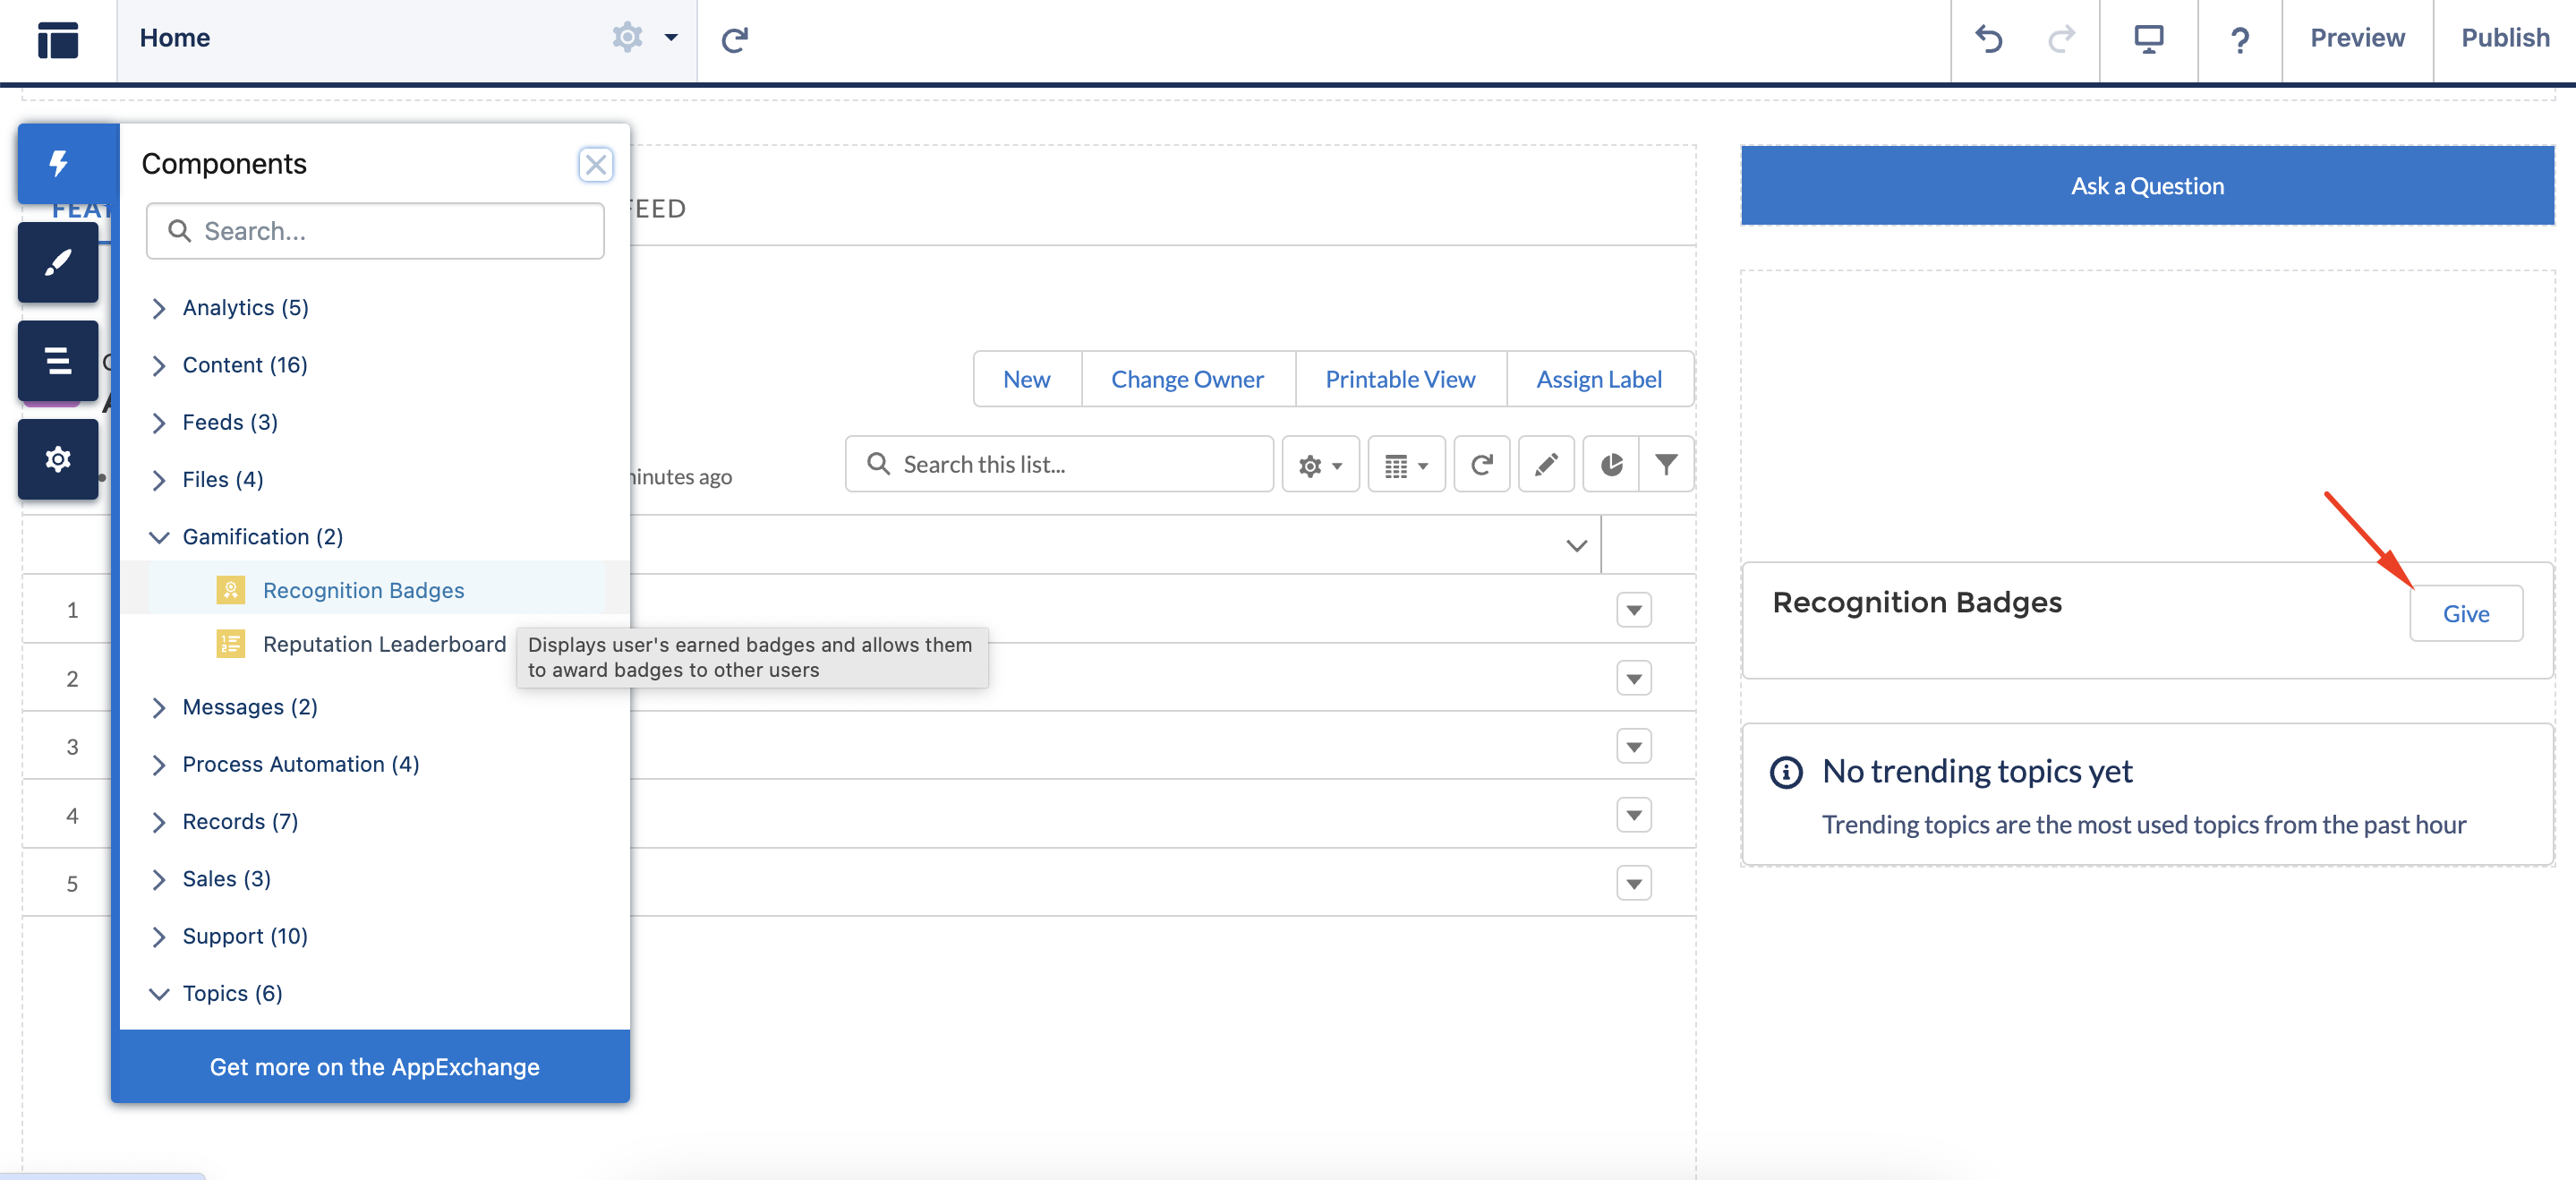
    After designing your Recognition Badges and Missions, head back to the Experience Builder. In the Components panel on the left, search for “Gamification.” You’ll find the Recognition Badges and Reputation Leaderboard components there.

    experience cloud community_gamification

    Start by dragging and dropping the Reputation Leaderboard component onto your site’s layout. Configure the settings as needed. You can choose to display up to 10 community members on the leaderboard.

    reputation leaderboard

    Next, let’s add the Recognition Badges component to your site. Simply drag and drop it onto the desired area of your layout. You can customize the button text that appears in the community. I’ve chosen “Give.” This component will display users’ badges and allow them to award badges to other members. Just a heads-up: you can’t award a badge to yourself.

    recognition badges_assignign

    Here, I’m assigning a standard Welcome badge to Olivia. She deserves to be welcomed! 

    giving a badge to a community user

    Step 8. Experiencing Gamification User Engagement on Experience Cloud

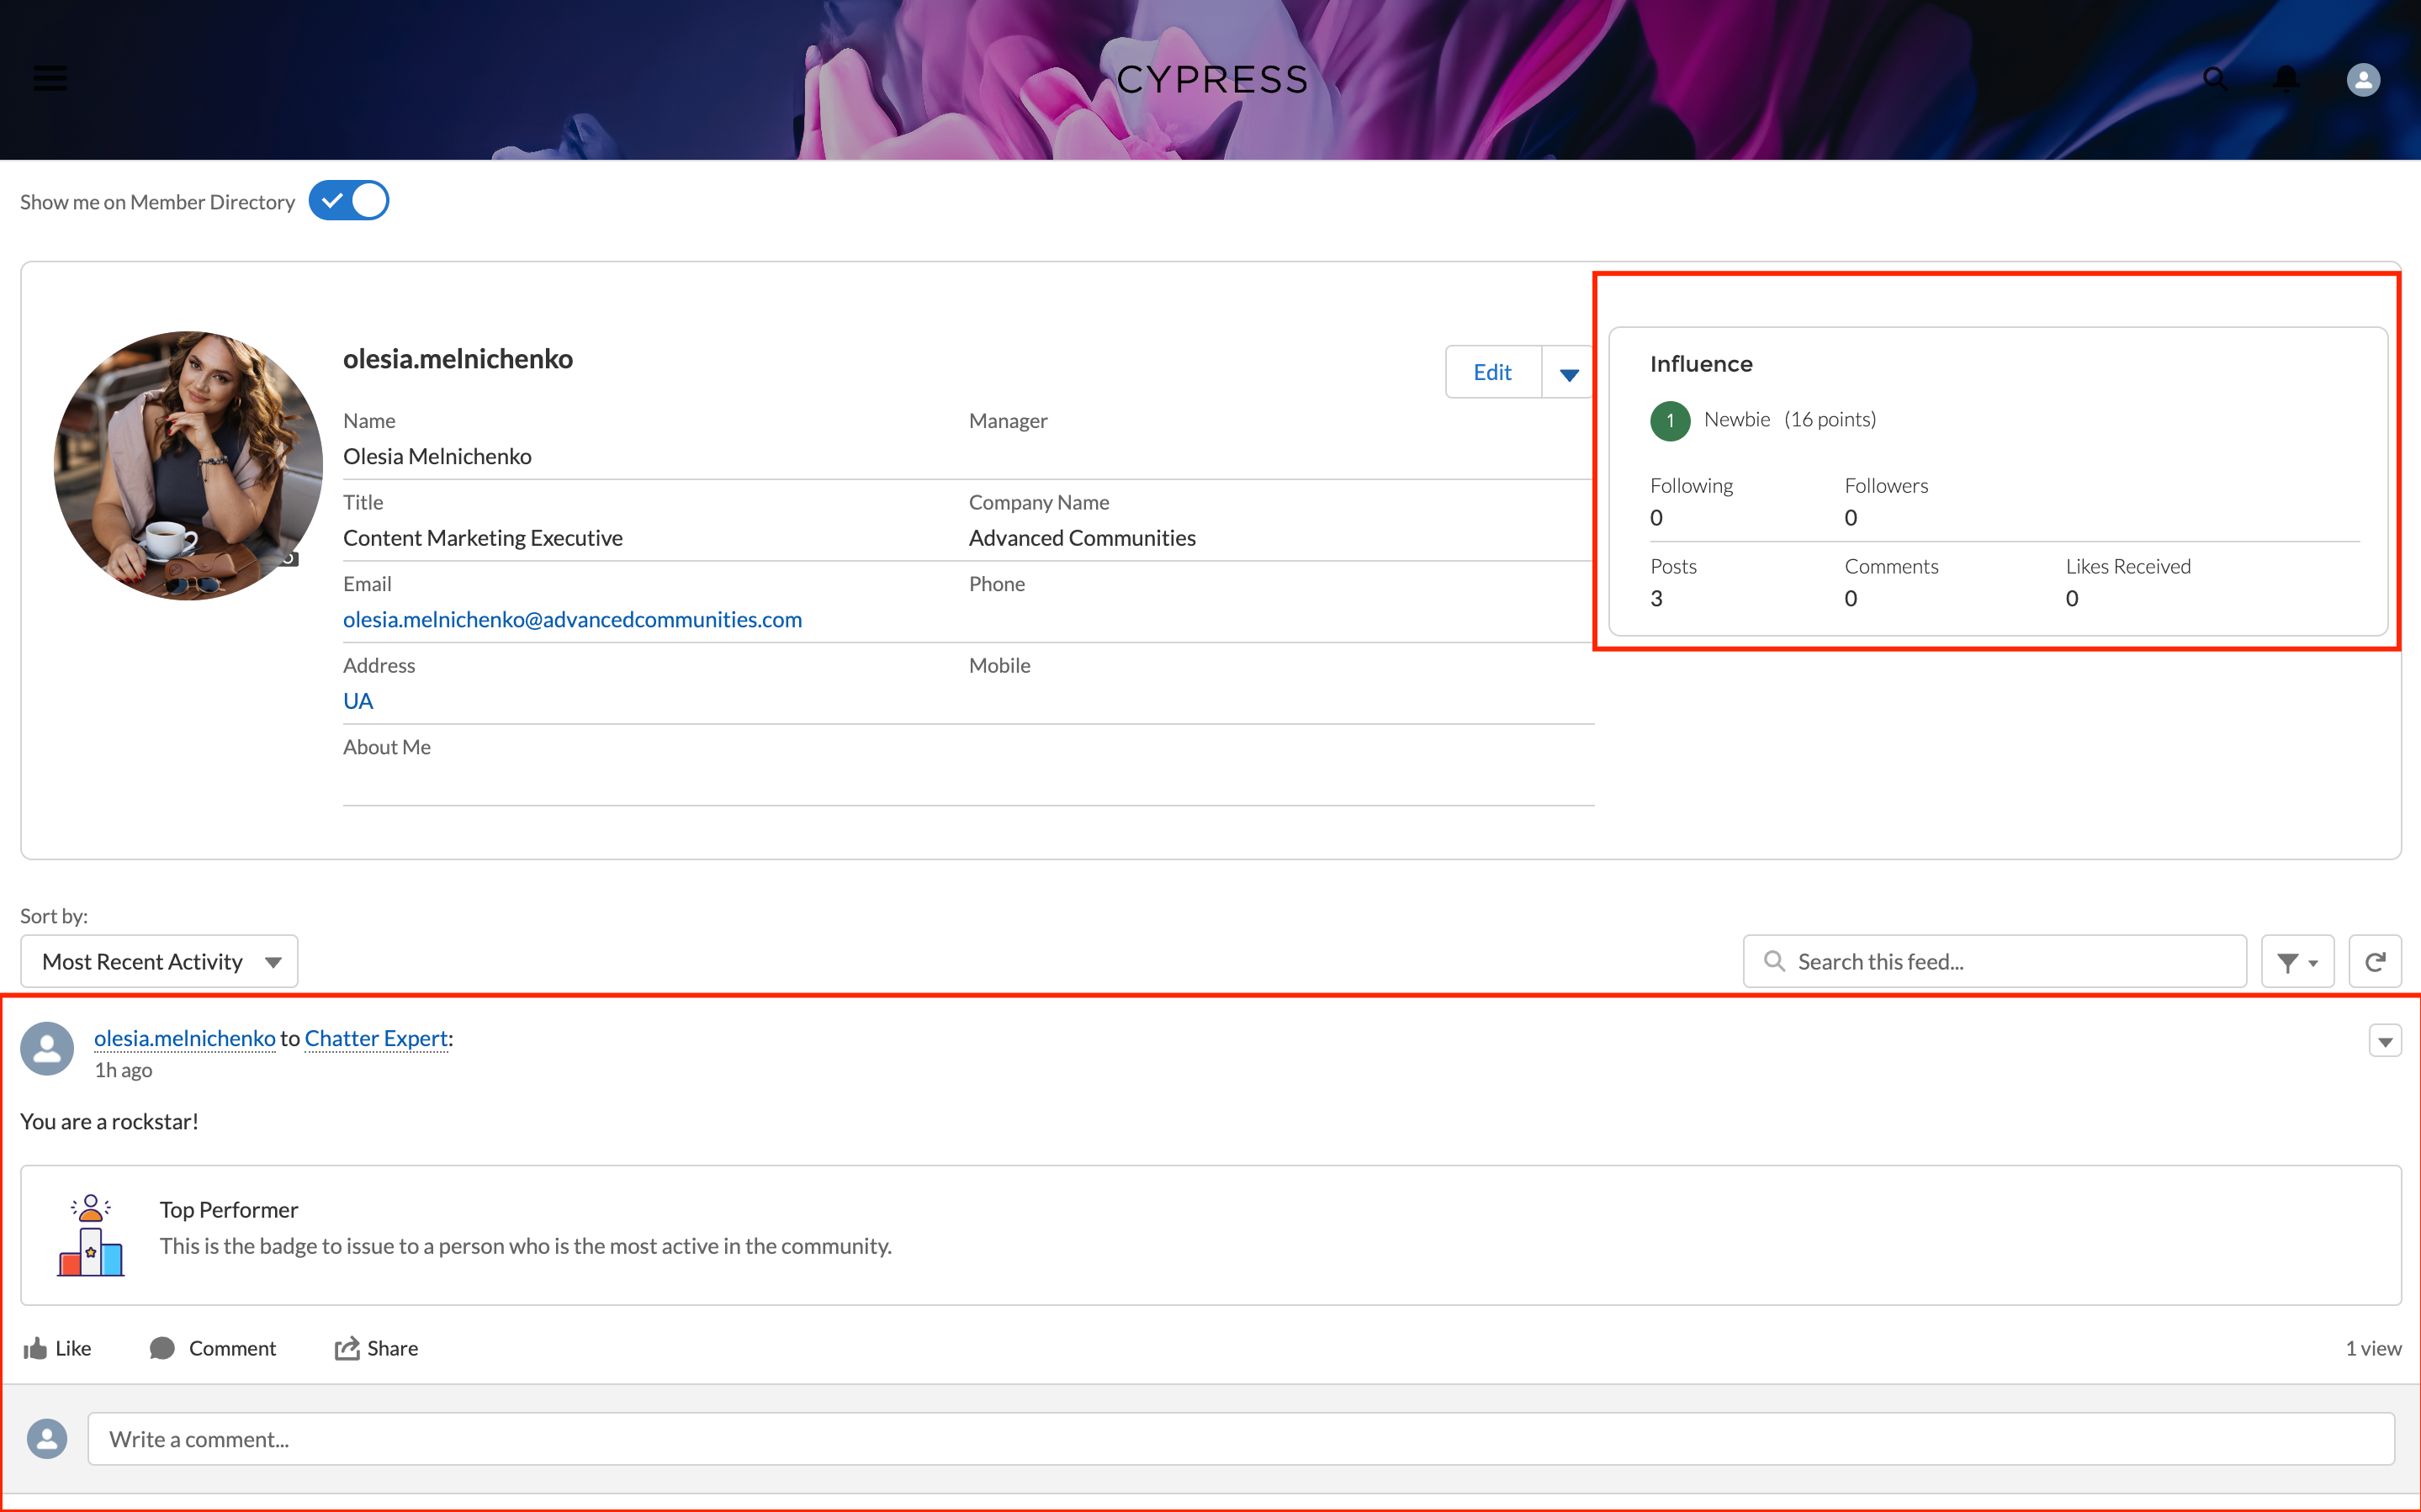
    Let’s take a look at gamification from a community user’s perspective. While viewing the community, click on your profile avatar (usually located in the top right corner).

    Here, you’ll find your Influencer board, displaying the number of followers, posts, comments, and likes you’ve received. Depending on the site administrator’s settings, you might also see your activity feed. As you can see, the “Top Performer” Reputation Badge we created, along with your current Reputation Level and Points, are displayed on your profile.

    how gamification looks like on experience cloud

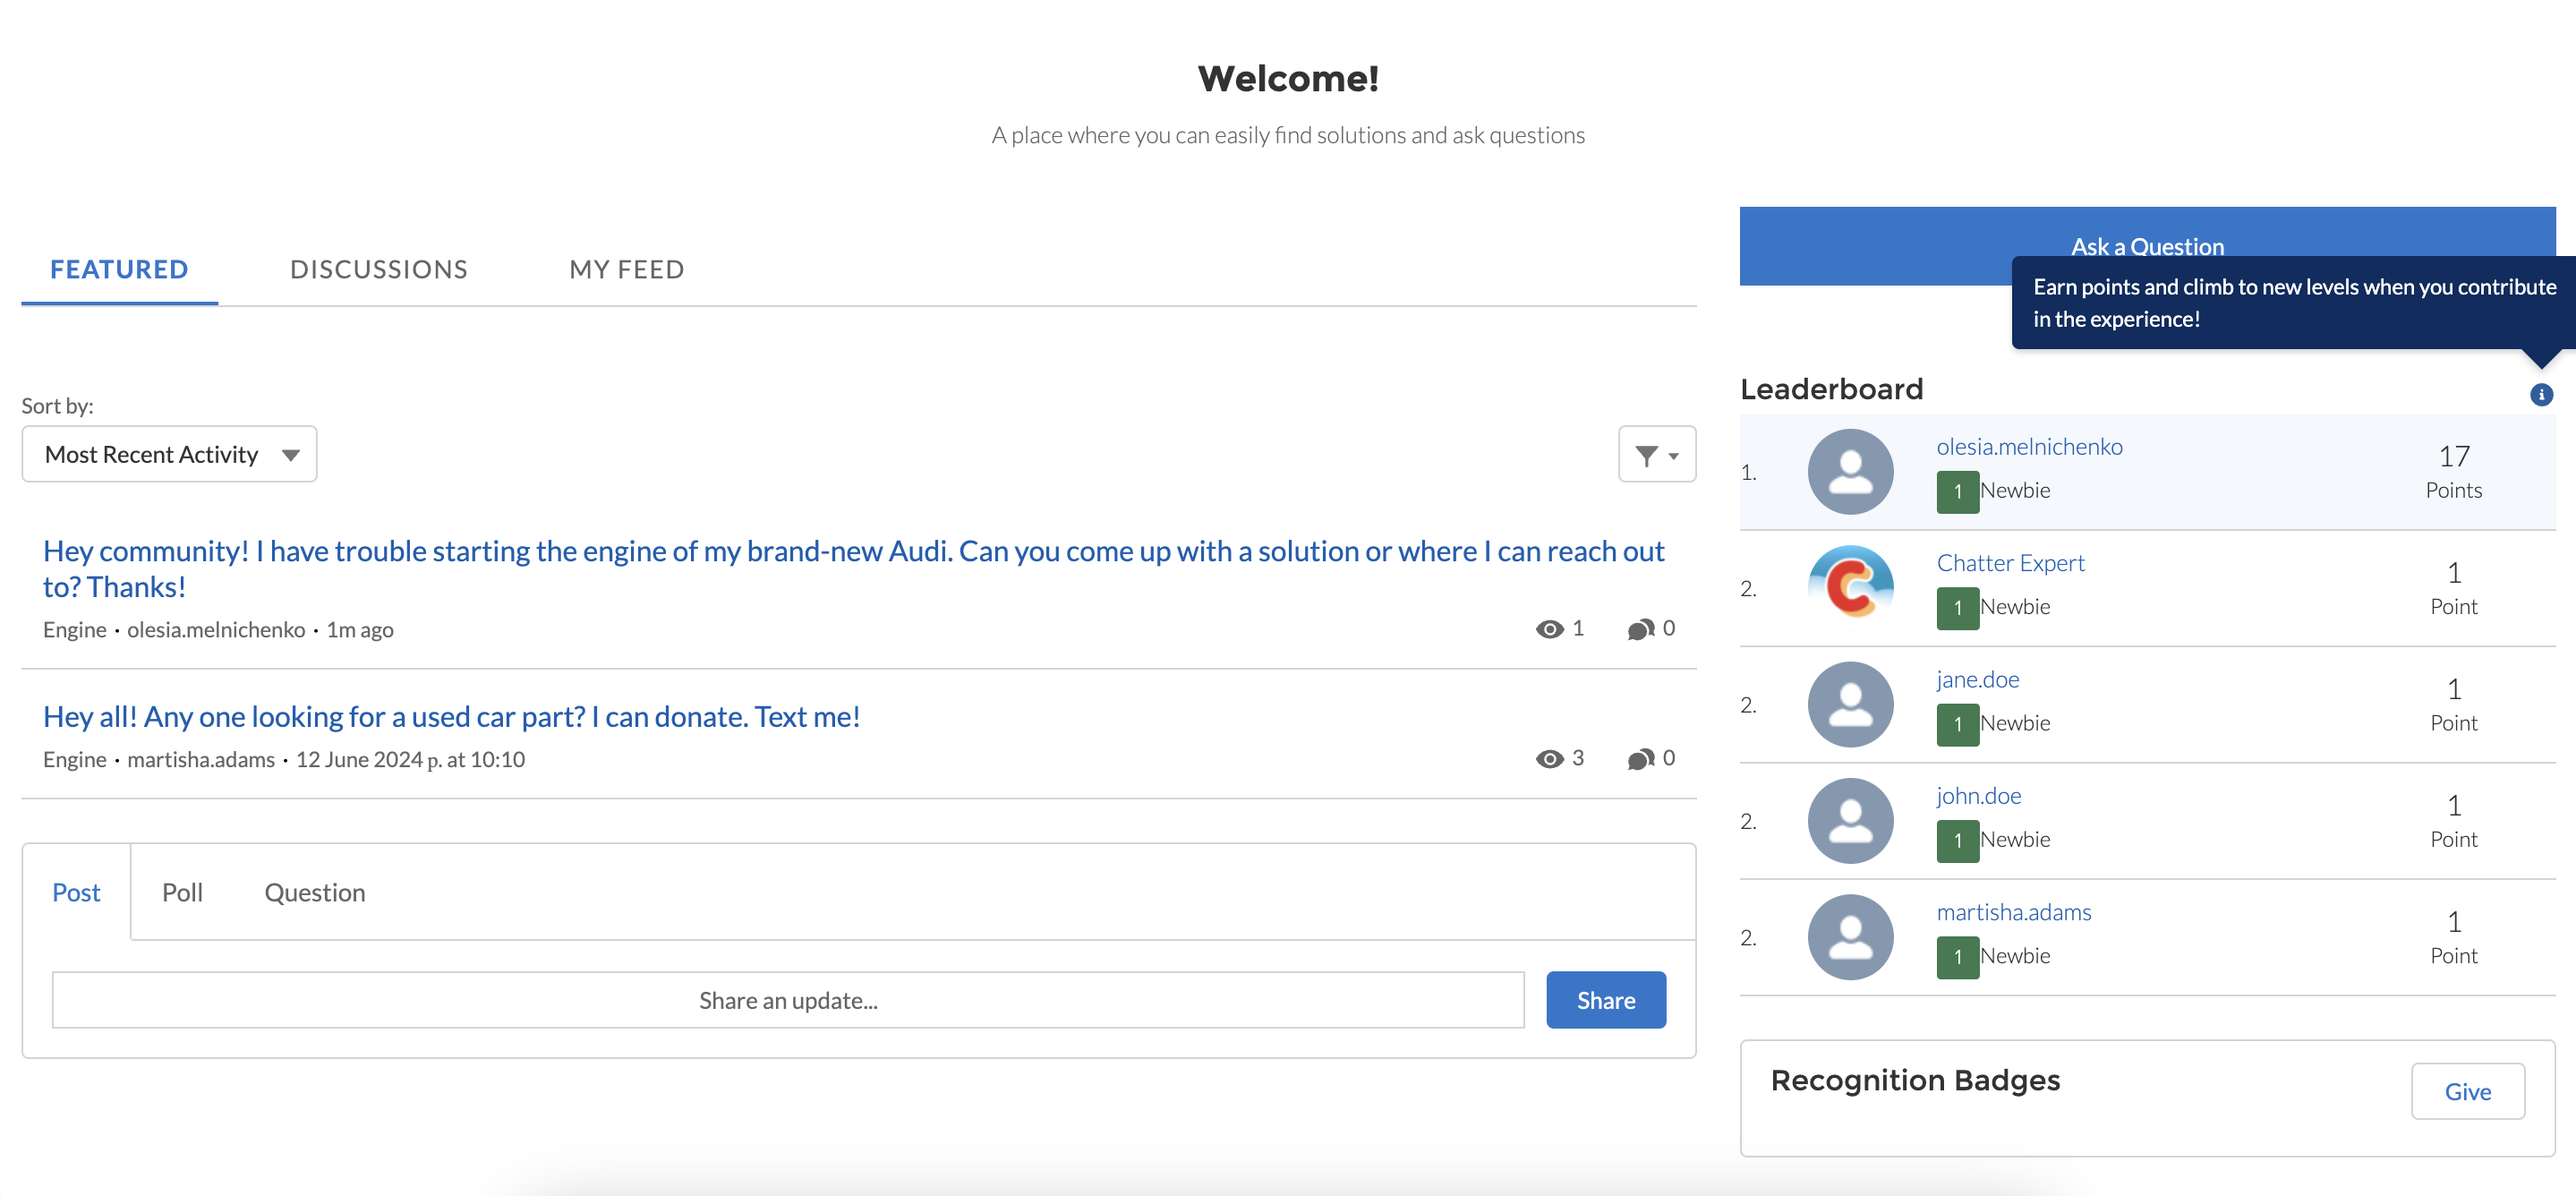
    Last but not least, this is how a Reputation Leaderboard is featured. Remember that you can tweak this component as you see fit. As of now, I’m the winner at a newbie level! That’s how gamification user engagement works.

    reputation leaderboard on experience cloud

    Final Words

    Gamification increases user engagement even better than loyalty programs at some point. While the setup process involves several steps, the rewards are substantial. We’ve just walked you through the process, from enabling the necessary settings and designing badges and missions to adding gamification components to your Experience Cloud site.

    Do you still have questions about configuring gamification elements on your Experience Cloud site? You can always contact Advanced Communities – a certified Salesforce Experience Cloud implementation partner and our team will help you turn gamification in loyalty and retain customers with game mechanics like a pro.

    Subscribe to Our Newsletter

    Receive regular updates on our latest blog posts, news, and exclusive content

      FAQ

      1. How does gamification increase customer engagement?

      Gamification increases customer engagement by leveraging game mechanics like points, badges, leaderboards, and challenges to motivate desired behaviors. It taps into our natural desire for achievement, recognition, and fun.

      2. What is gamification in CRM?

      Gamification in CRM involves integrating gamification techniques into CRM systems to motivate existing customers. Powerful examples are leaderboards, badges, point systems, challenges, and progress tracking.

      3. What are the phases of gamification?

      To win loyal customers on your Experience Cloud site, there is no one-size-fits-all approach. Everything will depend on the initial configurations of your site (if you have gamification set on from the get-go or not), what badges and missions you would like to create, and what points your users will get.

      Creating Engaging Virtual Events with Salesforce in 2025: Tools & Tips

      In 2025, virtual events aren’t a backup plan for achieving long-term business results. They are what you need to do. But the bar has been raised. Attendees expect more than just a webinar or a conference: they demand personalized experiences with ultimate value.

      This article explores how the Salesforce ecosystem, coupled with the Advanced Communities app, can transform your online events from ordinary webinars to unforgettable experiences.

      Why Use Salesforce for Online Events?

      Are you tired of mixing multiple platforms for your virtual gathering? Salesforce presents a powerful, centralized solution for event organizers that streamlines everything from registration to post-event analysis, freeing up your team to focus on creating truly engaging experiences. Here’s how Salesforce empowers you to create successful Salesforce virtual events:

      • Personalized attendee experiences: leverage Salesforce’s rich customer data to create personalized event experiences. Send targeted invitations, recommend relevant sessions, and tailor follow-up communications based on attendee interests and behavior;
      • Centralized event hub: manage all aspects of your event—from registration and ticketing to speaker information and post-event surveys—all within a single platform. This eliminates the need to switch between multiple tools and provides a holistic view of your event’s performance;
      • Flexibility: by using Salesforce Experience Cloud, you can be creative with your sites – there is a library of pre-built templates you can tailor to your business needs, or you can create one from scratch;
      • Streamlined registration & payments: simplify the registration process with forms and automated confirmations. Seamlessly manage payments and ticketing, all within Salesforce, eliminating the need for third-party payment processors;
      • Data-driven insights: track key event metrics in real-time and gain valuable insights into attendee engagement, session popularity, and overall event ROI. Use this data to optimize future events, track event success, and demonstrate the value of your virtual event strategy.

      Most Common Virtual Events Attributes

      Successful virtual events don’t just happen; they’re the result of careful planning and attention to detail. Event organizers usually oversee it. Thus, consider them before organizing live sessions:

      • Event microsite
      • Comprehensive promotion (email marketing, social media, ads, and other channels)
      • Seamless event registration
      • Interactive features, such as live demos, Q&A sessions, and gamification
      • Engaging decks (use visuals, QR codes, storytelling, and other interactive elements)
      • Live surveys
      • Chat rooms
      • Stable tech support
      • Accessibility (closed captions, transcripts, or screen reader compatibility)
      • QA or breakout sessions

      Organizing Virtual Events in Salesforce: Tips & Tricks

      Before you arrange Salesforce virtual events, we’d like to share a few tips and tricks so that your gathering is a blast.

      1. Choose a Decent Virtual Events Platform

      Selecting the right virtual event platform is crucial for a thriving event. It should be robust, reliable, and engaging. But don’t just settle for any platform – take the time and evaluate your specific needs. Key considerations include:

      • Salesforce integration: if you use Salesforce and integrate it with your virtual events platform, this opens up opportunities for streamlining data capture, automated workflows, and personalized follow-ups. Plus, look for a platform with out-of-the-box or additional functionalities. For instance, if you couple your event management solution with Salesforce membership management software, you might receive additional benefits.
      • Essential features: consider what functionalities will enhance your event and provide attendees with the impact. Do you need breakout rooms for smaller groups? Interactive polls? Live streaming capabilities? Prioritize them and align them with your event goals.
      • Reliability: the platform of your choice should be able to handle the expected attendee size without any glitches and other technical difficulties.
      • User experience: your virtual events platform should be intuitive and easy to navigate for both organizers and attendees. A clunky interface can lead to a negative event experience.
      • Analytics and reporting: in-depth analytics are essential for measuring the success of your event. Salesforce is second to none when it comes to analytics and reporting. You can have detailed data on attendees, engagement, and other key metrics centered under one roof.

      Where to find such virtual events software? At Advanced Communities, we offer you a Salesforce event management app that is decent and can fulfill your virtual events demands – AC Events Enterprise.

      2. Define a Crystal-Clear Goal

      While using the Salesforce platform features is beneficial, one of the most important stages is nailing down why you host a virtual event.

      Is it solely for lead generation? Do you need brand awareness? Are you anticipating a product launch soon? A clear objective will guide all your further decisions.

      Sit down with your marketing and sales teams and develop a straightforward action plan other event organizers might ignore. For instance, instead of blurry “increase attendee engagement”, commit to something like “generate 25 qualified leads for the sales team after the webinar”.

      3. Create a Standalone Event Microsite

      When you are hosting a virtual conference, any detail matters. Even a website where you first promote your event and gather all the info about it. That is why a well-designed microsite acts as a central hub for all event data, from the agenda and speaker bios to sponsor details and FAQs.

      Showcase the value and excitement of your event. Besides, it’s a proper way to kindle interest before the event starts. Attendees can explore the content, get to know the speakers, and even start networking early.

      For instance, you can add an event microsite on your Salesforce community portal. In the screenshot below, there is one fully designed using the AC Events Enterprise app. You are in charge of the design, branding, and positioning. Drive registrations and maximize attendance easily, within the Salesforce ecosystem.

      event microsite by AC

      4. Set up Event Zones

      A decent virtual events platform should be able to meet the audience’s demands scattered across multiple locations. Luckily, we at Advanced Communities can offer you such functionality – Event Zones.

      But that’s only one of the use cases. You might also need various event zones to organize meetings for different partner levels or members or divide events for external and internal.

      This structured approach not only simplifies the event ROI and management but also facilitates more accurate analysis across each zone.

      Watch our YouTube video to see how you can build Event Zones to cater to your virtual attendees and boost attendee engagement with AC Events Enterprise:

      5. Build a Straightforward & Flexible Registration

      A seamless registration process is what any virtual, offline, or hybrid event usually lacks. Friction during registration can lead to frustration and lost opportunities for attendees and impact their overall experience. That’s why streamlining it should be a top priority.

      AC Events Enterprise provides a unified registration integration. This means both virtual and in-person attendees enjoy a single-cart checkout experience, effortlessly handling all event payments. Imagine this: a user browsing your community wants to purchase a membership, grab some branded swag, register for your hybrid event, and make a donation – all in one go. With AC Events Enterprise, they can add everything to their cart and review their complete order at checkout, all within a single interface.

      unified checkout integration

      If virtual event attendees want to register for a live session while their friend wants to attend in person, AC Events Enterprise has also got you covered. They simply select their desired session and add it to their cart. At checkout, they’ll see their total order amount.

      event session registration

      6. Arrange Post-Event Activities

      Like with in-person events, you can’t be satisfied with what you’ve already achieved (for instance, high audience engagement). When the event is finished, perform several post-event activities that might bring fruit in the long run:

      • Send personalized thank-you emails to attendees with links to additional content or other relevant resources. Segment your audience based on their engagement during the event for a more targeted campaign;
      • Dive into your event info in Salesforce. What worked well? What could be improved? Use these insights to optimize your future Salesforce virtual events;
      • Repurpose content like you mean it. Reuse recordings, decks, and key takeaways in blog posts, social media posts, and other marketing material. This is how we used one of our latest webinar recordings the other day and brought additional value to our LinkedIn audience:
      LinkedIn post by AC
      • Send out post-event surveys to gather feedback from attendees. This can deliver valuable insights for future event planning.

      Bottom Line

      Arranging online events on Salesforce is easier than you might think. With a proper virtual events platform, you will have everything for a successful launch. For that purpose, AC Events Enterprise is exactly what you need. Take advantage of its powerful functionalities: Event Creation Wizard, the ability to organize multi-track events, separate event microsites, and more.

      Contact us for any details and our team will help you arrange your virtual conference using the best-in-class Salesforce-native app for event management.

      FAQ

      1. What is an example of a virtual event platform?

      The best virtual event platform is AC Events Enterprise by Advanced Communities – a Salesforce-native app. It’s fully customizable and designed for Salesforce Experience Cloud, comes with custom components, and simplifies managing online events, from registration and ticketing to marketing and post-event analysis.

      2. What software is used for virtual meetings?

      There is a wide range of software used for virtual events and depends on different needs. For instance, such virtual conference platforms as Zoom, Google Meet, or Microsoft Teams are widely used. The good news is that AC Events Enterprise is integrated with Zoom for an even better experience for attendees in live sessions.

      3. How do I create a virtual event?

      To create a virtual event with Salesforce, you have to install and configure the AC Events Enterprise app. Create a new event record in your Salesforce org, fill in the basic details (name, description, date, time, etc.), add event details (agenda, speakers, sponsors, and any relevant resources), and set up registration options for attendees. Struggling with organizing virtual events on Salesforce? Contact the AC team for further details.

      Subscribe to Our Newsletter

      Receive regular updates on our latest blog posts, news, and exclusive content!

        How to Build a Salesforce LWC Assistant to Run AI LLMs Locally: Expert Insights

        The article is fully authored by Anton Kutishevsky – a Certified Salesforce Developer at Advanced Communities.

        TL;DR

        I built a Salesforce Lightning Web Component that lets you run powerful AI language models (LLMs) directly on your computer within Salesforce. It uses Pico LLM technology to process data locally, keeping your information secure and responding quickly. You can use it to generate emails, write content, analyze customer data, and more, all without relying on external services. Check out the demo video and GitHub repo to learn more!

        I’ve been experimenting with the local LLMs inside Salesforce and would like to tell you about the component I developed as a result. It has the already familiar chat interface which uses Salesforce records for context. It works locally on your computer, so processed data is not being sent to any third-party service.

        The introduction of Agentforce was what influenced me to develop the component. Agentforce uses agents  —  systems that can make decisions and perform various actions. Assistants, in contrast, only process information reactively. Even though I believe it’s possible to build a local agent using Pico LLM, it would take enormous effort. Thus, I decided to develop an assistant instead.

        Running LLMs Locally in Salesforce Experience Cloud Using picoLLM Inference Engine SDK

        This article demonstrates how to run Large Language Models using the picoLLM Inference Engine SDK. We’ll cover the initial setup, configuration, and coding required to achieve this integration.
        Post image

        Features

        As you would expect an LLM to work, it generates responses on any topic, as it’s pretrained on a vast set of data. Moreover, it’s able to use Salesforce records for extra context. The features of the component are:

        • Supports multiple models. Any open-source model from the Pico website, such as Gemma, Llama, or Phi, can be used. The only limitation here is the amount of RAM your computer has. The more the model weighs the more RAM it consumes.
        • Works with a single record. When the component is placed on a record page, then it’s able to access the record for context. For example, being on an Account record detail page, it can generate a response based on its field values.
        • Supports related records. When a record has related records, the component can query and incorporate them into responses.
        • Configurable. The component can be configured on the fly, using the configuration popup. It allows changing the generation options, such as completion token limit, temperature, and top P.

        How it works

        From an end user’s perspective, the process is straightforward. You upload a model, select a system prompt, select records, write a user prompt, and look at the result being generated.

        What is Pico LLM?

        Running LLMs in a browser is a resource-consuming task because of the model’s size, bandwidth requirements and RAM needs. Therefore, the Pico team developed their picoLLM Compression technique, which makes usage of LLMs locally much more efficient for computers. They provided the picoLLM Inference Engine, as a JavaScript SDK, to allow front-end developers to run LLMs locally across browsers. It supports all modern browsers including Chrome, Safari, Edge, Firefox, and Opera. To know more about how the picoLLM Inference Engine works, you can read their article.

        The LWC part

        The component serves as a bridge between a user and the PicoLLM interface. At the core of the component is a Visualforce page embedded as an iframe. The page loads the PicoLLM SDK and communicates with the LWC allowing the last to use SDK via post messages. The whole combination of elements handles the following:

        • Loading a model. The LWC has a button that allows you to load a model of your choice. It triggers a file input element hidden inside the iframe. Once the model is loaded, the Pico SDK creates web workers, and the component is ready to process the user input.
        • Setting a system prompt. You don’t have to write a system prompt every time, it’s easy to select any saved record of the System_Prompt__c object. Once the button is pressed, it shows a popup with the existing system prompts to choose from.
        • Accepting user input. There is a resizable text area for collecting user input. When collected, it’s sent to the iframe as a payload and added to the conversation history.
        • Accessing Salesforce records. There are two buttons: Select Fields and Select Related Records. The first one collects the field values of the record on a record page on which the LWC resides. The second allows you to choose a related object and query its records along with the selected field values. This information is sent to the iframe as a payload as well.
        • Changing generation options. If desired, the completion token limit, temperature, and top P options can be changed via a dedicated button in the component. This information is also sent as a payload to the iframe.
        • Generating a result. When the iframe receives the payload, it utilizes the Pico SDK to utilize the loaded model and generate a result. If generation options were provided, they are taken into account. Also, the dialog is updated every time, so the LLM will remember the history of it.
        • Rendering chat messages. The LWC is able to render outgoing messages, which are the ones the user provided. The incoming messages, containing the generated response, are being rendered dynamically once the component has anything to say to the user. Such as the generated results or information and error messages.

        A little bit of Apex code

        On the back-end side of things, there is nothing fancy. The Apex code does all the heavy lifting related to detecting the relationships between the objects using a record ID from the record page. Also, it performs a couple of SOQL queries, and, thereby, its duty is done here.

        Development Challenges

        Web workers

        Previously, I used the unpkg tool to execute code from the node module in the LWC component. This approach led to additional configuration steps, and was a less secure way to make it work. This time, I wanted to execute the PicoLLM module directly from Salesforce and not only from the Experience Cloud site, which I had done previously, but the Lightning Experience interface.

        Under the hood, PicoLLM uses web workers for parallel processing, and it was the main problem because it’s not allowed to run them from LWC. Luckily, no one refused to let us run web workers from a Visualforce page, and it was the approach I used.

        I downloaded the raw PicoLLM code and added it as a static resource to the Visualforce page. In LWC I used an iframe that contained the Visualforce page. The communication between the LWC and the page inside the iframe allowed me to use web workers. The page triggers the PicoLLM-related code from the lightning web component.

        Using Salesforce records for context

        Copy and paste Salesforce records in a JSON or CSV format, throw it into any online LLM, and watch. It will consume the records, use them for extra context, and generate a response. It turned out that it is not that easy when using compressed models for local processing.

        At first, I was simply putting the records, in JSON format, right into the user prompt. Then I expected the thing to be smart enough to distinguish the prompt itself from the additional context I provided. I used different models of various sizes and didn’t understand why it wasn’t using the JSON to generate responses. It was mostly refusals to respond to my prompt or generation of fictional data not related to what I asked it to do. I started to experiment with different formats of the context data: using CSV, using JSON, using prompt dividers to strictly differentiate prompt from context — nothing helped.

        I nearly abandoned the idea because the key feature wasn’t functioning. After a couple of months, I suddenly got a stupidly simple brainwave. What if I just reversed the order of prompt parts? From user prompt coming first and context coming second, to context coming first and prompt second. To my surprise, it worked, and any model I used immediately started to understand Salesforce records as context.

        Performance

        The component’s functionality was tested on these machines:

        • PC with the AMD Ryzen 9 9900X processor and 32GB of RAM (5600 MT/s).
        • Microsoft Surface Laptop 7 powered by the Snapdragon X-Elite ARM processor with 16 GB of RAM (8448 MT/s).

        Model loading speed— it’s all about memory

        The most time-consuming part of using the component is the initial model loading. You might expect the 9900X to easily outperform the Snapdragon X-Elite, but you’d be wrong. To my surprise, the latter is faster. Since it has faster memory, I presume that the faster your RAM, the faster the model loads. Here’s a model loading speed comparison table for reference:

        snapdragon vs 9900x

        Response generation speed

        The same story with the response generation speed. As I understand, you need to have a fast combination of CPU and RAM to get the fastest generation possible. Because response generation varies with the same prompt, I did not conduct precise speed tests. Nevertheless, the generation speed is extremely fast, almost as fast as the online alternatives.

        What about using a GPU?

        Indeed, using a GPU to generate responses would be much more efficient. While it’s possible to use a GPU with PicoLLM, I haven’t tested that configuration myself. There are a couple of reasons for this. First, I believe it uses the WebGPU feature, which isn’t enabled by default in most browsers (except Edge). Second, it likely requires several gigabytes of VRAM to load the model which I don’t have.

        Conclusion

        Developing this assistant has been a fascinating journey of exploration. From grappling with web worker limitations to discovering the crucial role of prompt order in providing context, the challenges have been both stimulating and rewarding. The result is a Lightning Web Component that offers a unique approach to leveraging the power of Large Language Models within the Salesforce ecosystem.

        While the initial model loading time can be a consideration, especially for larger models, the ability to process data locally offers significant advantages in terms of data security, responsiveness, and cost-effectiveness. The potential use cases, from automating content generation to providing intelligent assistance, are vast and waiting to be explored.

        Check out the GitHub repo.

        Subscribe to Our Newsletter

        Receive regular updates on our latest blog posts, news, and exclusive content!

          AC Partner Marketplace Product Sheet

          Download the fact sheet now to explore:
          • How the app streamlines the entire channel sales process, from onboarding to selling.
          • How it enhances partner management with a self-service platform, real-time updates, and lead generation.
          • How it supports network expansion and automates business workflows.
           

          Complete the form to get your free copy.


          By submitting this form, you agree to occasionally receive guides, tips, and tricks from AC. You can unsubscribe at any time.  

           
          AC Partner Marketplace_one pager

          AC Knowledge Management Enterprise Product Sheet

          Download the fact sheet now to explore:
          • Key features – See how AC Knowledge Management Enterprise empowers your support team.
          • Benefits – Understand the value it brings to your customers.
          • Real results – See the impact AC Knowledge Management Enterprise can have on your organization.


          Complete the form to get your free copy.


          By submitting this form, you agree to occasionally receive guides, tips, and tricks from AC. You can unsubscribe at any time.  

           
          AC Knowledge Management Enterprise_One pager

          AC Ideas Ultimate Product Sheet

          Download the fact sheet now to explore how AC Ideas Ultimate helps you:
          • Capture – Easily collect ideas from customers, team members, and stakeholders.
          • Evaluate – Use built-in tools to score, prioritize, and review ideas based on custom criteria.
          • Implement – Track progress, convert cases into ideas, and turn the best ideas into actionable projects.


          Complete the form to get your free copy.


          By submitting this form, you agree to occasionally receive guides, tips, and tricks from AC. You can unsubscribe at any time.  

           
          AC Ideas Ultimate_One Pager

          AC MemberSmart Product Sheet

          Download the fact sheet now to explore:
          • Key features – See how AC MemberSmart empowers your team.
          • Benefits – Understand the value it brings to your members.
          • Real results – See the impact AC MemberSmart can have on your organization.


          Complete the form to get your free copy.


          By submitting this form, you agree to occasionally receive guides, tips, and tricks from AC. You can unsubscribe at any time.  

           
          AC MemberSmart_One pager

          AC Events Enterprise Product Sheet

          Download the fact sheet now to explore:
          • Key features – Learn how AC Events Enterprise automates registration, marketing, and analytics.
          • Benefits – Learn how it improves attendee satisfaction and helps your event shine.
          • Proven results – See how the app transforms your event outcomes.
           

          Complete the form to get your free copy.


          By submitting this form, you agree to occasionally receive guides, tips, and tricks from AC. You can unsubscribe at any time.  

           
          AC Events Enterprise_One Pager